
Removing the windshield wiper arms
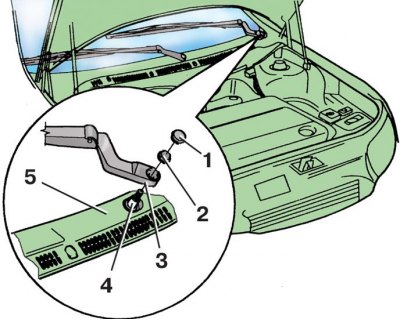
1 - decorative cap; 2 - nut; 3 - lever; 4 - roller; 5 - panel in front of the windshield
Removing the wiper
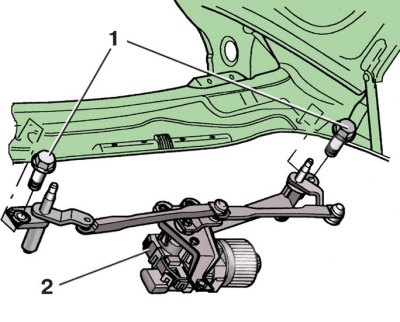
1 - bolt; 2 - wiper
Mounting the wiper rods to the gearmotor
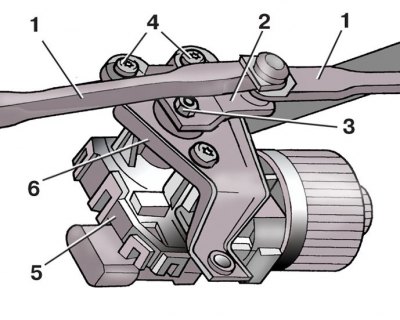
1 - thrust; 2 - crank; 3 - nut; 4 - screws; 5 - motor reducer; 6 - bracket
1. Disconnect the wire from the terminal «-» battery.
2. Carefully prying with a screwdriver, remove the decorative caps 1 (see fig. Removing the windshield wiper arms) from both levers 3 cleaners.
3. Open not completely (not to damage the threads of the rollers) nuts 2 fastening the wiper arms.
4. Using pliers, pull the levers 3 off the cones of the wiper rollers 4.
5. Finally unscrew the fastening nuts 2 and remove the levers 3 from the rollers.
6. Remove panel 5 in front of the windshield.
7. Holding wiper 2 (see fig. Removing the wiper) bottom, unscrew the two bolts 1 of its fastening.
8. Remove the wiper by disconnecting the block with wires from the gearmotor.
9. Using a screwdriver, disconnect both rods 1 (see fig. Mounting the wiper rods to the gearmotor) from crank 2.
10. Unscrew the fastening nut 3 and remove the crank 2.
11. Unscrew the three fixing screws 4 and remove the motor reducer 5 from the bracket 6.
12. Before installation, connect the block with wires to the electric motor of the gearmotor (then connect the battery) and turn on the wiper to return to its original position. Disconnect the wiring harness from the motor again.
13. Install the motor reducer on the bracket and fix it with screws.
14. Install crank 2 with rods 1 so that it is parallel to the rods and directed towards the electric motor.
15. Install the windshield wiper in reverse order.
16. Adjust the position of the levers with brushes (see subsection 10.5.1).
Tightening torques, Nm
| Nuts of fastening of levers of a screen wiper | 20 |
| Bolts of fastening of a screen wiper | 5 |
| Screws for fastening the motor reducer to the bracket | 8 |