
Removal of the right support of an arm of the panel of devices
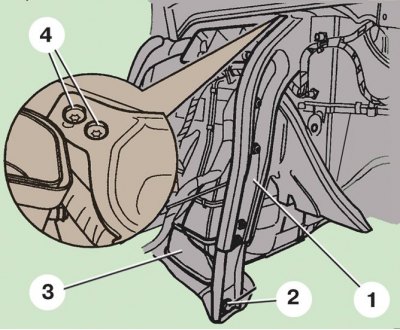
1 - right support; 2, 4 - bolts; 3 - lower air duct adapter
Fastening of an air duct of an obduv of the legs of the driver
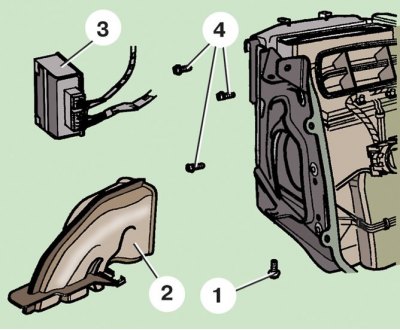
1 – a bolt of fastening of an air duct; 2 - air duct for blowing the driver's legs; 3 - system control unit «Comfort»; 4 - bolt
Heater mounting on the right side
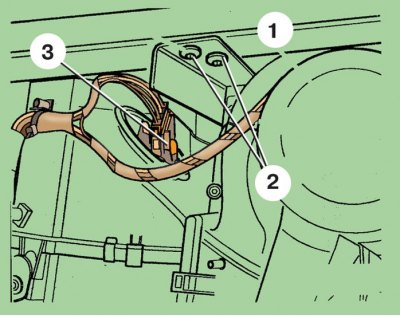
1 – an arm of the panel of devices; 2 - bolt; 3 - connecting block of the additional resistor
1. Disconnect the wire from the terminal «-» battery.
2. Drain the liquid from the engine cooling system or pinch the outlet 1 and inlet 2 (see fig. Connecting hoses to the heater core) heater radiator hoses (if the heater core is removed for replacement, the fluid must be drained).
3. From the side of the engine compartment, mark the position of the pipe 4 of the heater radiator and unscrew the bolt 5 of its fastening. Remove the hose and set it aside along with the hoses.
4. Plug the holes in the heater core.
5. Remove the floor console.
6. Remove the instrument panel (see subsection 11.6).
7. Remove air duct 24 (see fig. Heater elements) blowing windshield.
8. Remove blower 6 center nozzles.
9. Disconnect the wiring harness from the support 1 (see fig. Removal of the right support of an arm of the panel of devices) instrument panel bracket and «mass» the wire.
10. Turn away two top 4 and one lower 2 fastening bolt and remove the right support 1 of an arm of the panel of devices.
11. Remove the adapter 3 of the lower air duct.
12. Disconnect block 4 (see fig. Removing the heater fan) with wires from the heater fan.
13. Remove the heater control panel by disconnecting the block with wires and drive cables from it (see subsection 11.8.7).
14. Remove bolt 1 (see fig. Fastening of an air duct of an obduv of the legs of the driver) fasteners and remove the air duct 2 for blowing the driver's legs.
15. Slide the mounting bracket up and remove it from the system control unit 3 «Comfort» (if it is installed) from the heater cover.
16. On models with electric heater 2 (see fig. heater radiator) disconnect block 11 with wires from the harness on the left side of the heater and «mass» wire 10.
17. Loosen three screws 4 (see fig. Fastening of an air duct of an obduv of the legs of the driver) heater mounts on the left side.
18. Disconnect block 3 (see fig. Heater mounting on the right side) from the auxiliary heater resistor.
19. Turn away two bolts 2 fastenings of a heater on the right side.
20. Remove the heater from the vehicle.
21. Install the heater in reverse order. Before installing the instrument panel, check the correct operation of the heater. Install the nozzles in accordance with the previously made markings, firmly inserting them into the seal on the front shield.
22. Check the level and add coolant if necessary (When replacing the heater core, add new fluid to the engine cooling system).
Tightening torques, Nm
| Bolt of fastening of a branch pipe of a radiator of a heater | 20 |
| Bolts of the top fastening of a support of an arm of the panel of devices | 12 |
| Bolt of the bottom fastening of a support of an arm of the panel of devices | 25 |