



Heater radiator
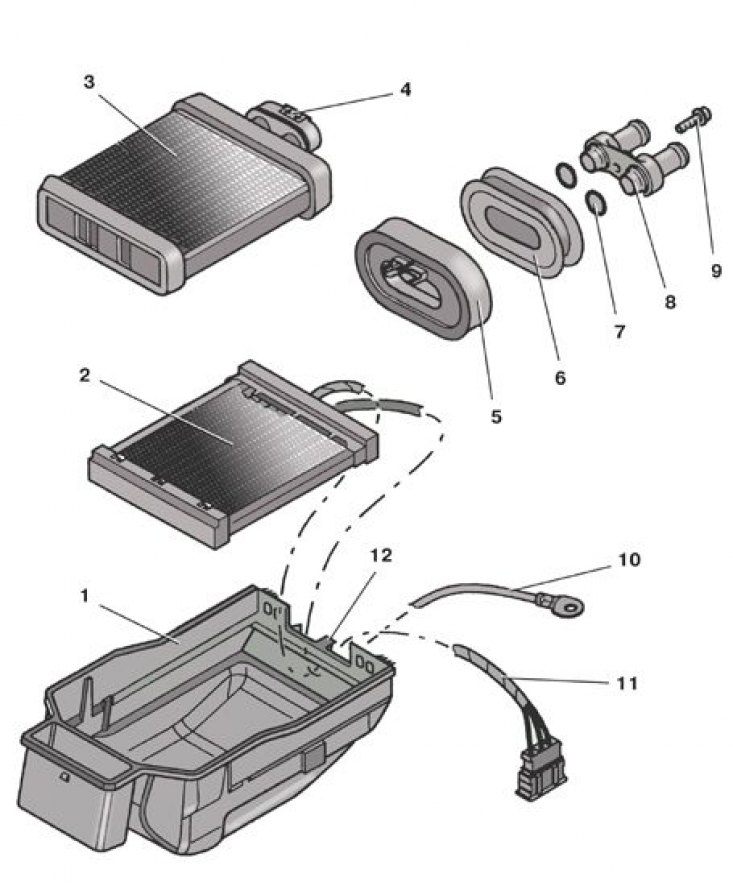
1 – casing; 2 – electric heating element; 3 – heater radiator; 4 – sticker; 5 – heater seal assembly; 6 – front shield seal; 7 – sealing ring; 8 – radiator hose; 9 – bolt; 10 – ground wire; 11 – connecting block; 12 – front casing retainer
Connecting hoses to the heater radiator
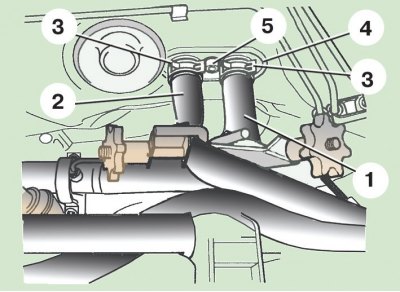
1 – discharge hose; 2 – supply hose; 3 – clamp; 4 – radiator pipe; 5 – bolt
Removal the heater radiator shroud
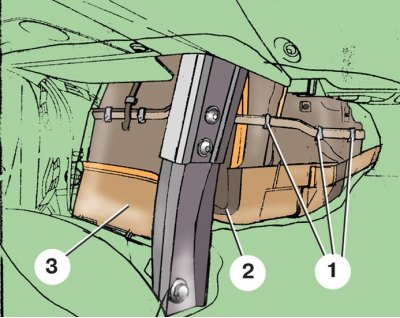
1 – spring clamps; 2 – casing; 3 – lower air duct adapter
Some models are equipped with an electric heating element, which additionally heats the air. The element is switched on by the engine control unit depending on the ambient air and coolant temperature and the generator load when the handle on the heater control panel is set to maximum heating.
1. Disconnect the wire from the "-" terminal of the battery.
2. Remove the floor console.
3. Drain the engine cooling system or pinch off the outlet 1 (see the figure Connecting hoses to the heater radiator) and 2 supply hoses of the heater radiator (if the heater radiator is removed for replacement, the fluid must be drained).
4. From the engine compartment side, mark the position of heater pipe 4 and unscrew bolt 5 that secures it. Remove the branch pipe and set it aside along with the hoses.
5. Plug the holes in the radiator 3 (see the picture Heater radiator) heater.
6. On models with electric heating element 2, disconnect block 11 with wires from the harness on the left side of the heater and the "ground" wire 10.
7. Remove adapter 3 (see the figure Removing the heater radiator cover) lower air duct.
8. Remove the spring clips 1 securing the heater radiator casing on three sides.
9. Lower and slide the heater radiator cover 2 towards you to release its front retainer 12 (see the picture Heater radiator).
10. Remove the heater radiator cover 1 from under the instrument panel on the right side.
11. Remove the heater radiator 3 from the casing 1.
12. Replace torn or loose sealing rings 7 of the pipe.
13. Install the heater radiator in reverse order. Please note that sticker 4 on it, indicating the inlet and outlet directions, should be on top. Install the pipe in accordance with the previously made markings, tightly inserting it into the seal 6 on the front shield.
(Article reprinted from the website: SkodaBook.ru)
14. Check the level and top up the coolant if necessary (when replacing the heater radiator, add new fluid to the engine cooling system).
Tightening torque for heat exchanger pipe mounting bolts: 20 Nm.