
Radio equipment installation diagram
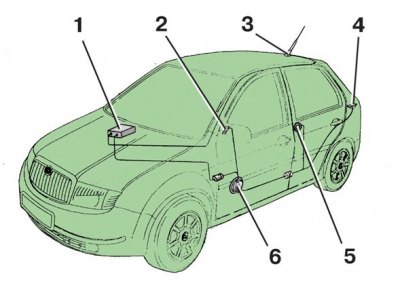
1 - radio receiver; 2 - front tweeter; 3 - antenna; 4 - rear low-frequency speaker; 5 - rear high-frequency speaker; 6 - front woofer
Front woofer
Front woofer mount
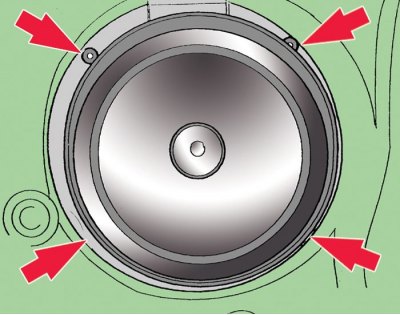
Attachment points are indicated by arrows.
1. Disconnect the wire from the terminal «-» battery.
2. Remove an upholstery of a forward door.
3. Drill out the four speaker fastening rivets, shown by the arrows in fig. Mounting the front woofer.
4. Remove the speaker from the inner door panel and disconnect the wires from it.
5. Install the speaker in reverse order, securing it with new rivets or suitable self-tapping screws.
Front tweeter
Removing the front tweeter
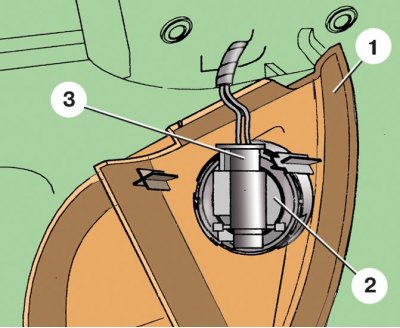
1 – a decorative overlay of an external mirror; 2 - speaker; 3 - connecting block
1. Disconnect the wire from the terminal «-» battery.
2. Remove trim 1 (see fig. Removing the front tweeter) outside mirror.
3. Disconnect connector 3 from speaker 2.
4. Press the latches and remove the speaker 2 from the decorative trim 1.
5. Install the speaker in reverse order.
Rear tweeter
Removing the rear tweeter
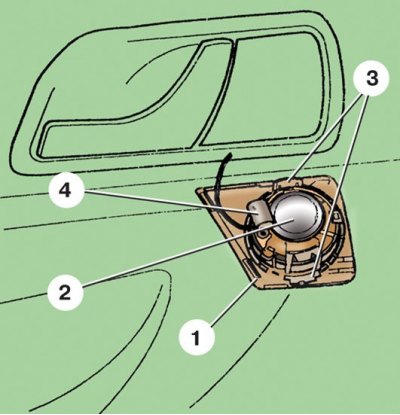
1 - decorative overlay; 2 - speaker; 3 - latch; 4 - connecting block
1. Disconnect the wire from the terminal «-» battery.
2. Carefully prying with a screwdriver, remove the decorative trim 1 (see fig. Removing the rear tweeter) from the back door.
3. Disconnect block 4 with wires from speaker 2.
4. Release the latches 3 and remove the speaker 2 from the decorative trim 1.
5. Install the speaker in reverse order.
Rear woofer
Removing the rear subwoofer

1 - connecting block; 2 - speaker; 3 - screw
1. Disconnect the wire from the terminal «-» battery.
2. Open the tailgate and fold down the edge of the upholstery to access speaker 2 (see fig. Removing the rear subwoofer).
3. Disconnect wires from a connecting block of 1 loudspeaker.
4. Loosen the four screws 3 securing and remove the speaker 2.
5. Install the speaker in reverse order.