



Petrol engine 1.8L (BZB) and 2.0L (CCZA) Skoda Superb 2

1.8 and 2.0 petrol engine specifications
Type - Petrol, 4-cylinder, in-line, DOHC, turbocharged Notation 1.8 l - BZB, CDAA, CDAB 2.0 l - CCZA The order of operation of cylinders 1-3-4-2 Cylinder diameter // piston stroke, mm 1.8 l - 82.5 // 84.2 2.0 l - 82.5...
Type - Petrol, 4-cylinder, in-line, DOHC, turbocharged Notation 1.8 l - BZB, CDAA, CDAB 2.0 l - CCZA The order of operation of cylinders 1-3-4-2 Cylinder diameter // piston stroke, mm 1.8 l - 82.5 // 84.2 2.0 l - 82.5...

Removal and installation of the engine and support of the power unit (engine 1.8)
Removing Note: The engine is removed from under the engine compartment down along with the transmission. 1. Remove the air cleaner ( see chapter 4 ). 2. Remove the PCV tube (1 per resist. illustrations), remove the bolt...
Removing Note: The engine is removed from under the engine compartment down along with the transmission. 1. Remove the air cleaner ( see chapter 4 ). 2. Remove the PCV tube (1 per resist. illustrations), remove the bolt...

Removal and installation of the auxiliary drive belt, its tensioner and auxiliary bracket (engine 1.8)
1. Details of the installation of the drive of auxiliary units are indicated on Ref. illustrations. 24.1 Accessories drive parts 1 crankshaft pulley 2 O-ring, to be replaced 3 Pulley bolt 1, to be replaced, 150 Nm, then...
1. Details of the installation of the drive of auxiliary units are indicated on Ref. illustrations. 24.1 Accessories drive parts 1 crankshaft pulley 2 O-ring, to be replaced 3 Pulley bolt 1, to be replaced, 150 Nm, then...

Removal and installation of the crankshaft pulley, replacement of the front crankshaft oil seal (engine 1.8)
Removal and installation of the crankshaft pulley Note: The crankshaft pulley installation details are shown in illustration 24.1. 1. Remove the sound insulation under the engine compartment, as well as the locker of...
Removal and installation of the crankshaft pulley Note: The crankshaft pulley installation details are shown in illustration 24.1. 1. Remove the sound insulation under the engine compartment, as well as the locker of...

Removal and installation of a flywheel and a back epiploon (sealing flange) engine 1.8
1. Details of the installation of the rear sealing flange and flywheel are indicated on Ref. illustrations. 26.1 Installation details of the rear sealing flange and flywheel 1 cylinder block 2, 8 Centering sleeve 3...
1. Details of the installation of the rear sealing flange and flywheel are indicated on Ref. illustrations. 26.1 Installation details of the rear sealing flange and flywheel 1 cylinder block 2, 8 Centering sleeve 3...

Removal and installation of N205 valve and timing chain covers (engine 1.8)
1. Installation details of the N205 sensor and timing chain covers are indicated on the resistance. illustrations. 27.1 Installation details for N205 sensor and timing chain covers 1, 10 O-ring, to be replaced,...
1. Installation details of the N205 sensor and timing chain covers are indicated on the resistance. illustrations. 27.1 Installation details for N205 sensor and timing chain covers 1, 10 O-ring, to be replaced,...

Removal and installation of the timing chain of the engine 1.8
1. Timing chain installation details are shown on the resist. illustrations. 28.1 Timing chain installation details 1.5 Bolt, 9 Nm 2 Chain tensioner 12 3 Chain tensioner 12 4, 14 Guide pins, 20 Nm 6 Timing valve,...
1. Timing chain installation details are shown on the resist. illustrations. 28.1 Timing chain installation details 1.5 Bolt, 9 Nm 2 Chain tensioner 12 3 Chain tensioner 12 4, 14 Guide pins, 20 Nm 6 Timing valve,...

Removal and installation of balancing shafts and their drive chain (engine 1.8)
Balance shaft drive chain 1. Details of the installation of balancer shafts and their chains are indicated on the resist. illustrations. 29.1 Installation details of balancer shafts and their chain 1, 10 Bolt, 9 Nm 2...
Balance shaft drive chain 1. Details of the installation of balancer shafts and their chains are indicated on the resist. illustrations. 29.1 Installation details of balancer shafts and their chain 1, 10 Bolt, 9 Nm 2...

Removal and installation of a head of cylinders and the vacuum pump (engine 1.8)
Note: Do not remove the open valve guards from the new cylinder head before you are ready to install the cylinder head. If a new cylinder head or gasket is installed, replace the coolant. Use new cylinder head bolts and...
Note: Do not remove the open valve guards from the new cylinder head before you are ready to install the cylinder head. If a new cylinder head or gasket is installed, replace the coolant. Use new cylinder head bolts and...
Working with the gas distribution mechanism, removing and installing the cylinder head cover (engine 1.8)
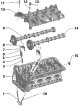
1. The design of the timing is shown in resist. illustrations. 31.1 Timing parts 1 Exhaust valve, no machining allowed, lapping only 2 Cylinder head 3 Valve guide 4 Oil cap 5 Valve spring 6 Spring plate 5 7 Keys for...
1. The design of the timing is shown in resist. illustrations. 31.1 Timing parts 1 Exhaust valve, no machining allowed, lapping only 2 Cylinder head 3 Valve guide 4 Oil cap 5 Valve spring 6 Spring plate 5 7 Keys for...

Work with the engine lubrication system 1.8
1. Installation details of the lubrication system components are shown on Ref. illustrations. 32.1a Installation details of the oil pan and oil pump 1 Sensor "G266" engine oil level and temperature 2 O-ring, to be...
1. Installation details of the lubrication system components are shown on Ref. illustrations. 32.1a Installation details of the oil pan and oil pump 1 Sensor "G266" engine oil level and temperature 2 O-ring, to be...
Features of the engine overhaul, replacement of the needle bearing and the rotor of the SKR sensor of the engine 1.8
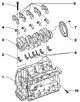
Attention: The presence of metal chips or a large number of small metal particles found during engine repairs may indicate damage to the crankshaft bearings and connecting rods. To prevent further damage from...
Attention: The presence of metal chips or a large number of small metal particles found during engine repairs may indicate damage to the crankshaft bearings and connecting rods. To prevent further damage from...
This section is available on russian, bulgarian, belarusian, ukrainian, serbian, croatian, romanian, polish, slovak, hungarian
Read similar sections on other Skoda models
➧ Power unit: Petrol engines Skoda Rapid 1 (2012-2022)
➧ Power unit: Petrol engine 1.6 l Skoda Felicia (1994-2001)
Link to this section in various formats
TEXTHTMLBB Code
- General information
- User manual
- Car driving
- Maintenance
- Power unit
- Petrol engines 3.6 l
- Petrol engines 1.4 l
- Petrol engines 1.8/2.0 l
- Diesel engines 2.0 l
- Diesel engines 1.9 l
- Cooling system
- Climate system
- Power and exhaust system
- Ignition and preheat system
- Launch and charge system
- Transmission
- Manual gearbox and clutch
- 7-speed DSG gearbox
- 6-speed DSG gearbox
- Transmission line
- Chassis (running gear)
- Brake system
- Front suspension
- Rear suspension
- Steering
- Body and interior
- Exterior (external elements)
- Interior (internal elements)
- Electrical equipment
- Equipment and devices
- Lighting and signaling