



Balance shaft drive chain
1. Details of the installation of balancer shafts and their chains are indicated on the resist. illustrations.
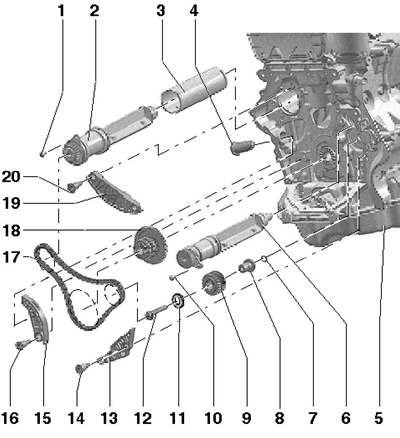
29.1 Installation details of balancer shafts and their chain
1, 10 Bolt, 9 Nm
2 Balance shaft on the exhaust side, lubricate the bearing with engine oil
3 Balance shaft tube
4 Chain tensioner, 65 Nm
5 Cylinder block
6 Balance shaft on the intake side, lubricate the bearing with engine oil
7 O-ring
8 Bearing support, lubricate with engine oil
9 Intermediate shaft with gear and sprocket, after loosening bolt 12 must be replaced
11 Washer
12 Bolt, must be replaced, after loosening, replace the shaft 9
13, 19 Chain guide 17
14, 16, 20 Guide pins, 20 Nm
15 Chain tensioner 17
17 Balance shaft drive chain
18 Crankshaft sprocket
2. Remove the timing chain and its tensioner (see Section 28).
3. Remove tensioner (1 per resist. illustrations) balance shaft chains, its tension (2) and guides (3 and 4) straps, and then the chain itself.
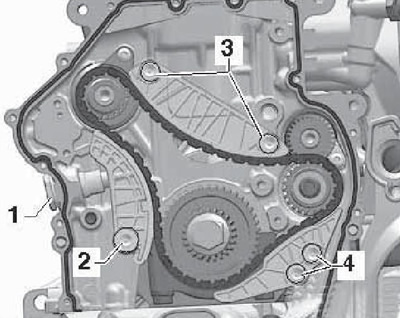
29.3 Removing the balance shaft chain
4. Rotate the intermediate shaft sprocket and balance shaft so that the mark on the balance shaft is between the marks on the intermediate shaft gear (arrow on resist illustrations).
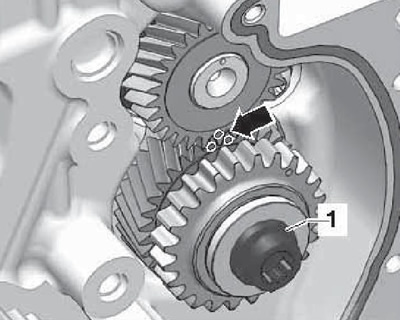
29.4 Installation position of intermediate shaft
Note: Up to 7 revolutions of the shafts may be required.
5. Lay the balance shaft drive chain on the sprockets so that its colored links are opposite the marks on the balance shaft sprockets and on the crankshaft sprocket (see resist. illustration).
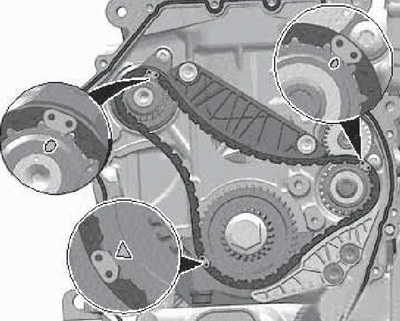
29.5 Marks on the balance shaft chain and sprockets
6. Install the guide rails (4 and 3 in illustration 29.3) and tension bar (2) balance shaft drive chain, and then tighten the tensioner (1).
7. Again make sure that the mark on the balancing shaft is between the marks on the countershaft gear (see illustration 29.4), and also that the colored links of the chain are opposite the marks on the sprockets (see illustration 29.5).
8. Install the timing chain tensioner and the timing chain itself (see Section 28).
Balance shaft on intake side
9. Remove the water pump drive timing belt (see chapter 3).
10. Remove the balance shaft chain (see subsection above).
11. Remove the bolt (1 in illustration 29.4) and remove the intermediate shaft with gear.
12. Turn out a bolt (2 to resist. illustrations) and pull out the balance shaft on the intake side.
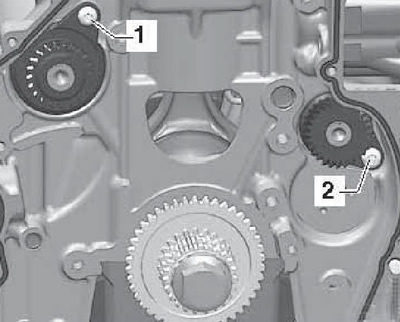
29.12 Balancing shaft bolts
Note: If the shaft cannot be removed by hand, use a puller (clamps and hammer with sliding head).
13. Lubricate the balance shaft bearing with engine oil and install the shaft in the cylinder block. The shaft must be installed by hand; otherwise, it must be cooled down first (keep in the freezer for about 30 minutes, or use a special cooling spray).
14. Install a new O-ring (1 per resist. illustrations), after lubricating it with engine oil. Lubricate the bearing support with engine oil and install it so that the center pin (arrow) entered the hole in the cylinder block.
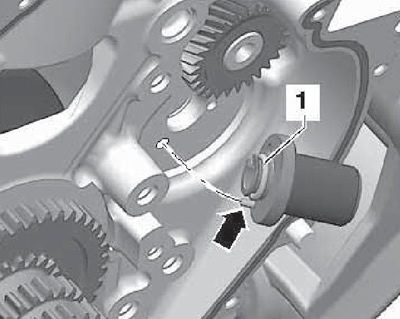
29.14 Fitting the bearing support
15. Prepare a new intermediate shaft (9 in illustration 29.1). If you use an old shaft, there will be no play between the teeth of the gears, which will damage the engine. The gear of the new intermediate shaft has a special coating, which is erased shortly after the start of work and provides the necessary play.
16. Mark with paint the edges of the teeth of the intermediate gear, marked with dots on the end (see resist. illustration), and then slide the idle gear onto the bearing bracket so that the marked teeth are on either side of the tooth marked on the balance shaft gear.
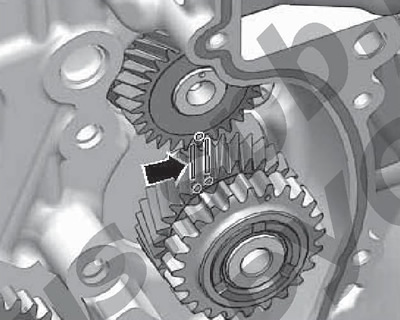
29.16 Installation of intermediate shaft
17. Make sure that the marks on the gears of the intermediate and balance shafts match (see illustration 29.4), and tighten the new bolt (1) with a force of 10 Nm. crank sprocket (there must be no play, otherwise loosen and retighten the bolt), tighten the bolt to 30 Nm and finally tighten the bolt by 90°. Again, make sure that the marks on the gears are in the correct relative position.
18. Install the balance shaft drive chain (see subsection above).
19. Replace the water pump drive oil seal and install the water pump drive toothed belt (see chapter 3).
Balance shaft on the exhaust side
20. Remove the balance shaft chain (see subsection above).
21. Remove the bolt (1 in illustration 29.12) and pull out the balance shaft on the exhaust side.
Note: If the shaft cannot be removed by hand, use a puller (clamps and hammer with sliding head).
22. Make sure that the protrusion of the balance shaft tube fits into the hole in the cylinder block (see resist. illustration).
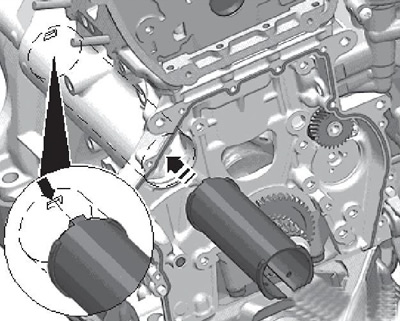
29.22 Mounting position of the camshaft tube
Note: Squeeze the tube to install.
23. Lubricate the balance shaft bearing with engine oil and install it in the cylinder block. The shaft must be installed by hand; otherwise, it must be cooled down first (keep in the freezer for about 30 minutes, or use a special cooling spray).
24. Make sure that the balance shaft is adjacent to the cylinder block, and tighten the bolt (1 in illustration 29.12) shaft mounting.
25. Install the balance shaft drive chain (see relevant subsection above).