
Company vehicles Hyundai Company vehicles Kia Company vehicles Lada Company vehicles Mazda Company vehicles Mercedes-Benz Company vehicles Opel Company vehicles Mitsubishi
English Русский
Български
Беларускі
Український
Српски
Hrvatski
Română
Polski
Slovenský
Magyar
Articles   
Bookmark Contacts Sitemap
SkodaBook.ru


Fabia Rapid Octavia Superb Kodiaq Yeti Others
Octavia 1 (1996-2004) Octavia 3 (2013-2019)

Rear spoiler (Skoda Octavia 5E)

  • Main
  • Octavia
  • 5E (2013-2019)
  • Body and interior
  • Exterior (external elements)
  • Rear spoiler
0
Contents: Removal and installation the rear…⬇ Rear spoiler (Octavia RS) ⬇ Removal and installation the rear…⬇
Rear spoiler "3". Adhesive tape Sealant "2".

Removal and installation the rear spoiler


Seal the painted surfaces along the spoiler with fabric adhesive tape. Cut the spoiler off the trunk lid (cut the sealant), and cut off the double-sided adhesive tape, for example, with a cutting string -357 853 999 B-. Remove the spoiler.

Installation


Note: The ambient temperature when gluing the spoiler must be more than 18°C!


Clean the bonding surface thoroughly, e.g. with cleaning agent D 009 401 04. Apply adhesive sealant D 172 090 A2 into the guide groove (item 2) in the spoiler. Bond the spoiler: 15 minutes after applying the adhesive sealant! Partially stick the protective film from the adhesive tape along the edges. Position the spoiler evenly on the tailgate. Maintain an even gap of 2 mm from the edge of the tailgate. Remove the protective film from the adhesive tape. Press the spoiler evenly onto the tailgate. Secure the spoiler against shifting with adhesive tape.
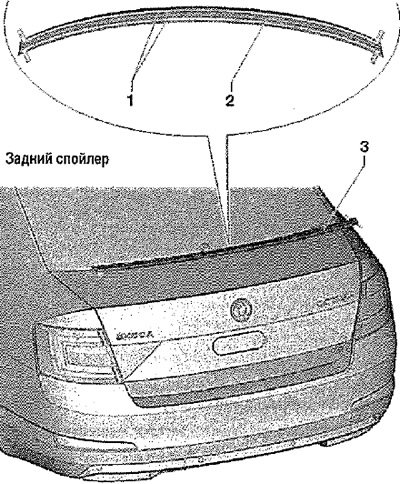
Clean the bonding surface thoroughly, e.g. with…


Note: The adhesive sealant dries for 2 hours. During this time, you cannot drive the car. Do not wash the car at a car wash for 24 hours after gluing the spoiler.


Rear spoiler (Octavia RS)
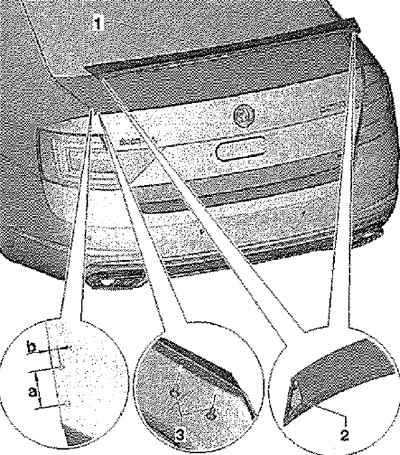


Rear spoiler (Octavia RS)


Rear spoiler "1".

Sealant "2".

Fastening screws "3" (5 Nm).

Removal and installation the rear spoiler


Seal the painted surfaces around the spoiler supports with textile adhesive tape. Loosen the screws (pos. 3). Cut the spoiler off the tailgate, e.g. with a cutting string -357 853 999 B- (cut the sealant). Remove the spoiler.

Installation


Note: The ambient temperature when gluing the spoiler must be more than 18°C!


Diameter of the holes in the tailgate = 6.5 mm. Location of the holes for the spoiler: a = 50 mm, b = 12 mm. Distance from the edge of the tailgate = 24.5 mm. Thoroughly clean the surface to be bonded, e.g. with cleaning agent D 009 401 04. Apply sealant D 172 090 A2 to the support space between the screw holes. Glue the spoiler 15 minutes after applying the adhesive sealant. Place the spoiler evenly on the tailgate. Press the spoiler evenly onto the boot lid. Install the screws (item 3).

Note: The adhesive sealant dries for 2 hours. During this time, you cannot drive the car. Do not wash the car at a car wash for 24 hours after gluing the spoiler.
This article is available at russian, bulgarian, belarusian, ukrainian, serbian, croatian, romanian, polish, slovak, hungarian
Article verified: Anatoly Ovchinnikov
Share with friends:
◀ Previous
Skoda Octavia 3: Exterior (external elements)
 

Roof rails (Combi)
Towing hitch — design description
External rear view mirrors — removal and installation
External rear view mirrors — design description
Rear bumper support beam and guide profiles
 
Read similar articles on other Skoda models

➧ Front and rear ashtray Skoda Fabia 1 (1999-2007)
➧ Main technical characteristics of the rear suspension Skoda Rapid 1 (2012-2022)
➧ Adjusting the rear view mirrors Skoda Superb 2 (2008-2015)
➧ Rear Drive Shafts — components Skoda Kodiaq 1 (2016-2024)
➧ Removing and installing the flywheel and rear oil seal (sealing… Skoda Yeti (2009-2017)
➧ View of the rear part of the bottom Skoda Favorit (1987-1994)
Link to this article in various formats
Reviews and comments of visitors
No comments yet


Add two numbers: 45 + 43


Octavia 3 (2013-2019) 
  • General information
  • User manual
  • Car driving
  • Maintenance
  • Petrol engines 1.2 l
  • Engine repair
  • Cooling system
  • Supply system
  • Petrol engines 1.4 l
  • Engine repair
  • Supply system
  • Petrol engines 1.8/2.0 l
  • Engine repair
  • Cooling system
  • Supply system
  • Diesel engines 1.6/2.0 l
  • Engine repair
  • Cooling system
  • Supply system
  • Transmission
  • Mechanical gearbox 02S
  • Automatic gearbox 0CW
  • Automatic gearbox 0D9
  • Chassis (running gear)
  • Front suspension
  • Rear suspension
  • Brake system
  • Steering
  • Body and interior
  • Doors, locks and windows
  • Exterior (external elements)
  • Interior (internal elements)
  • Ventilation and air conditioning
  • Electrical equipment
  • Equipment and devices
  • Headlights and lighting
  • Wiring diagrams (basic)
  • Wiring diagrams (comfort)
Octavia 1 (1996-2004) 
  • General information
  • Vehicle details
  • Maintenance
  • Power unit
  • Petrol engines 1.6 l AEE
  • Petrol engines 1.8 l AGN
  • Diesel engines 1.9 l AGR
  • Fuel system
  • Exhaust system
  • Cooling system
  • Transmission
  • Clutch
  • Car gearbox
  • Gearbox repair 02J
  • Gearbox repair 02K
  • Chassis (running gear)
  • Wheels and tires
  • Suspension and axles
  • Brake system
  • Body and interior
  • Exterior (external elements)
  • Interior (internal elements)
  • Doors, locks and windows
  • Electrical equipment
  • Equipment and devices
  • Electrical circuits
SkodaBook.ru © 2018–2026 | Mobile version | Articles on Skoda | Sitemap EN BG BY UA RS HR RO PL SK HU | Feedback | Site search | Bookmark
Fabia 1 (1999-2007) | Fabia 2 (2007-2014) | Rapid 1 (2012-2022) | Octavia 1 (1996-2004) | Octavia 3 (2013-2019) | Superb 2 (2008-2015) | Kodiaq 1 (2016-2024) | Yeti (2009-2017) | Favorit (1987-1994) | Felicia (1994-2001) |
By continuing to use the site, you agree to the use of cookies.