



Car front suspension Skoda Octavia 3

Front Suspension Repair — General Information
Bringing the steering knuckle into a position corresponding to the curb weight Note: All bolts on silent block components must be fully tightened when the suspension is set to the position corresponding to the vehicle's...
Bringing the steering knuckle into a position corresponding to the curb weight Note: All bolts on silent block components must be fully tightened when the suspension is set to the position corresponding to the vehicle's...

Subframe, stabilizer — design description
1. Stabilizer: applicability 2. Nut, 65 Nm 3. Shock absorber strut 4. Stabilizer bar: connects the stabilizer bar to the shock absorber bar 5. Subframe: welded steel 6. Bolt, 70 Nm, turn 180°: replace after each removal...
1. Stabilizer: applicability 2. Nut, 65 Nm 3. Shock absorber strut 4. Stabilizer bar: connects the stabilizer bar to the shock absorber bar 5. Subframe: welded steel 6. Bolt, 70 Nm, turn 180°: replace after each removal...

Fixing the position of the subframe
Note: 2 rods "T10486/1" are included in the set of the device "T10486". If the enterprise has the device "T10486", only two more rods "T10486/1" are needed. The set of the device -T10486 A- includes 4 guide rods...
Note: 2 rods "T10486/1" are included in the set of the device "T10486". If the enterprise has the device "T10486", only two more rods "T10486/1" are needed. The set of the device -T10486 A- includes 4 guide rods...

Bringing the subframe into service position
When the wheels are pointing straight ahead, secure the steering wheel from unexpected movement with the "arrow" tape. Unscrew nut "1" and pull the floor covering in the "direction of the arrow". Loosen bolt "1" and...
When the wheels are pointing straight ahead, secure the steering wheel from unexpected movement with the "arrow" tape. Unscrew nut "1" and pull the floor covering in the "direction of the arrow". Loosen bolt "1" and...

Removal and installation a subframe without a steering gear
Note: The subframe is removed together with the suspension arms. Remove the front wheels. Remove the noise-insulating casing. On vehicles with automatic headlight corrector, disconnect the front left ground clearance...
Note: The subframe is removed together with the suspension arms. Remove the front wheels. Remove the noise-insulating casing. On vehicles with automatic headlight corrector, disconnect the front left ground clearance...

Removal and installation the subframe with steering gear
Note: The subframe is removed together with the suspension arms. Remove the front wheels. With the wheels in a straight line, secure the steering wheel from unexpected displacement with tape "arrow". Unscrew the nut "1"...
Note: The subframe is removed together with the suspension arms. Remove the front wheels. With the wheels in a straight line, secure the steering wheel from unexpected displacement with tape "arrow". Unscrew the nut "1"...

Removal and installation the stabilizer bar
Unscrew the "arrow" nut. Unscrew nut "1". Disconnect struts "3" from stabilizer "2". Installation in reverse order.
Unscrew the "arrow" nut. Unscrew nut "1". Disconnect struts "3" from stabilizer "2". Installation in reverse order.

Steering knuckle — design description
1. Shield 2. Screw, 12 Nm 3. Wheel hub with bearing: The magnetic ring of the ABS sensor is installed in the hub; repairs not provided 4. Bolt, 200 Nm, then turn 180°: replace after each removal; when loosening and...
1. Shield 2. Screw, 12 Nm 3. Wheel hub with bearing: The magnetic ring of the ABS sensor is installed in the hub; repairs not provided 4. Bolt, 200 Nm, then turn 180°: replace after each removal; when loosening and...

Removal and installation the drive shaft mounting bolt
Note: If the drive shaft mounting bolt is loosened more than 90°, the wheel bearing must not be loaded with the weight of the vehicle, i.e. the vehicle must not be standing on the wheels. If the wheel bearing is loaded...
Note: If the drive shaft mounting bolt is loosened more than 90°, the wheel bearing must not be loaded with the weight of the vehicle, i.e. the vehicle must not be standing on the wheels. If the wheel bearing is loaded...

Removal and installation the steering knuckle
Note: If the drive shaft mounting bolt is loosened more than 90°, the wheel bearing must not be loaded with the weight of the vehicle, i.e. the vehicle must not be standing on the wheels. If the wheel bearing is loaded...
Note: If the drive shaft mounting bolt is loosened more than 90°, the wheel bearing must not be loaded with the weight of the vehicle, i.e. the vehicle must not be standing on the wheels. If the wheel bearing is loaded...

Removal and installation the bearing unit
Remove the bolt securing the drive shaft to the hub. Note: If the drive shaft mounting bolt is unscrewed more than 90°, the wheel bearing must not be loaded with the weight of the vehicle, i.e. the vehicle must not...
Remove the bolt securing the drive shaft to the hub. Note: If the drive shaft mounting bolt is unscrewed more than 90°, the wheel bearing must not be loaded with the weight of the vehicle, i.e. the vehicle must not...
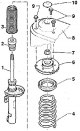
Shock absorber strut — design description
1. Shock absorber: can be replaced separately 2. Buffer 3. Protective case 4. Spring: There should be no damage on the surface of the spring 5. Thrust ball bearing 6. Shock absorber support: install in the proper...
1. Shock absorber: can be replaced separately 2. Buffer 3. Protective case 4. Spring: There should be no damage on the surface of the spring 5. Thrust ball bearing 6. Shock absorber support: install in the proper...

Shock absorber strut — removal and installation
Remove the bolt securing the drive shaft to the hub. Note: If the drive shaft mounting bolt is unscrewed more than 90°, the wheel bearing must not be loaded with the weight of the vehicle, i.e. the vehicle must not be...
Remove the bolt securing the drive shaft to the hub. Note: If the drive shaft mounting bolt is unscrewed more than 90°, the wheel bearing must not be loaded with the weight of the vehicle, i.e. the vehicle must not be...

Triangular lever — design description
1. Steering knuckle: design options 2. Nut, 60 Nm: replace after each removal 3. Ball joint; set in proper position 4. Nut, 100 Nm: replace after each removal 5. Triangular lever 6. Front silent block 7. Bolt, 70 Nm and...
1. Steering knuckle: design options 2. Nut, 60 Nm: replace after each removal 3. Ball joint; set in proper position 4. Nut, 100 Nm: replace after each removal 5. Triangular lever 6. Front silent block 7. Bolt, 70 Nm and...

Removal and installation the triangular lever
Remove the wheel. Remove the noise-insulating casing. On a car with automatic headlight corrector, unscrew nut "1" of the left front ground clearance sensor "G78". Unscrew the "arrow" nuts. Unscrew the "arrow" bolts....
Remove the wheel. Remove the noise-insulating casing. On a car with automatic headlight corrector, unscrew nut "1" of the left front ground clearance sensor "G78". Unscrew the "arrow" nuts. Unscrew the "arrow" bolts....

Removal and installation the ball joint
Loosen the drive shaft mounting bolt to the hub. Remove the wheel. On vehicles with automatic headlight range control, disconnect the front left ground clearance sensor rod "G78" from the left suspension arm. Loosen the...
Loosen the drive shaft mounting bolt to the hub. Remove the wheel. On vehicles with automatic headlight range control, disconnect the front left ground clearance sensor rod "G78" from the left suspension arm. Loosen the...

Checking the condition of the ball joint
Checking axial play First pull the triangle lever down forcefully, and then push it up again. Checking the radial clearance Grasp the wheel at its bottom and shake it vigorously (inside - outside). Note: In both cases,...
Checking axial play First pull the triangle lever down forcefully, and then push it up again. Checking the radial clearance Grasp the wheel at its bottom and shake it vigorously (inside - outside). Note: In both cases,...

Removal and installation the front left ground clearance sensor «G78»
The sensor does not require mechanical adjustment. Note: For clarity, the illustration shows the suspension removed. Disconnect connector "1" from the left front ground clearance sensor of the vehicle. Unscrew nut "1"...
The sensor does not require mechanical adjustment. Note: For clarity, the illustration shows the suspension removed. Disconnect connector "1" from the left front ground clearance sensor of the vehicle. Unscrew nut "1"...

VL100 Internal Constant Velocity Joint
Note: Before removing the joint and its cover, thoroughly clean the adjacent parts. When disassembling the joint, remove old grease and dirt. Clean the joint thoroughly. Dispose of old grease in accordance with...
Note: Before removing the joint and its cover, thoroughly clean the adjacent parts. When disassembling the joint, remove old grease and dirt. Clean the joint thoroughly. Dispose of old grease in accordance with...

VL107 Internal Constant Velocity Joint
Note: Before removing the joint and its boot, thoroughly clean the adjacent parts. When disassembling the joint, remove old grease and dirt. Clean the joint thoroughly. Dispose of old grease in accordance with...
Note: Before removing the joint and its boot, thoroughly clean the adjacent parts. When disassembling the joint, remove old grease and dirt. Clean the joint thoroughly. Dispose of old grease in accordance with...

AAR3300i Internal Tripod Jointed Shaft
Note: Before removing the joint and its boot, thoroughly clean the adjacent parts. When disassembling the joint, remove old grease and dirt. Clean the joint thoroughly. Dispose of old grease in accordance with...
Note: Before removing the joint and its boot, thoroughly clean the adjacent parts. When disassembling the joint, remove old grease and dirt. Clean the joint thoroughly. Dispose of old grease in accordance with...

Removal and installation a constant velocity joint (CV joint)
Remove the bolt securing the drive shaft to the hub. Note: If the drive shaft mounting bolt is loosened more than 30°, the wheel bearing must not be loaded with the weight of the vehicle, i.e. the vehicle must not be...
Remove the bolt securing the drive shaft to the hub. Note: If the drive shaft mounting bolt is loosened more than 30°, the wheel bearing must not be loaded with the weight of the vehicle, i.e. the vehicle must not be...

Removal and installation a cardan shaft with an internal insert joint
Remove the bolt securing the drive shaft to the hub. Note: If the drive shaft mounting bolt is unscrewed more than 90°, the wheel bearing must not be loaded with the weight of the vehicle, i.e. the vehicle must not...
Remove the bolt securing the drive shaft to the hub. Note: If the drive shaft mounting bolt is unscrewed more than 90°, the wheel bearing must not be loaded with the weight of the vehicle, i.e. the vehicle must not...
This section is available on russian, bulgarian, belarusian, ukrainian, serbian, croatian, romanian, polish, slovak, hungarian
Read similar sections on other Skoda models
➧ Chassis (running gear): Front suspension Skoda Fabia 1 (1999-2007)
➧ Chassis (running gear): Front suspension Skoda Rapid 1 (2012-2022)
➧ Chassis (running gear): Front suspension Skoda Superb 2 (2008-2015)
➧ Chassis (running gear): Front suspension Skoda Kodiaq 1 (2016-2024)
➧ Chassis (running gear): Front suspension Skoda Yeti (2009-2017)
Link to this section in various formats
TEXTHTMLBB Code
- General information
- User manual
- Car driving
- Maintenance
- Petrol engines 1.2 l
- Engine repair
- Cooling system
- Supply system
- Petrol engines 1.4 l
- Engine repair
- Supply system
- Petrol engines 1.8/2.0 l
- Engine repair
- Cooling system
- Supply system
- Diesel engines 1.6/2.0 l
- Engine repair
- Cooling system
- Supply system
- Transmission
- Mechanical gearbox 02S
- Automatic gearbox 0CW
- Automatic gearbox 0D9
- Chassis (running gear)
- Front suspension
- Rear suspension
- Brake system
- Steering
- Body and interior
- Doors, locks and windows
- Exterior (external elements)
- Interior (internal elements)
- Ventilation and air conditioning
- Electrical equipment
- Equipment and devices
- Headlights and lighting
- Wiring diagrams (basic)
- Wiring diagrams (comfort)
- General information
- Vehicle details
- Maintenance
- Power unit
- Petrol engines 1.6 l AEE
- Petrol engines 1.8 l AGN
- Diesel engines 1.9 l AGR
- Fuel system
- Exhaust system
- Cooling system
- Transmission
- Clutch
- Car gearbox
- Gearbox repair 02J
- Gearbox repair 02K
- Chassis (running gear)
- Wheels and tires
- Suspension and axles
- Brake system
- Body and interior
- Exterior (external elements)
- Interior (internal elements)
- Doors, locks and windows
- Electrical equipment
- Equipment and devices
- Electrical circuits