
Note: Incandescent lamps should only be replaced with lamps of the same type. Before replacing a lamp, make sure that the appropriate light fixture is turned off. Do not handle the bulb with bare fingers, use a clean towel or cotton gloves. Fingerprints left on the lamp bulb evaporate and deposit on the reflector, which is especially noticeable on headlights and fog lights. Accidentally left fingerprints should be removed with a cloth soaked in alcohol. It is not allowed to wipe the headlight reflectors covered with a protective varnish with a dry hard rag, and also to use any cleaners or solvents for this purpose. Use soft wet wipes. Halogen and xenon lamps are under pressure and may crack. Therefore, when replacing them, wear protective goggles and gloves. When replacing xenon lamps, there is an additional risk of injury due to high voltage! Be sure to turn off the headlights and disconnect the electrical wiring from the battery. After replacement, turn the headlight on and off briefly to remove residual voltage. As a safety measure, wear boots with rubber soles.
1. Details of the headlight are indicated on the resist. illustrations.
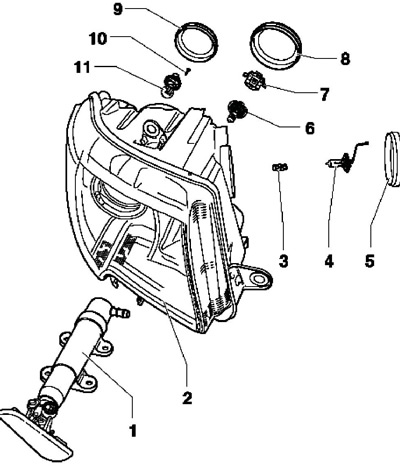
5.1a Parts of the right headlight with halogen lamps
1 Lift cylinder with nozzles (with headlight washer)
2 Headlight housing
3 Position lamp, W5W
4 High beam lamp, NC
5, 8, 9 Rubber cover
6 Dipped beam lamp, H7
7 Lifting bracket
10 Screw, 1.4 Nm
11 Turn signal lamp, PY24W Hyperclick
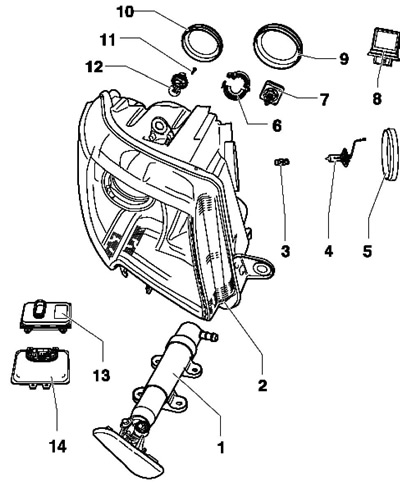
5.1b Parts of the right xenon headlamp
1 Lift cylinder with nozzles (with headlight wash)
2 Headlight housing
3 Side light bulb, W5W BL (blue glass)
4 High beam lamp, NC
5, 9, 10 Rubber cover
6 Lamp holder 7
7 Xenon lamp with built-in ignition unit, D1S
8 Control unit for cornering light and headlight range adjustment (AFS)
11 Screw, 1.4 Nm
12 Turn signal lamp, PY24W Hyperclick
13 Headlight control unit ("J667" or "J668")
14 Xenon lamp control unit ("J343" or "J344")
Removal and installation of a headlight
Note: After installing xenon headlights, use the diagnostic tool to check the basic settings for them (see chapter 5).
2. Turn off the ignition and all electrical consumers. Remove the key from the ignition lock.
3. Remove the front bumper cover (see chapter 11) and disconnect the headlight wiring connector.
4. Turn out three bolts (see resist. illustration).
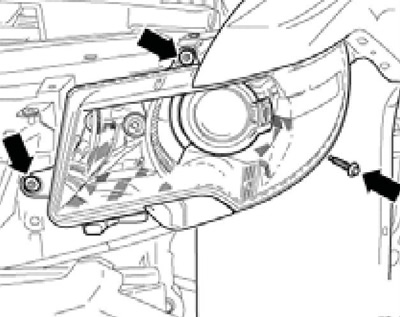
5.4 Headlamp bolts
5. On models with headlight washer, press the lock (arrow on resist illustrations), disconnect the connection (1) and remove the hose from the lift cylinder.
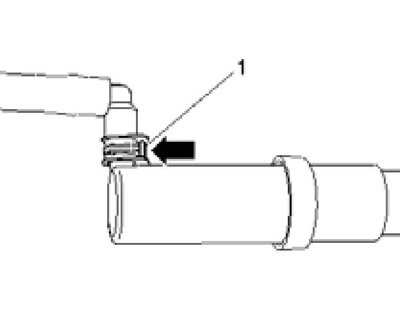
5.5 Separating the hose from the lifting cylinder
6. Remove the headlight.
7. Installation is carried out in the reverse order. In this case, an even gap should be set between the headlight and adjacent body elements (see Specifications Chapter 11). To do this, after installing the bumper cover with loose bolts (1 per resist. illustrations) set the gap, and then adjust the protrusion of the headlight by turning the adjusting nut (2) with left hand thread. Finally, tighten the bolts to 5 Nm.
5.7 Headlight adjustment
8. After installation, you should adjust the tilt of the headlight (see Section 4).
Replacing bulbs and other headlight parts
9. The serviceable headlight components are covered at the rear with three rubber covers (see illustrations 5.1a-b). Before removing a headlight component, open the hood and remove the appropriate cover.
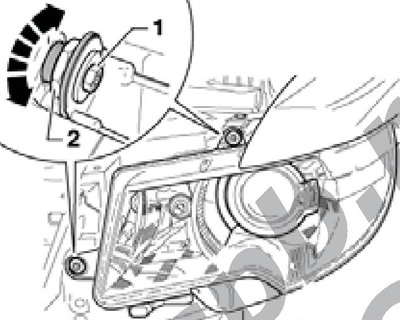
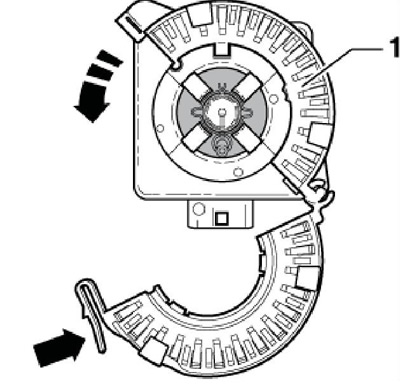
10. To replace the dipped beam lamp of a halogen headlight, remove its cover, turn the bracket (1 per resist. illustrations) with the connector in the direction of the arrow by 45°, remove the lamp together with the bracket and connector, and then remove the lamp from the connector.
5.10 Removing low beam bulbs (2) halogen headlight and turn signal (3)
11. To replace the turn signal lamp, remove the locker of the corresponding front wheel arch (see chapter 11), remove the screw (2 in illustration 5.10), turn the cartridge in the direction of the arrow, remove it together with the lamp from the headlight and disconnect the connector (3).
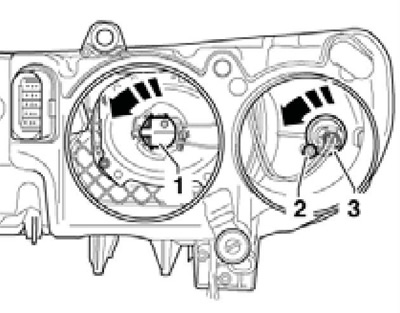
12. To replace the high beam lamp, remove the corresponding cover, release the spring clip (2 to resist. illustrations), remove the lamp (3) out of the headlight and disconnect the connector.
5.12 Removing the high beam bulbs (3) and marker light (1)
13. To remove the parking light lamp, remove the corresponding cover, pull out the cartridge together with the lamp (1 in illustration 5.12) out of the headlight in the direction of the arrow and remove the bulb from the socket.
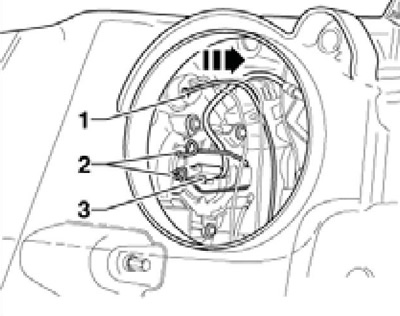
14. To remove the low beam lamp of the xenon headlight, disconnect the headlight connector, remove the corresponding rubber cover, press the tab (1 in illustration 5.14a) connector (2) and disconnect it. Turn the bulb together with the ignition unit 45°in the direction of the arrow and remove it from the headlamp. Then press the tongue (arrow in illustration 5.14b), open the holder (1) and remove the lamp.
5.14a Removing the xenon lamp with ignition unit
5.14b Separating the xenon lamp from the ignition unit
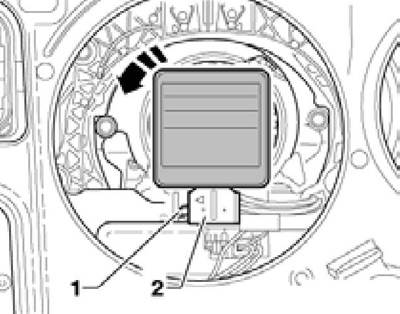
15. Xenon lamp control unit ("J343" or "J344") and mode control unit ("J667" or "J668") can be removed after removing the headlight by unscrewing the screws accordingly (3 or 2 per resist. illustrations). When installing, tighten the screws to 1.4 Nm.
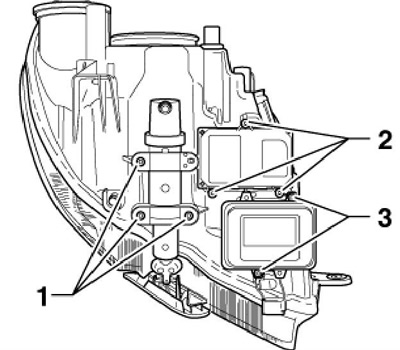
5.15 Fixing control units (2 and 3) and lifting cylinder (1) on the headlight
Changing the headlight setting when changing direction of travel
17. Xenon headlights can be set to drive on the other side of the road via the multifunction display menu (see "Controls and methods of operation") or with a diagnostic tool (see chapter 5).
5.17 Measuring headlight alignment on LHD models
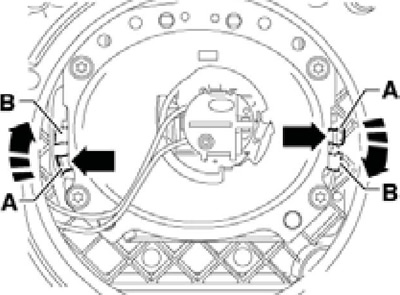
18. On models with halogen headlights, remove the low beam lamp cover and move the levers (arrows on resist. illustrations) into position (A, for right-hand traffic) or (B, for left-hand traffic).