



Contents: Front bumper ⬇ Rear bumper of Hatchback models ⬇ Rear bumper of station wagon models ⬇ Towing hitch and trailer recognition…⬇
Front bumper
1. Front bumper cover installation details are shown in the accompanying illustration.
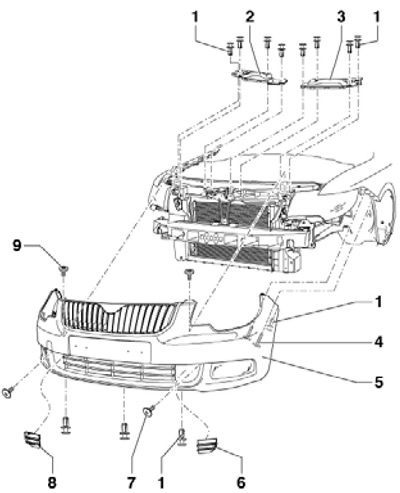
4.1 Front bumper trim installation details
1 Fixator
2/3 Upper cover right/left shock absorber
4 Bolt, 3.5 Nm
5 Bumper cover
6 Left grille
7 Bolt, 1.5 Nm
8 Right grille
9 Bolt, 6.6 Nm
Note: References in the text of this subsection refer to this illustration.
2. Remove the clips (1) from the top and remove the covers (2 and 3).
3. Remove the front wheel arch liners (see Section 6), unscrew the bolts (4) and remove the fasteners (1) from the lower part of the cover.
4. Pry up and remove the grates (7 and 6).
5. Loosen the bolts (7 and 9), disconnect the connectors of the fog lights and front parking assist system, and then remove the bumper cover.
6. If necessary, after removing the trim, you can remove the bumper beam (see accompanying illustration).
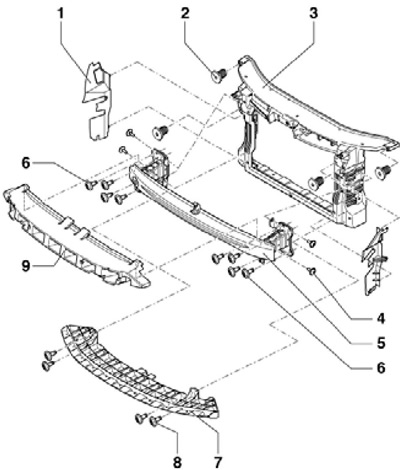
4.6 Front bumper beam installation details
1 Air deflector
2 Adjusting nut
3 Hood lock holder
4 Bolt, 9 Nm
5 Bumper beam
6 Bolt, 30 Nm
7 Lower part of the holder 3
8 Bolt, 5 Nm
9 Metal amplifier
7. Installation is carried out in reverse order.
[The original article is located on: skodabook]
Rear bumper of Hatchback models
8. Details of the installation of the rear bumper of the Superb II models are shown in the accompanying illustration.
Note: References in the text of this subsection refer to this illustration.
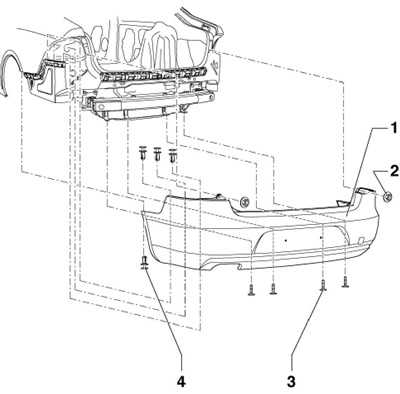
4.8 Installation details of the rear bumper cover for Superb II models
1 Bumper cover
2 Nut, 3.5 Nm
3 Bolt, 1.5 Nm
4 Retainer
9. Remove the bolts (3).
10. Partially remove the rear wheel arch liners (see Section 6) and remove the clips (2) at the corners of the bumper.
11. Remove the rear lights (see Chapter 12).
12. Remove the clamps (4) from above and loosen the nuts (2).
13. Disconnect the license plate light and parking assist sensor wiring connectors. Remove the wiring from the bumper and remove the bumper.
14. If necessary, after removing the trim, you can remove the bumper beam (see accompanying illustration).
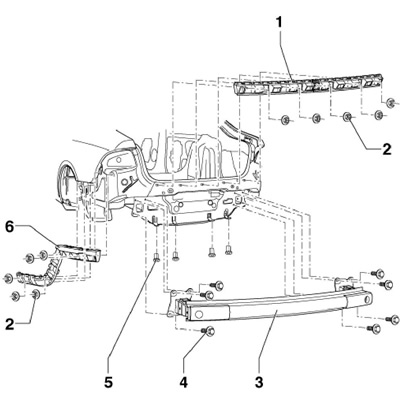
4.14 Rear bumper beam installation details for Superb II models
1 Centering beam
2 Nut, 3.5 Nm
3 Bumper beam
4 Bolt, 20 Nm
5 Adjusting nut
6 Guide piece
15. Installation is carried out in reverse order.
Rear bumper of station wagon models
16. The details of the installation of the rear bumper of the Superb Combi II models are shown in the accompanying illustration. Removal of the bumper cover is carried out in the same way as for the Hatchback models (see above).
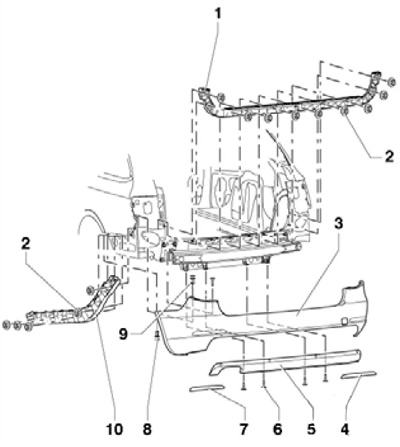
4.16 Rear bumper installation details for Superb Combi II models
1 Centering beam
2 Nut, 3.5 Nm
3 Bumper cover
4, 7 Rear deflector
5 Spoiler
6 Bolt, 1.5 Nm
8, 9 Retainer
10 Guide piece
Towing hitch and trailer recognition unit
17. To remove the trailer recognition unit, turn off the ignition, partially remove the left side trim of the luggage compartment, disconnect the connector and release the hooks (see accompanying illustration).
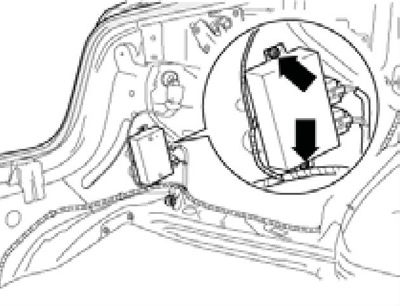
4.17 Trailer Recognition Unit Fastener
18. The details of the installation of the towing hitch (TSU) are shown in the accompanying illustration.
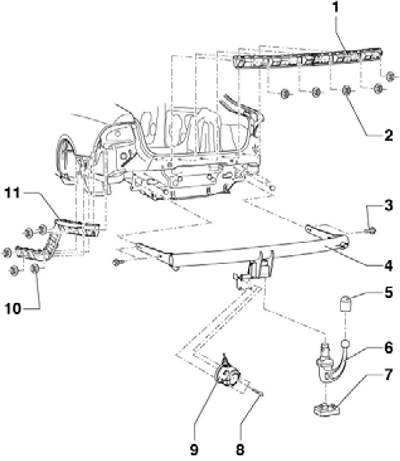
4.18 Towing hitch (TH) mounting parts
1 Centering beam
2, 10 Nut, 3.5 Nm
3 Bolt, 55 Nm
4 TSU frame
5 Protective cap
6 TSU lever
7 Plug
8 Bolt, 2.5 Nm
9 Connector
10 Guide piece
19. To remove the towbar frame, remove the rear bumper cover (see above), partially remove the heat shield (see accompanying illustration), remove the socket (9 in illustration 4.18) and unscrew the bolts (3).
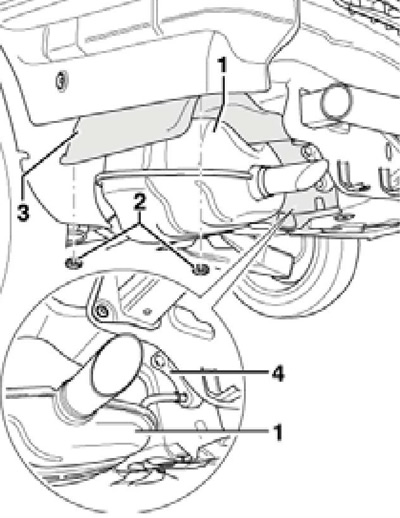
4.19 Unhook the rear muffler (1) from the hanger (4), remove the lock washers (2) and bend the heat shield (3) downwards