
Company vehicles Hyundai Company vehicles Kia Company vehicles Lada Company vehicles Mazda Company vehicles Mercedes-Benz Company vehicles Opel Company vehicles Mitsubishi
English Русский
Български
Беларускі
Український
Српски
Hrvatski
Română
Polski
Slovenský
Magyar
Articles   
Bookmark Contacts Sitemap
SkodaBook.ru


Fabia Rapid Octavia Superb Kodiaq Yeti Others
Yeti (2009-2017)

Removal and installation door trim (Skoda Yeti 5L)

  • Main
  • Yeti
  • 5L (2009-2017)
  • Body and interior
  • Interior (internal elements)
  • Removal and installation door trim
0
Contents: Side doors ⬇ Tailgate ⬇

Side doors


1. Unhook the switch block (2 in the illustration) in the direction of the arrow using a plastic wedge (1) and disconnect the electrical wiring connector.
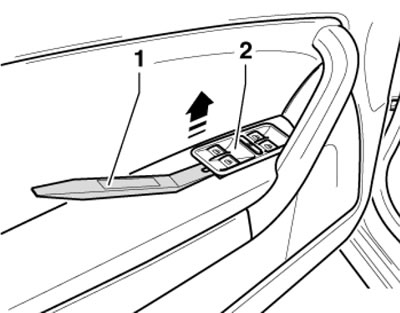
18.1. Removing the switch block

18.1. Removing the switch block


2. Insert a screwdriver no wider than 5 mm into the slot under the handle and pry up its cover (1 in the illustration). Then insert this screwdriver into the slot at the top of the handle and pry up the retaining tab (2).
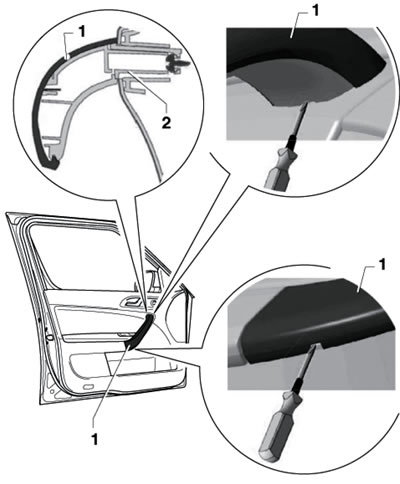
18.2. Removing the handle cover

18.2. Removing the handle cover


Note: To avoid damaging the door trim, place a plastic spatula between the door and the screwdriver.


3. Remove the screws (1 and 2 in the illustration) internal handle (3).
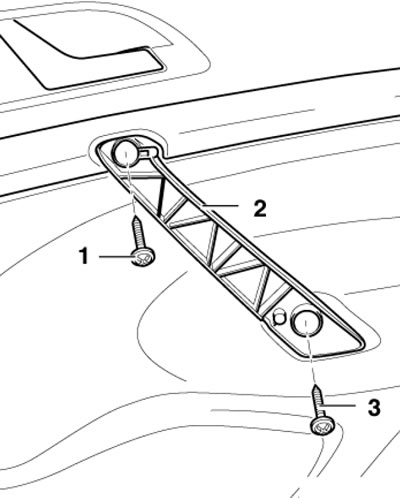
18.3. Inner handle bolts

18.3. Inner handle bolts


Note: When installing, tighten the screws to 4 Nm.


4. Remove the tweeter cover (2 in the illustration) and disconnect the connector (1), then remove the screw (arrow).
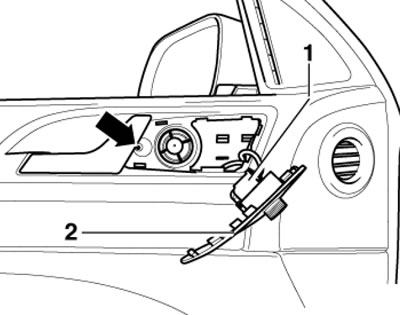
18.4. Removing the tweeter in the driver's door…

18.4. Removing the tweeter in the driver's door (on other doors - similarly)


Note: When installing, tighten the screws to 1.1 Nm.


5. If present, remove the handle (1 in the illustration) window lift drive. To do this, unlock the spacer ring (3) in the direction of the arrow (A) and remove the handle from the shaft (2) of the window lift in the direction of the arrow (B).
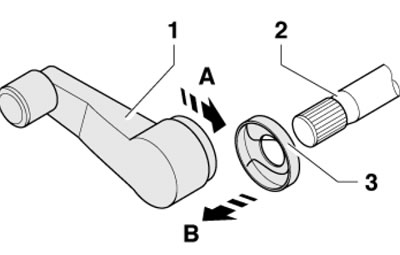
18.5. Removing the window lifter handle

18.5. Removing the window lifter handle


6. Remove the lower bolts of the trim (see illustration) and carefully pry the door trim off the clips using a plastic wedge. Disconnect the electrical wiring connectors and remove the trim. Unhook the cable from the inside release handle.
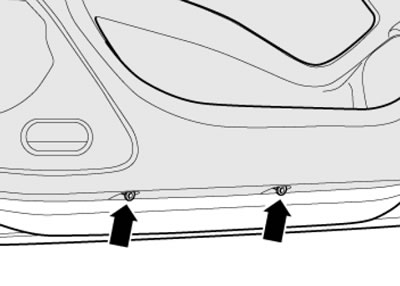


18.6. Front door trim lower mounting bolts (on…

18.6. Front door trim lower mounting bolts (on the back door - one bolt)


Note: When installing, tighten the lower bolts to 1.1 Nm.


Tailgate


7. To remove the lower trim (4 in the illustration) unscrew the bolts (2.2 Nm) and handles (1) from the tailgate, detach the trim from the clips (3) using a plastic wedge and remove it from the tailgate (5).
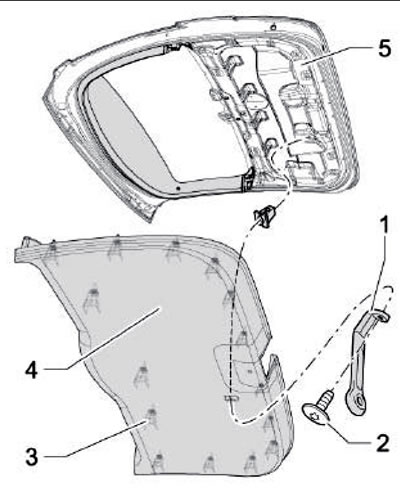
18.7. Removing the lower trim of the tailgate

18.7. Removing the lower trim of the tailgate


8. To remove the top trim (5 in the illustration) rear door remove the rear door threshold trim (see Section 17) and its lower trim (see paragraph 7). Remove the screws (3, 2 Nm) and the luggage compartment plate bolt (2, 1.5 Nm). Using a plastic wedge, release the trim (5) on the sides and unhook it from the clips (4).
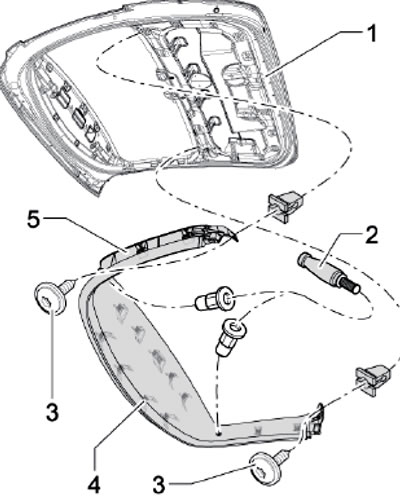


18.8. Removing the upper trim of the tailgate

18.8. Removing the upper trim of the tailgate
This article is available at russian, bulgarian, belarusian, ukrainian, serbian, croatian, romanian, polish, slovak, hungarian
Article verified: Timur Komissarov
Share with friends:
◀ Previous
Skoda Yeti: Interior (internal elements)
Next ►

Removal and installation of body trim panels
Removal and installation of ceiling trim and parts located on it
Removal and installation of the instrument panel and its parts
Removal and installation the main storage compartment
Removal and installation of the center console and its parts
Removal and installation of seats and their parts
Removal and installation seat belts
Read similar articles on other Skoda models

➧ Removal and installation the front door Skoda Fabia 1 (1999-2007)
➧ Front Door Trim Panel — Removal and Installation Skoda Rapid 1 (2012-2022)
➧ Removal and installation the rear door trim Skoda Octavia 3 (2013-2019)
➧ Removal and installation door trim Skoda Superb 2 (2008-2015)
➧ Luggage compartment door Skoda Kodiaq 1 (2016-2024)
➧ Removal and installation interior door trim panels Skoda Felicia (1994-2001)
Link to this article in various formats
Reviews and comments of visitors
No comments yet


Add two numbers: 39 + 12


Yeti (2009-2017) 
  • General information
  • Introduction to manual
  • Controls and instruments
  • Maintenance
  • Power unit
  • Petrol engine 1.2 l
  • Petrol engine 1.4 l
  • Petrol engine 1.8 l
  • Diesel engine 2.0 l
  • Cooling system
  • Power and control system
  • Exhaust system
  • Ignition and preheating systems
  • Starting and charging system
  • Transmission
  • Clutch
  • Manual gearbox
  • 7-speed gearbox DSG «0AM»
  • 6-speed gearbox DSG «02E»
  • Drive shafts
  • Chassis (running gear)
  • Brake system
  • Front suspension
  • Rear suspension
  • Steering
  • Body and interior
  • Heating and air conditioning
  • Exterior (external elements)
  • Interior (internal elements)
  • Electrical equipment
  • Equipment and devices
  • Lighting and signaling
  • Electrical diagrams
SkodaBook.ru © 2018–2026 | Mobile version | Articles on Skoda | Sitemap EN BG BY UA RS HR RO PL SK HU | Feedback | Site search | Bookmark
Fabia 1 (1999-2007) | Fabia 2 (2007-2014) | Rapid 1 (2012-2022) | Octavia 1 (1996-2004) | Octavia 3 (2013-2019) | Superb 2 (2008-2015) | Kodiaq 1 (2016-2024) | Yeti (2009-2017) | Favorit (1987-1994) | Felicia (1994-2001) |
By continuing to use the site, you agree to the use of cookies.