
Company vehicles Hyundai Company vehicles Kia Company vehicles Lada Company vehicles Mazda Company vehicles Mercedes-Benz Company vehicles Opel Company vehicles Mitsubishi
English Русский
Български
Беларускі
Український
Српски
Hrvatski
Română
Polski
Slovenský
Magyar
Articles   
Bookmark Contacts Sitemap
SkodaBook.ru


Fabia Rapid Octavia Superb Kodiaq Yeti Others
Octavia 1 (1996-2004) Octavia 3 (2013-2019)

Removal and installation rear door seals (Skoda Octavia 5E)

  • Main
  • Octavia
  • 5E (2013-2019)
  • Body and interior
  • Doors, locks and windows
  • Removal and installation rear door seals
0
Contents: Removal and installation the rear…⬇ Removal and installation the outer…⬇

Removal and installation the rear door inner seal


During assembly at the factory, the internal door seals are coated with sealant, placed on the door frame flange and rolled with a roller.

Note: When removing the seal, some of the sealant on the inside is lost. The edges are slightly bent. When reinstalling the removed seal, the required tightness and secure fastening are not ensured. For this reason, a completely removed seal must be replaced with a so-called "mallet-installed seal". When partially removing the seals, the edges of the seal must be compressed before installation. The removal and installation of the inner seal of the right door is described below. The inner seal of the left door is removed and installed in a similar manner.


Remove the pillar trim. Remove the inner door seal "1" from the body opening flange "2".

The original can be viewed on [SKODABOOK]

Installation


Start installing the seal from the upper radius of the doorway "arrow b". The seal joint is in place - see arrow a-.
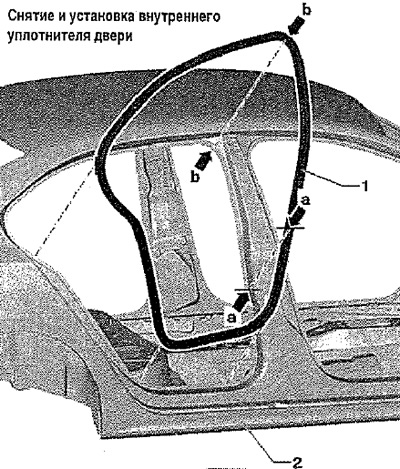
Start installing the seal from the upper radius…


Removal and installation the outer door seal


Note: Check clamps "2" for damage, replace if necessary.
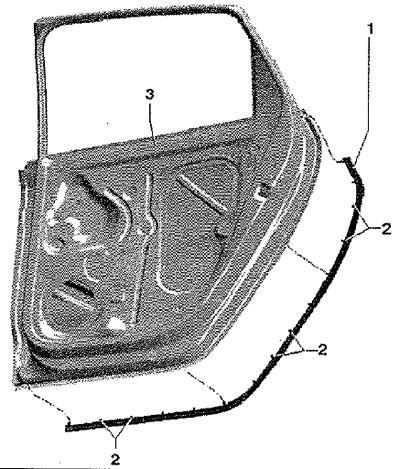

Note: Check clamps «2» for damage, replace if…


Disconnect clamps "2" and remove seal "1" from door "3".

Installation


Press the seal "1" to the door and snap the fasteners "2" into place.

Note: The seal must be in direct contact with the glass guide.
This article is available at russian, bulgarian, belarusian, ukrainian, serbian, croatian, romanian, polish, slovak, hungarian
Article verified: Anatoly Ovchinnikov
Share with friends:
◀ Previous
Skoda Octavia 3: Doors, locks and windows
Next ►

Removal and installation the inner seal of the rear door glass groove
Removal and installation fixed rear door window glass
Removal and installation the outer trim of the C-pillar
Removal and installation the rear door glass guide
Removal and installation the rear door window lifter and its handle
Windshield parts
Rear window parts and components
Side glass parts and units (Combi)
Mudguards — removal and installation
Read similar articles on other Skoda models

➧ Replacing the rear door seals Skoda Fabia 1 (1999-2007)
➧ Rear Door Interior — Exterior Skoda Rapid 1 (2012-2022)
➧ Adjusting the rear view mirrors Skoda Superb 2 (2008-2015)
➧ Adjusting the position of the rear door relative to the body Skoda Kodiaq 1 (2016-2024)
➧ Replacing crankshaft seals, removing and installing flywheel and… Skoda Yeti (2009-2017)
➧ View of the rear part of the bottom Skoda Favorit (1987-1994)
Link to this article in various formats
Reviews and comments of visitors
No comments yet


Add two numbers: 26 + 39


Octavia 3 (2013-2019) 
  • General information
  • User manual
  • Car driving
  • Maintenance
  • Petrol engines 1.2 l
  • Engine repair
  • Cooling system
  • Supply system
  • Petrol engines 1.4 l
  • Engine repair
  • Supply system
  • Petrol engines 1.8/2.0 l
  • Engine repair
  • Cooling system
  • Supply system
  • Diesel engines 1.6/2.0 l
  • Engine repair
  • Cooling system
  • Supply system
  • Transmission
  • Mechanical gearbox 02S
  • Automatic gearbox 0CW
  • Automatic gearbox 0D9
  • Chassis (running gear)
  • Front suspension
  • Rear suspension
  • Brake system
  • Steering
  • Body and interior
  • Doors, locks and windows
  • Exterior (external elements)
  • Interior (internal elements)
  • Ventilation and air conditioning
  • Electrical equipment
  • Equipment and devices
  • Headlights and lighting
  • Wiring diagrams (basic)
  • Wiring diagrams (comfort)
Octavia 1 (1996-2004) 
  • General information
  • Vehicle details
  • Maintenance
  • Power unit
  • Petrol engines 1.6 l AEE
  • Petrol engines 1.8 l AGN
  • Diesel engines 1.9 l AGR
  • Fuel system
  • Exhaust system
  • Cooling system
  • Transmission
  • Clutch
  • Car gearbox
  • Gearbox repair 02J
  • Gearbox repair 02K
  • Chassis (running gear)
  • Wheels and tires
  • Suspension and axles
  • Brake system
  • Body and interior
  • Exterior (external elements)
  • Interior (internal elements)
  • Doors, locks and windows
  • Electrical equipment
  • Equipment and devices
  • Electrical circuits
SkodaBook.ru © 2018–2026 | Mobile version | Articles on Skoda | Sitemap EN BG BY UA RS HR RO PL SK HU | Feedback | Site search | Bookmark
Fabia 1 (1999-2007) | Fabia 2 (2007-2014) | Rapid 1 (2012-2022) | Octavia 1 (1996-2004) | Octavia 3 (2013-2019) | Superb 2 (2008-2015) | Kodiaq 1 (2016-2024) | Yeti (2009-2017) | Favorit (1987-1994) | Felicia (1994-2001) |
By continuing to use the site, you agree to the use of cookies.