



Attention: Observe the rules of conduct at the gas station. First, turn off the engine and ignition, turn off the auxiliary heater and do not smoke when removing the fuel filler cap.
Caution: If the wrong type of fuel is added to the tank, do not attempt to start the engine, as this may result in engine damage. The fuel supply system must be checked immediately by a qualified technician.
The fuel filler cap is located behind the rear right door. The hatch cover is locked and unlocked together with a single lock (see Section 1). Some models have a separate lock in the lid that can be opened and locked with a metal key. To open the unlocked lid, press on its rear edge (1 in illustration 4.1), and then pull it.
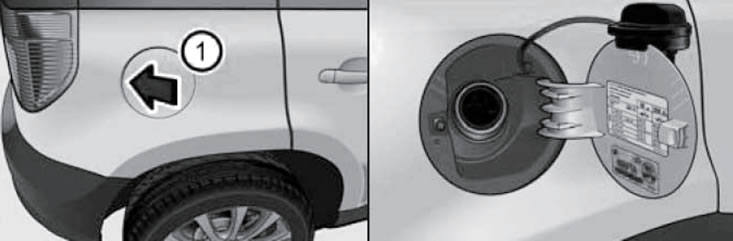
4.1. Fixing the plug
Unscrew the filler cap and install it on the hatch cover (right side of illustration 4.1). On the inside of the filler cap there is a sticker indicating the type of fuel to be filled. The fuel type and fuel tank capacity are also indicated in Specifications for Chapter 1.
Material published on the website: SKODABOOK
Insert the filling nozzle into the filler neck of the tank so that it constantly rests against the body of the car and begin filling. On early model years, please keep an eye on this. so that the filling nozzle does not press on the air valve in the neck, otherwise you may accidentally fill the expansion space with fuel. Stop refueling as soon as the fuel nozzle switches off for the first time, otherwise the fuel may fill the expansion space of the tank and spill out. Before removing the fuel nozzle, it is recommended to wait at least 10 seconds to allow any remaining fuel to drain into the fuel tank. To remove the gun from the tank, lift the gun slightly.
If necessary, use a funnel to add fuel from the canister to the tank.
Tighten the filler cap until it clicks, then close the filler cap and press it down. Any fuel that gets on the body and wheels should be wiped off and washed off immediately.