



Contents: Seats and headrests - general…⬇ Adjustment and heating of front seats ⬇ Memory for driver's seat and outside…⬇ Armrests ⬇ Rear seats ⬇ Steering column ⬇ Rear view mirrors ⬇
Note: Do not adjust the seats or steering column while the vehicle is moving. After adjusting the seat, you should rock it slightly to make sure it is securely fixed.
Seats and headrests - general information
The design of the car seats guarantees maximum comfort for the person sitting in them, while simultaneously providing conditions for the most effective functioning of the seat belts and airbags. The choice of seat position also affects the safety of the person sitting in it. For example, if the front seat is moved too far forward, the risk of injury to the occupant when the airbag deploys increases, as does the risk of being thrown through the windshield in a frontal collision. Increasing the angle of the seat back will worsen the fixation of the body by the seat belt - the more the seat back is tilted back, the higher the probability of the occupant's body slipping under the lap section of the belt in the event of a strong frontal impact, and the more severe the injuries may be.
Secure the front seat in a position that is as far away from the steering wheel/dashboard as possible while still allowing comfortable control of the vehicle. The recommended distance from the chest to the airbag pad is at least 25 cm. Bring the backrest to a position close to vertical; the slope should not be more than 30°.
Raised front edges of seat cushions prevent the occupant from slipping out from under the belt in a frontal collision.
Head restraints prevent injury to the cervical spine and head in the event of a rear impact.
The headrest should be adjusted in height so that its top point is level with the top edge of the occupant's head. The top point should not be below the eye level of the person sitting.
To raise the headrest, simply pull it up. To lower the headrest, press the lock (2 in illustration 9.1) and press the headrest into the backrest.
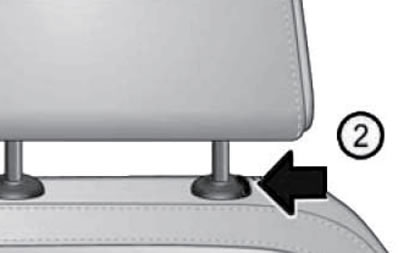
9.1. Headrest release button
To remove the headrest, first lift it to its maximum height, then press the lock (2 in illustration 9.1) and pull the headrest out of the backrest. To install the headrest, press it into the backrest until it clicks into place.
Adjustment and heating of front seats
Note: After changing the position of the seat, push it in the appropriate direction to ensure that it is securely locked.
The front seats are equipped with a manual adjustment mechanism as standard (see illustration 9.2a). Some models are partially or fully equipped with electric seat adjustment (see illustration 9.2). The electric seat adjustment works both with the ignition on and off. If the battery charge is low, the electric adjustment drive may not work.
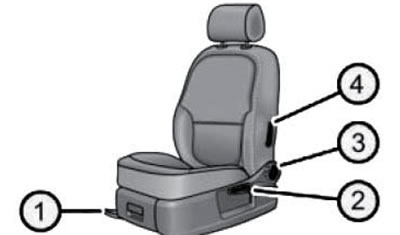
9.2a. Driver's seat manual adjustment controls 1. Lever for releasing the seat adjustment lock in the forward-backward direction (pull up); 2. Seat height adjustment lever (pull up or down a few times); 3. Rotary handle for adjusting the backrest tilt (when adjusting, do not lean on the backrest); 4. Lumbar support adjustment handle (if available)
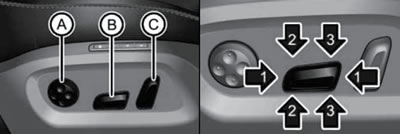
9.2b. Driver's seat adjustment controls with electric drive A. Adjusting the projection (front and back recesses) and heights (upper and lower recesses) lumbar support (if available); B. Seat height adjustment (move the whole switch up/down); B1. Moving the seat forward and backward; B2/B3. Adjusting the height of the front/rear edge of the seat; C. Backrest tilt adjustment
Note: If the seat accidentally stops moving while adjusting the electric seat position, press the switch again in the appropriate direction and perform the full travel of the adjustment.
To ensure the comfort of the driver and front passenger, some trim levels include a heated seat for each front seat. The front seat heating is controlled using the buttons (8 and 13 in Illustration 12.1) in the climate control panel: the left one is for the left seat, and the right one is for the right seat. The front seat heating has three intensity levels and only works when the ignition is on. On models from 11.2010, if the seat heating is set to maximum power, it automatically decreases to power 2 after 10 minutes. To avoid discharging the battery, it is recommended to turn on the heating with the engine running. If the voltage in the vehicle's electrical system drops, the seat heating is automatically switched off to ensure sufficient electrical power to operate the engine. The degree of heating power can be judged by the number of indicators lit in the regulator. To save fuel, the heating should be turned off when not needed.
Caution: Heated seats should not be used by people with a low threshold for pain or heat.
Note: To avoid damaging the heating elements, do not kneel on the seats or apply other point loads to them, and do not allow the seats to get wet. Do not turn on the heating when the air temperature in the passenger compartment exceeds 25°C.
Memory for driver's seat and outside mirrors
On models with electric seat adjustment, up to three seat/mirror positions can be stored in memory, and then recalled using the buttons on the driver's seat or used automatically when the car is unlocked with a specific key.
To memorize the current position of the driver's seat and outside mirrors, with the ignition on, press the "SET" button (And in illustration 9.3), and then within 10 seconds press the key of the corresponding memory cell (B) - successful entry into memory will be confirmed by a sound signal. If the selected memory cell is already occupied, it is replaced with the new settings.
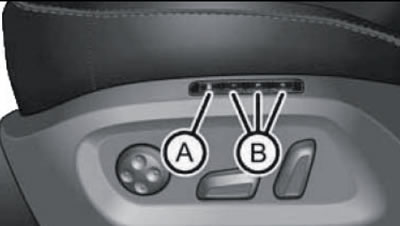
9.3. "SET" key (A) and memory cell keys (B)
Note: For safety reasons, it is not possible to store a position in memory when the angle between the seat cushion and the seat back is more than 102°.
You can also memorize the position of the right outside rearview mirror, which will be automatically selected when reverse gear is engaged if the mirror control is in the "R" position (see relevant subsection below). To do this, turn on the ignition, set the outside mirror adjuster to the "R" position, engage reverse gear, adjust the right mirror and disengage the gear. The reverse mirror position should be memorized each time a new seat/mirror setting is made. The right mirror, automatically set to the reverse position, returns to its normal position when reverse gear is disengaged or when the speed exceeds 15 km/h.
To apply the stored seat/mirror positions, briefly press the corresponding button (In Illustration 9.3) at a speed of no more than 5 km/h. To interrupt the movement of the seat/mirrors, press any button on the seat. To gradually move the seat/mirrors to the desired position, hold down the corresponding button (B).
To assign the settings specified for the current memory cell to the remote control, remove the key from the ignition within 10 seconds after saving the settings and press the unlock button on the remote control. A sound signal indicates that the settings have been successfully assigned to this remote control. If a memory cell was previously assigned to the remote control, it is replaced by the newly assigned cell. Also, if you assign a memory cell to a remote control that is already assigned to another remote control, the new assignment replaces the previous one.
To set the seat and mirrors to a desired position using the remote control, unlock the car with the remote control and open the driver's door.
Armrests
Note: It is not permitted to carry passengers on the central armrests.
The armrests are molded into the interior door trim. Additionally, there are central front (with appropriate equipment) and rear armrests.
To raise the front center armrest, pull it up in the direction of the arrow (1 in illustration 9.4a). - in this case, the armrest will sequentially pass through several fixed positions. The central front armrest can only be lowered from the uppermost position. The central front armrest can be moved forward: from the extreme forward position, the armrest can be moved back to the required distance.
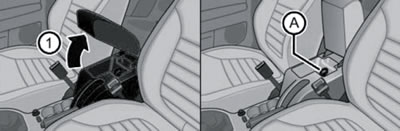
9.4a. Central front armrest
There is a storage compartment under the cover of the central front armrest. On models with a refrigeration unit, this storage compartment is equipped with a shut-off air inlet (A) from the air conditioning system. If this hole is open (the lock is pulled up), the storage compartment is supplied with conditioned air. The maximum amount of air is supplied when the chest air supply mode is selected. Do not open the air supply to the storage compartment unless necessary. In some trim levels, an AUX-IN connector may be installed in the glove compartment (see Section 15).
The central rear armrest is formed by folding down the backrest of the central rear seat (see illustration 9.4b). There is a cup holder in the armrest. If the center rear seatback is left reclined for a long period of time, make sure that no seat belt buckles remain underneath it (to prevent the back padding from deforming). When the armrest is lowered, a hatch is created for transporting long loads, such as skis (see Section 12).
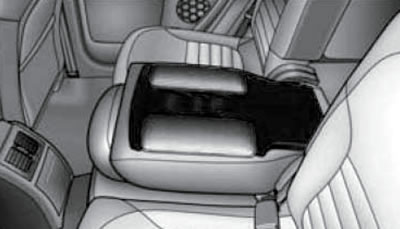
9.4b. Rear center armrest
Rear seats
The 3-seater rear seat is divided into three parts. Each part can be adjusted separately.
To increase the volume of the luggage compartment, the rear seats can be moved forward and backward (only the outermost places), recline their backs, recline the seats forward, or remove them altogether.
To increase space for rear passengers (in the transverse direction) remove the center rear seat, fold down the outer seats and push them towards each other (to the center of the car), and then unfold it into its original position. A description of how to fold back the seat, fold back the seat and remove the seat is given in Section 19 Chapter 11. The reclined seats should be secured using the pins of the front seat headrests. When installing, the outer rear seats can be identified by the markings on them: "R" - right, "L" - left.
To move the outer seats forward, pull the lever (And in illustration 9.5a) in the direction of the arrow (1) or pull the loop from the luggage compartment in the direction of the arrow (2), and then slide the seat in the direction of the arrow (3).
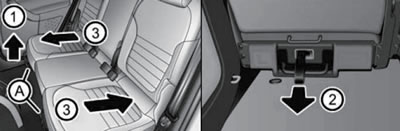
9.5a. Longitudinal adjustment of the outer rear seats
To change the angle of the rear seat backs, pull the handle up (lower arrows in illustration 9.5b).
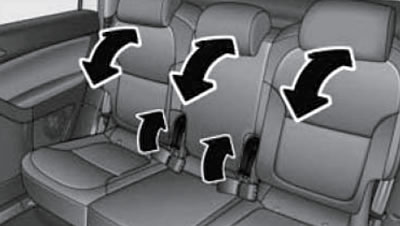
9.5b. Adjusting the angle of the rear seat backrests
Steering column
The steering column is adjustable for reach and height.
The steering column should be adjusted so that the steering wheel is located opposite the driver's chest at a distance of at least. The position in which the steering wheel is opposite the driver's face is incorrect, as it reduces the protective functions of the driver's front airbag. The driver's arms were slightly bent when correctly positioned on the steering wheel.
Caution: Do not adjust the steering column while driving, as this may result in loss of control of the vehicle. Do not hold the steering wheel by the top point or by the spokes, otherwise you may injure your hands and head if the airbag deploys.
To change the reach and angle of the steering column, first release the lock by pulling down the lock release lever (22 in illustration 12.1). Set the steering column to the required position and return the lever to its original position. After adjustment, check the reliability of the steering column fixation by trying to move it up/down and away from/towards you.
Rear view mirrors
Note: In auto-dimming rearview mirrors (in electrochromic mirrors) contains liquid electrolyte, which, if the mirror is damaged, may leak and cause irritation to the skin, eyes and respiratory system. This applies primarily to people suffering from asthma or other similar diseases. In this case, it is necessary to provide intensive ventilation with fresh air. If electrolyte gets on your skin, in your eyes or inhalation system, on your clothes or shoes, rinse it with plenty of water (mouth - rinse). If electrolyte gets on plastic trim parts, remove it as soon as possible with a damp sponge or cloth.
Please note: The exterior rear-view mirrors are curved, which increases the field of view, but objects reflected in the curved parts of the mirrors appear further away than they actually are. These mirrors are intended for assessing the traffic situation and should not be used to determine the distance to an object.
The interior rearview mirror can be turned manually. To reduce the brightness of the reflected light from the headlights of a vehicle moving behind you at night, move the interior mirror dimming control towards you (see illustration 9.6a). When equipped with an interior rearview mirror with an automatic dimming function, this function can be turned on or off using a switch (2 in illustration 9.6b), - the mirror will automatically darken when bright light hits the sensor (3), and the indicator (1) will light up. This function is automatically switched off when the interior lighting or reverse gear is turned on.
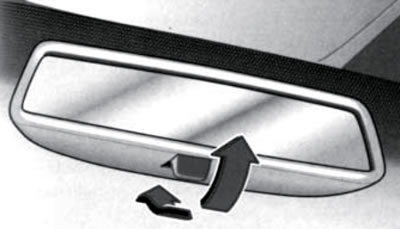
9.6a. Dimming control for a regular interior rearview mirror
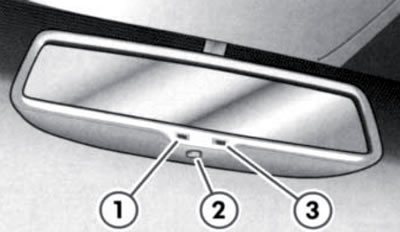
9.6b. Auto-dimming interior rearview mirror
Note: When the automatic dimming of the interior mirror is turned off, the dimming of the left outside mirror is also turned off. Do not cover the sensor to avoid damaging the automatic dimming function. Do not install an external navigation system or video recorder display on the windshield next to the electrochromic mirror, as the glow of this display may cause inadequate operation of the mirror electronics.
The exterior rear-view mirrors have a heating function and electric adjustment. The automatic dimming of the left mirror is switched on and off together with the automatic dimming of the interior mirror (see paragraph above). For driving in tight spaces, the outside mirrors can be folded or unfolded manually. To control the electric drive, a handle is installed in the driver's door (see illustration 9.7). In position "0" no adjustment is made, the mirror heating is turned off. When turning the handle to the "R" or "L" position, it becomes possible to adjust the right or left mirror, respectively. To adjust, tilt the regulator in the appropriate directions (up/down and left/right). If the electric drive is faulty, the mirror can be adjusted by simply gently pressing on the edges of the reflective element.
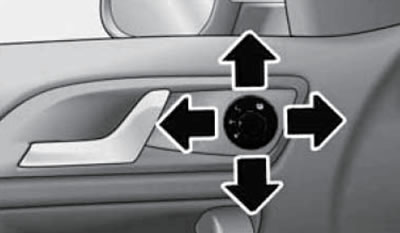
9.7. Control handle for heating and electric adjustment of outside mirrors
Using the menu "Settings→Comfort→Mirror settings" of the instrument cluster display, you can select the algorithm for adjusting the outside mirrors. To adjust the mirrors individually, select "Individually". If "Synchronized" is selected, when adjusting the left mirror, the right mirror will move along with it; if necessary, then adjust the right mirror by moving the switch to the "R" position.
The rear parking assist function can be switched on or off via the menu "Settings→Comfort→Mirror tilt" on models with electric driver's seat adjustment (to see the curbstone in the right mirror). If this function is enabled and the mirror control is turned to the position (R in Illustration 9.7), then when selecting reverse gear with the ignition on, the right mirror is automatically set to a preset position. After disengaging reverse gear, or after accelerating to 15 km/h, the mirror will return to its normal position. A description of how to set the position to which the right mirror will move when reverse gear is engaged is provided in the subsection "Driver's seat and outside mirror position memory" above.
When the switch is turned to the position
 the outside mirror heating is turned on.
Note: Heating is only switched on when the engine is running and the outside air temperature is no more than 20°C. To save fuel, do not switch on the mirror heating when it is not necessary.