
Company vehicles Hyundai Company vehicles Kia Company vehicles Lada Company vehicles Mazda Company vehicles Mercedes-Benz Company vehicles Opel Company vehicles Mitsubishi
English Русский
Български
Беларускі
Український
Српски
Hrvatski
Română
Polski
Slovenský
Magyar
Articles   
Bookmark Contacts Sitemap
SkodaBook.ru


Fabia Rapid Octavia Superb Kodiaq Yeti Others
Yeti (2009-2017)

6-speed DSG fluid and filter replacement (Skoda Yeti 5L)

  • Main
  • Yeti
  • 5L (2009-2017)
  • General information
  • Maintenance
  • 6-speed DSG fluid and filter replacement
0
1. Set the selector lever to position "P", turn off the engine.

2. Connect the diagnostic tool to the diagnostic connector (see Chapter 5) and use it to make sure that the DSG fluid temperature is no more than 35°C. If necessary, allow the fluid to cool down. Sections 3-8 describe filter replacement, and sections 9-14 describe oil replacement.

3. Remove the top engine cover (see Chapter 2).

4. Disconnect the connector (2 in the illustration) mAF sensor, disconnect the vent hose (1) and air duct (5). Loosen the spring clamp (3) and remove the hose from the tube. Remove the screws (4) and remove the air cleaner.
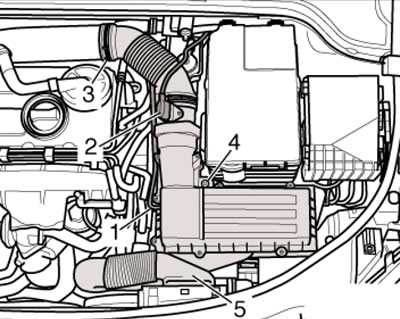
21.4. Providing access to the DSG filter

21.4. Providing access to the DSG filter


5. Raise the vehicle and remove the sound insulation panels under the engine. Place a container under the transmission to collect the DSG fluid and lower the vehicle.

6. Unscrew the lid (1 in the illustration), tilt the filter (3) slightly to allow the oil to drain out and remove it. Install a new sealing ring (2), after lubricating it with DSG fluid.
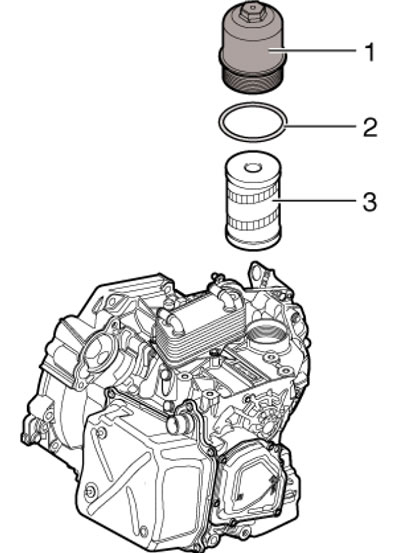
21.6. DSG Filter Installation Details

21.6. DSG Filter Installation Details


7. Wet the sealing ring in the receiving sleeve (see illustration), install the filter and tighten its cover to 20 Nm.
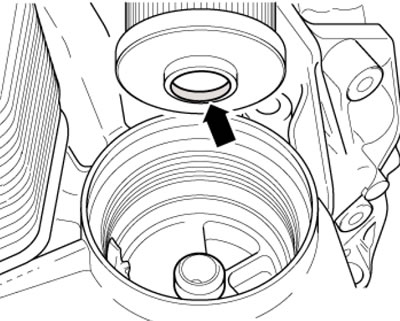
21.7. DSG filter seal

21.7. DSG filter seal


8. Reinstall the removed parts.

9. Jack up the car and place it on reliable supports so that the car is horizontal.

10. If present, remove the protective plate (1 in the illustration) from below the DSG by unscrewing the bolts (arrows). Put on safety glasses and gloves.
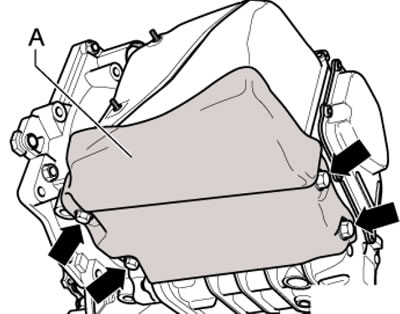
21.10. DSG housing

21.10. DSG housing


11. Unscrew the filler plug (In the illustration) next to the swing support. Behind it is a plastic overflow tube with an 8 mm hexagon. The length of this tube determines the DSG fluid level. Unscrew the overflow tube - about 5 liters of DSG fluid will flow out. Screw in the overflow tube with a force of 3 Nm.
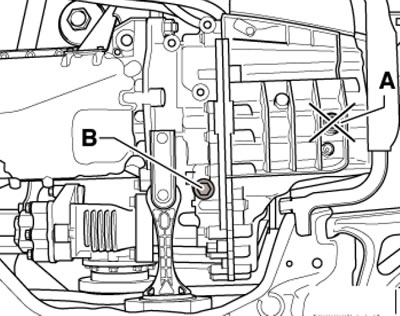


21.11. Plug (B) of the inspection filler hole

21.11. Plug (B) of the inspection filler hole


Material published on the website: SkodaBook

12. Screw the adapter into the DSG inspection hole (And in the illustration) filling device VAS6262 or VAS6262A. Connect a container with DSG fluid to the filling device and fill the DSG with 5.5 litres of fluid.
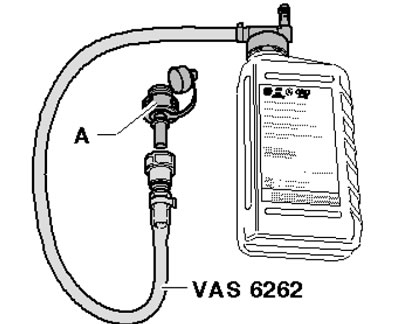
21.12. Adapter (A) of the filling device

21.12. Adapter (A) of the filling device


Note: Do not refill with drained fluid. Shake the container with liquid before filling. If it is necessary to change the container, close its valve while disconnecting the container from the filling device.


13. Read the temperature using a diagnostic tool. Start the engine, press the brake pedal and move the selector lever through all positions, waiting in each of them for about 3 seconds. Finally, return the lever to the "P" position. Do not turn off the engine, monitor the temperature of the DSG fluid. When the temperature reaches 35 to 45°C, disconnect the adapter and let the excess fluid drain.

14. When the DSG fluid level is correct and at the above temperature, a small amount of fluid will flow out of the overflow tube every 30 seconds. This is due to the pulsation of the fluid level that cools the clutch. There is no need to compensate for the volume of dripping liquid. Tighten the check bolt with a new seal to 45 Nm and turn off the engine.
This article is available at russian, bulgarian, belarusian, ukrainian, serbian, croatian, romanian, polish, slovak, hungarian
Article verified: Timur Komissarov
Share with friends:
◀ Previous
Skoda Yeti: Maintenance
Next ►

Conducting a road check
Top hatch maintenance
Checking the condition of drive belts
Checking and caring for your battery
Replacing the air cleaner filter element
Haldex Clutch Fluid Replacement
Replacing the fuel filter of diesel models
Read similar articles on other Skoda models

➧ Diesel engine oil filter Skoda Fabia 1 (1999-2007)
➧ Checking and filling with ATF fluid (6-speed gearbox) Skoda Rapid 1 (2012-2022)
➧ Changing the oil filter Skoda Octavia 1 (1996-2004)
➧ 6-speed DSG fluid and filter replacement Skoda Superb 2 (2008-2015)
➧ Brake fluid Skoda Kodiaq 1 (2016-2024)
➧ Layout of components in the engine compartment (air filter removed) Skoda Favorit (1987-1994)
Link to this article in various formats
Reviews and comments of visitors
No comments yet


Add two numbers: 48 + 10


Yeti (2009-2017) 
  • General information
  • Introduction to manual
  • Controls and instruments
  • Maintenance
  • Power unit
  • Petrol engine 1.2 l
  • Petrol engine 1.4 l
  • Petrol engine 1.8 l
  • Diesel engine 2.0 l
  • Cooling system
  • Power and control system
  • Exhaust system
  • Ignition and preheating systems
  • Starting and charging system
  • Transmission
  • Clutch
  • Manual gearbox
  • 7-speed gearbox DSG «0AM»
  • 6-speed gearbox DSG «02E»
  • Drive shafts
  • Chassis (running gear)
  • Brake system
  • Front suspension
  • Rear suspension
  • Steering
  • Body and interior
  • Heating and air conditioning
  • Exterior (external elements)
  • Interior (internal elements)
  • Electrical equipment
  • Equipment and devices
  • Lighting and signaling
  • Electrical diagrams
SkodaBook.ru © 2018–2026 | Mobile version | Articles on Skoda | Sitemap EN BG BY UA RS HR RO PL SK HU | Feedback | Site search | Bookmark
Fabia 1 (1999-2007) | Fabia 2 (2007-2014) | Rapid 1 (2012-2022) | Octavia 1 (1996-2004) | Octavia 3 (2013-2019) | Superb 2 (2008-2015) | Kodiaq 1 (2016-2024) | Yeti (2009-2017) | Favorit (1987-1994) | Felicia (1994-2001) |
By continuing to use the site, you agree to the use of cookies.