



Removal and installation the clutch
Note: The pressure and driven clutch discs are replaced only in pairs.
1. Remove the manual transmission (see Section 5).
2. In several steps, unscrew the pressure plate mounting bolts in a diagonal order and remove the clutch basket assembly. To prevent the flywheel from turning, use the device MP1-223 or No. 3067 (see illustration 8.10).
3. On models with a "Sachs" clutch, after unscrewing the bolts, the stopper (2 in the illustration) with finger (1) should loosen. If this does not happen, press the finger towards the flywheel.
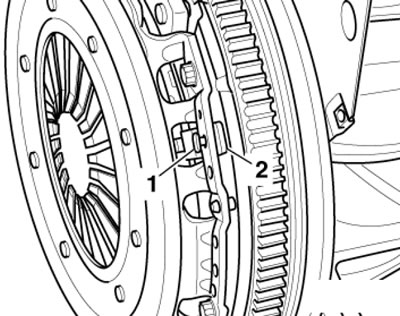
8.3. Pin (1) and stopper (2)
4. Remove the clutch basket.
5. The slave disk is installed with the inscription "Getriebeseite" or "side of gearbox" and the protruding spring cage towards the gearbox side.
6. Check the condition of the diaphragm spring petals. Wear of their edges up to half the thickness is allowed. Make sure there are no cracks in the diaphragm spring petals between the pressure plate and the cover. Make sure the rivets have not loosened. If a new LuK pressure plate is installed, check the position of its adjustment mechanism as described in the subsection below.
7. The driven disk linings must be free of grooves or oil/grease marks. The corresponding flywheel surface must also be free of oil or grease marks.
8. Clean the splines of the manual transmission input shaft and the driven disk hub if an old driven disk is used. Remove any corrosion and apply a very thin coat of G 000 100 grease to the input shaft splines. Then move the clutch disc back and forth on the input shaft until the hub moves freely on the shaft. Remove excess grease.
(Text taken from this website: SkodaBook.ru)
9. The pressure plates are supplied with corrosion protection and lubrication, so to prevent their service life from being reduced, only their contact surface should be cleaned.
10. Place the pressure plate on the centering pins and center it using a suitable drift (see illustration):
- on models with manual transmission "02Q" - T10097;
- on models with manual transmission "OAJ" - T10086;
- on models with manual transmission "0A4" - MRZ-475A.
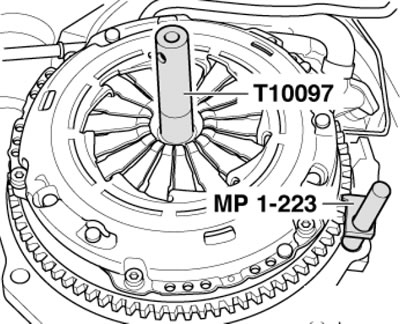
8.10. Clutch centering (bushing T10372 is used)
11. On a Sachs clutch, make sure the locking pin (position sensor) can be moved freely (see illustration).
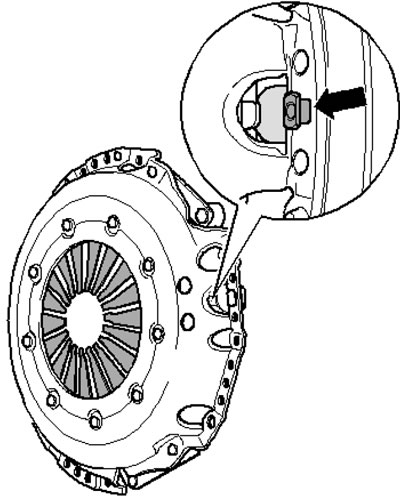
8.11. Locking pin
12. Install the pressure plate onto the centering pins. Make sure that the contact surface of the pressure plate and the driven disk lining are in full contact with the flywheel - only then insert the clutch mounting bolts and tighten them by hand until they fit against the pressure plate. After that, on the Sachs clutch, the locking pin (see illustration 8.11) should lift off the pressure plate. Tighten the clutch mounting bolts evenly and in several steps in a diagonal pattern to the required torque. Be careful not to disturb the clutch centering. To prevent the flywheel from turning, use tool #3067 or MP1-223.
Checking the position of the adjusting mechanism of the pressure plate of the company "LuK"
13. Both edges (And in the illustration) the adjustment rings must be located between the two marks (B).
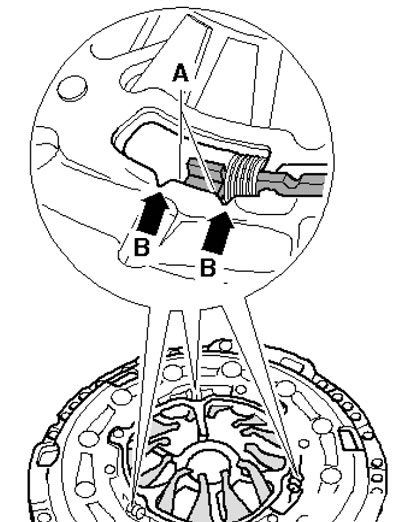
8.13. Checking the position of the adjustment mechanism
14. If the adjusting ring occupies a different position in the new pressure plate, it is not allowed to install the pressure and driven plates.
15. On a used clutch, the adjusting ring may be positioned outside the marks.