
Company vehicles Hyundai Company vehicles Kia Company vehicles Lada Company vehicles Mazda Company vehicles Mercedes-Benz Company vehicles Opel Company vehicles Mitsubishi
English Русский
Български
Беларускі
Український
Српски
Hrvatski
Română
Polski
Slovenský
Magyar
Articles   
Bookmark Contacts Sitemap
SkodaBook.ru


Fabia Rapid Octavia Superb Kodiaq Yeti Others
Rapid 1 (2012-2022)

Removal and installation the rear window (Spaceback) (Skoda Rapid NH1)

  • Main
  • Rapid
  • NH1 (2012-2022)
  • Body and interior
  • Doors, locks and windows
  • Removal and installation the rear window (Spaceback)
0
Contents: Removal damaged glass ⬇ Removal an undamaged rear window ⬇ Installing the rear window ⬇
Attention: Before starting any work related to the removal and installation of the rear window, it is necessary to put on protective gloves and safety glasses.


Removal damaged glass


1. Cover the car interior trim panels with a protective coating to protect them from rear window fragments.

2. Remove the upper part of the luggage compartment door trim panel (more details, see the relevant section in this chapter).

3. Remove any remaining broken glass from the body opening, right down to the glue.

4. Seal the open parts of the body panels near the opening for the glass with special adhesive tape.

5. Disconnect the wiring harness connector from the rear window heating element (if the car is equipped).

6. Remove the rear window wiper arm.

7. Cut off the remaining adhesive bond from the body opening for installing the rear window using a special electric or pneumatic knife. The adhesive material must be cut to a thickness of 1 mm.

Removal an undamaged rear window


1. Remove the upper part of the tailgate trim panel (for more details, see the relevant section in this chapter).

2. Disconnect the rear window heater wiring harness connector (if the car is equipped).

3. Remove the rear window wiper arm (for more details, see the relevant section in the chapter Electrical equipment and electrical systems).

4. Using adhesive tape, seal all metal body panels near the opening for installing the rear window to prevent damage to the paintwork of the body.


5. Using a special cord pulled through the glue joint and connected to both sides of the handles. Then cut the glue joint as shown in the picture below.
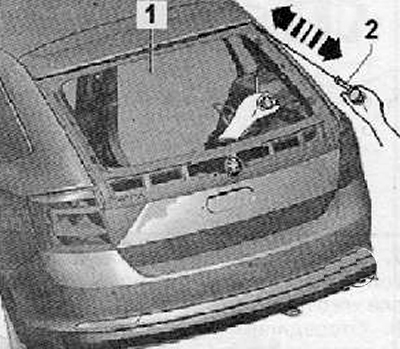
5. Using a special cord pulled through the glue…


6. Remove the rear glass assembly.

Installing the rear window


Prepare the body opening for installing the rear window.

Prepare the glass for installation on the body.

Data taken from an online portal: SkodaBook.ru

Glue a rubber buffer to the rear window.

Install the rear window and wait for the required time for the adhesive bond to dry before driving the vehicle.

Further installation is carried out in the reverse order of removal.
This article is available at russian, bulgarian, belarusian, ukrainian, serbian, croatian, romanian, polish, slovak, hungarian
Article verified: Anatoly Ovchinnikov
Share with friends:
◀ Previous
Skoda Rapid 1: Doors, locks and windows
Next ►

Rear window (Spaceback) — appearance
Removal and installation the rear window
Rear window — exterior view
Removal and installation the windshield
Windshield — appearance
Preparing glass for installation on a car
Preparing the body opening for glass installation
Read similar articles on other Skoda models

➧ Rear window heating Skoda Fabia 1 (1999-2007)
➧ Rear window wiper and washer Skoda Octavia 1 (1996-2004)
➧ Removal and installation the rear window wiper motor and lever Skoda Superb 2 (2008-2015)
➧ Rear window wiper motor Skoda Kodiaq 1 (2016-2024)
➧ Removal and installation the rear window wiper motor and lever Skoda Yeti (2009-2017)
➧ Checking the windshield and rear window wiper/washer system Skoda Favorit (1987-1994)
Link to this article in various formats
Reviews and comments of visitors
No comments yet


Add two numbers: 39 + 45


Rapid 1 (2012-2022) 
  • General information
  • Faults en route
  • User manual
  • Maintenance and care
  • Power unit
  • Petrol engines
  • Diesel engines
  • Power and control system
  • Lubrication system
  • Cooling system
  • Intake and exhaust system
  • Transmission
  • Clutch
  • Mechanical gearbox
  • Automatic gearbox
  • Drive shafts
  • Chassis (running gear)
  • Front suspension
  • Rear suspension
  • Brake system
  • Steering
  • Body and interior
  • Exterior (external elements)
  • Interior (internal elements)
  • Doors, locks and windows
  • Heating and air conditioning
  • Security systems
  • Electrical equipment
  • Equipment and devices
  • Power devices
  • Electrical circuits
  • Electrical circuits (petrol)
  • Electrical circuits (diesel)
SkodaBook.ru © 2018–2026 | Mobile version | Articles on Skoda | Sitemap EN BG BY UA RS HR RO PL SK HU | Feedback | Site search | Bookmark
Fabia 1 (1999-2007) | Fabia 2 (2007-2014) | Rapid 1 (2012-2022) | Octavia 1 (1996-2004) | Octavia 3 (2013-2019) | Superb 2 (2008-2015) | Kodiaq 1 (2016-2024) | Yeti (2009-2017) | Favorit (1987-1994) | Felicia (1994-2001) |
By continuing to use the site, you agree to the use of cookies.