
Removing
1. Remove the A-pillar trim panel (at both sides) (more. see relevant section in this chapter).
2. Remove both sun visors.
3. Remove the interior rear-view mirror.
4. Detach and lower the roof lining panel just enough to allow sufficient access to remove the windshield adhesive.
5. Remove the cover of the air intake of the ventilation and air conditioning system on the cross member of the body.
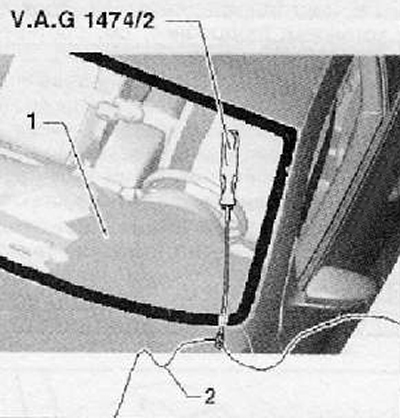
6. Lay a special protective coating on the dashboard (1), as shown in the figure below.
7. Pull the end of the special cord (2) through the sealing material of the windshield into the interior of the vehicle. as shown in the picture below.
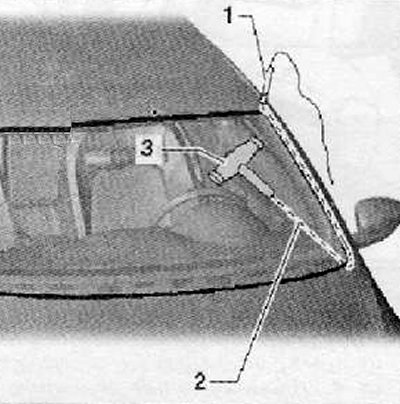
8. Fix one end of the cord on a special handle (3), as shown in the figure below.
9. Insert cord (2) with a tube (1) into the windshield frame as shown in the figure below.
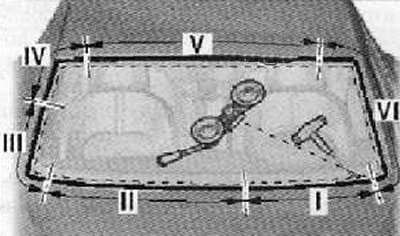
10. Lay the cord around the windshield.
11. Make sure the cord is pulled through the corners under the windshield.
12. Connect the second end of the cord to a special device - spooler - (VAG1654A), as shown in the figure below.
13. Set the spooler to position «I», shown in the figure below.
14. Move the spooler sequentially, as shown in the figure below, while cutting through the adhesive joint of the windshield.
15. When performing the operation of cutting the adhesive joint of the windshield, substitute plastic corners under the released sections of the windshield to create a gap between the glass and the dashboard.
16. Remove the windshield assembly from the body opening together with an assistant
Installation
Prepare the windshield for installation (for details, see the relevant section in this chapter).
Prepare a hole in the body for the windshield (for details, see the relevant section in this chapter).
Install windshield.
Observe the recommended time after installing the windshield before driving.