



Contents: Checking and adjusting the washer…⬇ Checking and adjusting the parking…⬇ Removal and installation windshield…⬇
Note: If the wash pattern is uneven due to dirty nozzles, remove them, rinse them in the opposite direction, and then blow them out with compressed air in the opposite direction. Do not use any objects to clean the injectors.
1. Over time, road film accumulates on windshield wiper blades, reducing their effectiveness, so the blades should be regularly washed in a mild cleaning solution or replaced.
2. Windscreen wiper assemblies with brushes should be inspected regularly. If inspection reveals hardening or cracks in the rubber of the wiper blades, replace them. If nothing unusual is found during inspection, wet the windshield and turn on the wipers for a short time. Uneven wiper blade marks or streaks on clean glass indicate that the wiper blades need to be replaced.
3. If the wipers do not clean the windshield well enough, this may be due to wax particles that got on the glass when the car passed through an automatic car wash. These particles can be removed by using a wax-dissolving detergent as an additive to the washer fluid (see Specifications). You can also use glass cleaning cloths G052 522 A1 according to VW specification to remove wax.
Checking and adjusting the washer fluid supply nozzles
4. Correctly installed fan-type nozzles supply washer fluid to the windshield and require virtually no adjustment. The jets should hit the glass in the shape of a cone. The fluid supply areas are shown in Illustration 7.4a. It may be necessary to adjust their height if there is a difference in the height of the washer fluid supply. To increase/decrease the height, turn the knob (2 in illustration 7.4b) with a screwdriver counterclockwise/clockwise.
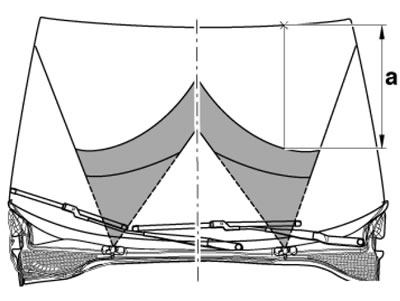
7.4a. Liquid supply areas from fan-type nozzles (a = 49±5 cm)
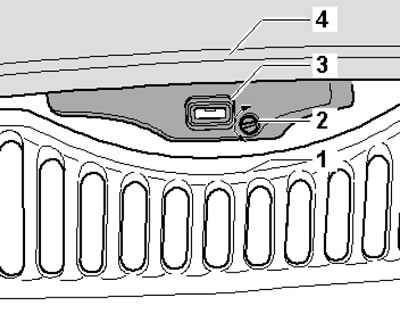
7.4b. Adjusting the fan-type nozzle 1. Windshield fairing; 2. Regulator; 3. Nozzle; 4. Hood
5. The jet from the fluid supply nozzle onto the rear window when the vehicle is stationary should hit the window at a distance (In the illustration) above the nozzle. Use a suitable needle for adjustment.
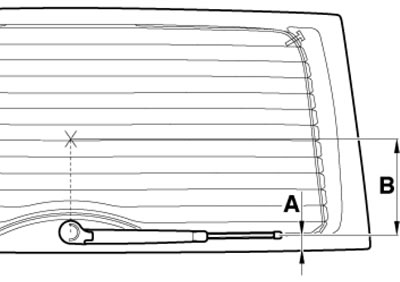
7.5. The area (B = 157 mm) of liquid jet impact from the rear nozzle and the distance (A = 35±2 mm) of lever installation
6. The washer fluid should be supplied to the headlights at the points (A and B in the illustration). If this is not the case, or the jets are uneven, replace the corresponding nozzle (see Chapter 12).
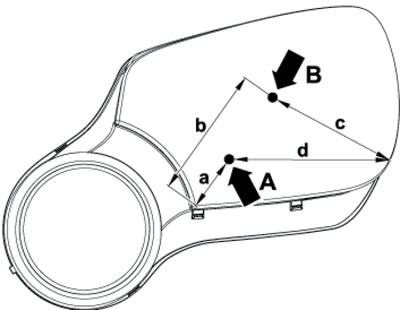
7.6. Points (A and B) where jets hit the left headlight a. 58 mm; b, p. 134 mm; d. 162 mm
Checking and adjusting the parking position of the windshield wiper arms
The original article is located on SKODABOOK.RU
7. After switching off, the windshield wiper arms should stop in the parking position. To extend the life of the windshield wipers, after every second time they are turned off, the levers are set to an alternative parking position (from the normal parking position the levers are slightly moved upwards). For the rear window wiper, this function can be switched off/on (see chapter "Controls and operating techniques"). The following check applies to the normal parking position. You can verify this position by observing the brushes when the windshield wipers are turned off several times in a row.
8. The parking position of the windshield wipers is set correctly if the brushes are on the corresponding marks on the glass with a tolerance of ±3 mm (see illustration). The rear window wiper parking position is set correctly if the wiper blades are at a distance (And in illustration 7.5) from the bottom edge of the glass.
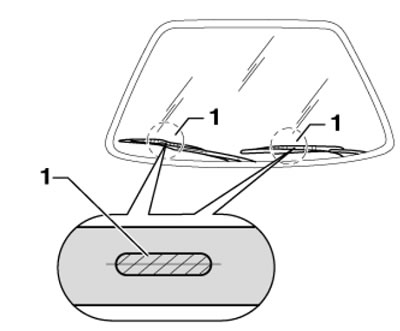
7.8. Parking position of windshield wiper blades
9. Adjustment of the parking position of the windshield wipers is carried out by moving their levers with their fastening nuts loosened (see Chapter 12). After adjustment, tighten the nuts to the specified torque Specifications effort.
Removal and installation windshield wipers
10. It is only possible to move the levers away from the windshield from the service position. To set the windshield wiper to this position, with the hood closed, turn the ignition on and off, then within 10 seconds move the right steering column stalk to the down position. The levers return from the service position to the park position the next time the ignition is turned on and the right steering column switch is moved again or the vehicle is moving at a speed of more than 6 km/h.
11. To remove the frameless windshield wiper blade, move its arm away from the glass, press the button (1 in the illustrations) and pull the brush in the direction of the arrow (2). To install the brush, insert it into the support in the opposite direction until it locks, so that the button appears in the slot. Installation is carried out in reverse order (see illustration 7.9b). A longer brush is installed on the driver's side.
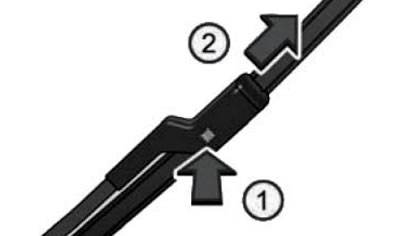
7.11a. Removing the frameless windshield wiper blade
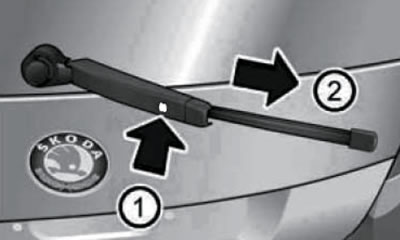
7.11b. Removing the frameless rear window wiper blade