



Contents: Signs of a problem with the brake…⬇ Brake lines and hoses ⬇ Checking the wear of brake pads and…⬇ Checking and adjusting the parking…⬇ Checking the brake booster ⬇
Caution: Dust from brake lining wear that accumulates on brake components may contain asbestos, which is hazardous to health. Do not blow out this dust with compressed air or inhale it! Do not use gasoline-based solvents to remove dust.
Note: In addition to checking at specified intervals, the condition of the brake mechanisms should be checked every time the wheels are removed or when signs of a malfunction in the brake system appear. Checking the brake fluid level is described in Section 4.
Signs of a problem with the brake system
1. Any of the following symptoms may indicate a potential defect in the brake system:
- when you press the brake pedal while driving, the car "pulls" to the side.
- the brakes make scraping or squealing sounds when braking.
- the brake pedal has excessive travel.
- the brake pedal pulsates (this is normal only when the ABS system is working).
- brake fluid leaks are observed (usually visible on the inside of a tire or wheel).
2. If you notice any of these signs, inspect the brake system immediately.
Brake lines and hoses
Note: The brake system uses mostly metal brake lines, with the exception of flexible reinforced hoses at the wheels. Regular inspection of all these lines is very important.
3. Park the car on a level surface.
4. Jack up the car and place it on stands, then remove the wheels. Checking the vacuum hoses is described in Section 5.
5. Check all brake lines and hoses for cracks or abrasions in their outer coating, as well as leaks, bulges and deformations. Check the brake hoses at the front and rear of the vehicle for signs of softening, cracking, deformation, or wear due to friction against other parts. Check all fittings for signs of leaks and ensure that all brake line fasteners are secure.
6. Bend the brake hose in both directions with your hands to identify any damage. Do not twist the hoses.
7. Turn the steering wheel right and left until it stops. Make sure that the front brake hoses do not touch any structural elements of the vehicle.
8. If damage to the brake lines or fluid leaks from them are detected, these faults must be corrected immediately. For a more detailed description of the brake system repair procedure, please refer to Chapter 9.
Checking the wear of brake pads and discs
9. Experience shows that due to the presence of dirt on the edge of the road, the wear of the brake pads on the right wheel is greater than on the left. Therefore, it makes sense to check the right wheels.
10. To measure the thickness of the disc brake pads without removing the wheel, turn the wheel so that the brake mechanism is visible through the gap between the spokes of the disc (see illustration): use a mirror to measure the thickness of the inner pad. If the design of the wheel rim does not allow measuring the pad thickness without removing the wheel, remove the wheel.
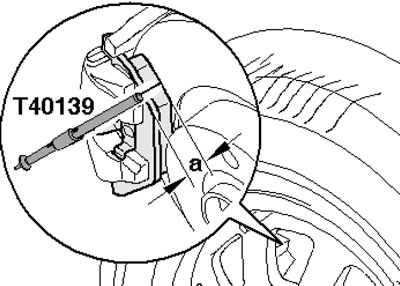
8.10. Thickness of the disc brake pad with the backing
11. Compare the measurement result with the requirements Specifications for Chapter 9 and if necessary, replace all the pads of both brake mechanisms of the wheels of this axle (see Chapter 9).
12. Taking advantage of the fact that the wheel has been removed, check the wheel cylinders of the brake mechanisms for brake fluid leaks. If leaks are detected, repair the wheel cylinders immediately.
13. Visually inspect the brake discs from the inside and outside for grooves, rust and cracks. Replace defective components.
14. Measure the thickness of the brake discs in several places using a micrometer or special calipers. You can also measure the thickness of the brake disc with a regular caliper, placing a lining of a known size on each side of the disc (for example, two coins), and then calculating the difference between the measured value and the thickness of the linings.
15. Compare the minimum of the results obtained with the requirements Specifications for Chapter 9. If the wear limit is reached, replace both brake discs. The brake disc should also be replaced if there are large cracks or deep grooves on the working surface.
Checking and adjusting the parking brake
16. The simplest way to check the operation of the parking brake is to park the car on a steep slope (25%) with the parking brake engaged and the transmission in neutral (you must be in the car during the check).
17. Adjustment of the parking brake is required only after replacing its cable, replacing the caliper or brake disc. The description of the adjustment is given in Chapter 9.
Checking the brake booster
18. With the engine off, press the brake pedal several times - with each press its travel should decrease.
19. With the brake pedal depressed, start the engine - the pedal should move down.
20. Keeping the brake pedal depressed, turn off the engine. If the pedal stroke does not change when you hold it down for 30 seconds, the vacuum booster is OK.
21. If any of the above checks fail, repair or replace the vacuum booster (see Chapter 9).