
Company vehicles Hyundai Company vehicles Kia Company vehicles Lada Company vehicles Mazda Company vehicles Mercedes-Benz Company vehicles Opel Company vehicles Mitsubishi
English Русский
Български
Беларускі
Український
Српски
Hrvatski
Română
Polski
Slovenský
Magyar
Articles   
Bookmark Contacts Sitemap
SkodaBook.ru


Fabia Rapid Octavia Superb Kodiaq Yeti Others
Yeti (2009-2017)

Removal and installation the timing chain and oil pump drive chain (Skoda Yeti 5L)

  • Main
  • Yeti
  • 5L (2009-2017)
  • Power unit
  • Petrol engine 1.2 l
  • Removal and installation the timing chain and oil pump drive chain
0
1. Front right wheel arch liner and sound insulation under the engine compartment (see Chapter 11).

2. Remove the drive belt (see Section 6).

3. Remove the upper timing belt cover (see section 7).

4. Follow the steps described in paragraphs 6-11 Section 9 and in paragraphs 12-14 Section 7.

5. Loosen the timing chain tensioner (see illustration 9.13) and mark the direction of movement of the timing chain with a felt-tip pen.

6. Holding the camshaft sprocket with tool T10172, remove the bolt (1 in illustration 9.14) its fastenings and remove the sprocket. Remove the timing chain downwards.

7. If necessary, after removing the timing chain, remove the oil pump drive chain as described in paragraphs 8-10. To install the timing chain, proceed to paragraph 11.

8. Remove the cover from the oil pump (1 in illustration 9.12) and mark the direction of movement of the oil pump drive chain with a felt-tip pen.

9. Remove the oil pump mounting bolts (see illustration) and remove it from the chain, and then remove the chain from the rear crankshaft sprocket.
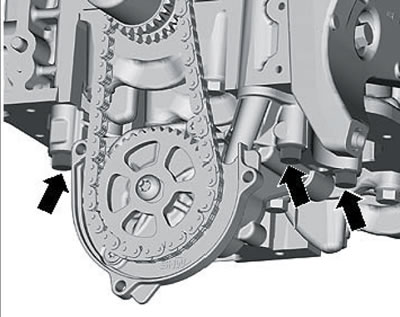
11.9. Oil pump mounting bolts

11.9. Oil pump mounting bolts


10. Installation of the oil pump drive chain is carried out in the reverse order. To secure the oil pump, use new bolts and tighten them in two stages: first with a force of 14 Nm, and then tighten to an angle of 90°.


11. Install the timing chain (1 in the illustration) onto the front sprocket (2) of the crankshaft from underneath and slide it up between the guide and tension bars. Secure the chain against falling, for example using a screwdriver (3).
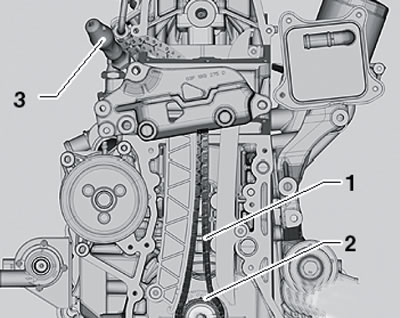
11.11. Fixing the timing chain from falling

11.11. Fixing the timing chain from falling


12. Perform the actions described in paragraphs 32-37 Section 9.

13. Install the lower timing chain cover (see Section 7).

14. Install the oil pump cover (see illustration 9.12) and the engine oil pan (see section 13).

15. Install the crankshaft pulley (see Section 8).

16. Install the accessory drive belt (see Section 6).

17. Install the upper timing belt cover (see Section 7).

18. Fill the engine cooling system (see Chapter 3).

19. Further installation is carried out in reverse order.
This article is available at russian, bulgarian, belarusian, ukrainian, serbian, croatian, romanian, polish, slovak, hungarian
Article verified: Timur Komissarov
Share with friends:
◀ Previous
Skoda Yeti: Petrol engine 1.2 l
Next ►

Checking and adjusting the timing phases (setting TDC)
Removal and installation the cylinder head, its cover and camshaft
Replacing crankshaft seals, removing and installing flywheel and…
Removal and installation timing belt covers
Removal and installation the accessory drive belt and auxiliary brackets
Work with the gas distribution mechanism
Removal and installation the oil pan, oil pump and oil cooler
Features of engine overhaul
Read similar articles on other Skoda models

➧ Replacing the camshaft drive chain Skoda Fabia 1 (1999-2007)
➧ Timing chain and oil pump drive — removal and installation (1.6 MPI… Skoda Rapid 1 (2012-2022)
➧ Timing chain casing parts and assemblies Skoda Octavia 3 (2013-2019)
➧ Removal and installation of camshafts, timing phase adjusters, timing… Skoda Superb 2 (2008-2015)
➧ Gas distribution mechanism drive chain cover Skoda Kodiaq 1 (2016-2024)
➧ Drive cover, chain and sprockets — removal, inspection and… Skoda Favorit (1987-1994)
Link to this article in various formats
Reviews and comments of visitors
No comments yet


Add two numbers: 11 + 37


Yeti (2009-2017) 
  • General information
  • Introduction to manual
  • Controls and instruments
  • Maintenance
  • Power unit
  • Petrol engine 1.2 l
  • Petrol engine 1.4 l
  • Petrol engine 1.8 l
  • Diesel engine 2.0 l
  • Cooling system
  • Power and control system
  • Exhaust system
  • Ignition and preheating systems
  • Starting and charging system
  • Transmission
  • Clutch
  • Manual gearbox
  • 7-speed gearbox DSG «0AM»
  • 6-speed gearbox DSG «02E»
  • Drive shafts
  • Chassis (running gear)
  • Brake system
  • Front suspension
  • Rear suspension
  • Steering
  • Body and interior
  • Heating and air conditioning
  • Exterior (external elements)
  • Interior (internal elements)
  • Electrical equipment
  • Equipment and devices
  • Lighting and signaling
  • Electrical diagrams
SkodaBook.ru © 2018–2026 | Mobile version | Articles on Skoda | Sitemap EN BG BY UA RS HR RO PL SK HU | Feedback | Site search | Bookmark
Fabia 1 (1999-2007) | Fabia 2 (2007-2014) | Rapid 1 (2012-2022) | Octavia 1 (1996-2004) | Octavia 3 (2013-2019) | Superb 2 (2008-2015) | Kodiaq 1 (2016-2024) | Yeti (2009-2017) | Favorit (1987-1994) | Felicia (1994-2001) |
By continuing to use the site, you agree to the use of cookies.