
Company vehicles Hyundai Company vehicles Kia Company vehicles Lada Company vehicles Mazda Company vehicles Mercedes-Benz Company vehicles Opel Company vehicles Mitsubishi
English Русский
Български
Беларускі
Український
Српски
Hrvatski
Română
Polski
Slovenský
Magyar
Articles   
Bookmark Contacts Sitemap
SkodaBook.ru


Fabia Rapid Octavia Superb Kodiaq Yeti Others
Octavia 1 (1996-2004) Octavia 3 (2013-2019)

Rear door adjustment (Skoda Octavia 5E)

  • Main
  • Octavia
  • 5E (2013-2019)
  • Body and interior
  • Doors, locks and windows
  • Rear door adjustment
0
Contents: Adjust the gaps ⬇ Adjusting the lock bracket ⬇ Adjustment by changing the position…⬇
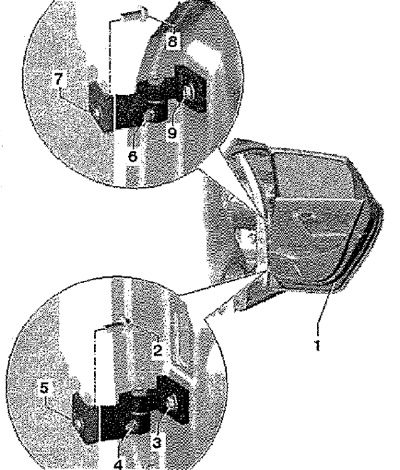
Note: To adjust the rear door, the car must be on its wheels. The rear door is adjusted correctly if the gap is the same around the entire perimeter when closed, the door is not recessed or protruding outward. Set the gaps around the perimeter of the front door. After installation or adjustment, apply anti-corrosion treatment to the hinges and screws.

Note: To adjust the rear door, the car must be on…


Adjust the gaps


To properly adjust the clearances, loosen screws -2, 5, 7, and 8- on pillar "A". To loosen screw "5", remove the lower trim of pillar B. To loosen screw "7", remove the lower trim of pillar B. To properly adjust the fit, loosen screws -3 and 9-.

Note: Other adjustment methods, such as sliding the door up, will not work. The door will eventually sag under its own weight.


Adjusting the lock bracket


Adjusting the lock bracket


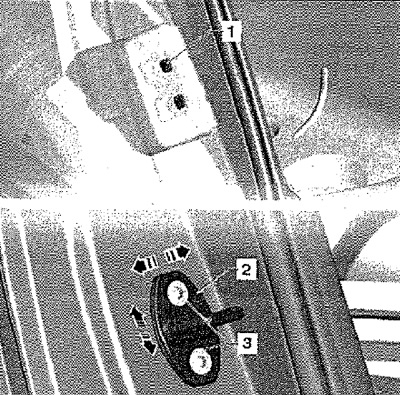
Note: The sheet metal covering the plate is firmly welded to the rack. More force will be required to move the bracket "2" when the screws "3" are loose. The adjustment of the right door is described below. The left door is adjusted in a similar way. The door should not have any play, and when closed, the door lock should click completely without much effort. When adjusting the locking bracket, do not press on the door from above or below.


Adjustment by changing the position of the lock bracket


It is produced when the door is not flush with the side.
It is produced when the door is not flush with…


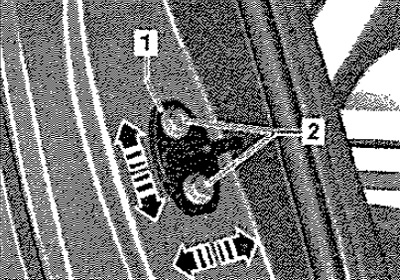
Loosen the fastening of the lock bracket "1" by releasing the screws "2" on the C-pillar. Adjust the position of the bracket "1" to ensure that the rear door in the closed position is flush with the side panel (to reduce aerodynamic noise). Tighten screws "2" securing bracket "1".
  • Tightening torques: Screws (pos. 2) — 25 Nm.
This article is available at russian, bulgarian, belarusian, ukrainian, serbian, croatian, romanian, polish, slovak, hungarian
Article verified: Anatoly Ovchinnikov
Share with friends:
◀ Previous
Skoda Octavia 3: Doors, locks and windows
Next ►

Rear door — design description, removal and installation
Central lock
Removal and installation front door seals
Removal and installation seals for the front door glass grooves
Removal and installation the front door window lifter
Rear door trims — design description
Removal and installation the rear door trim
Removal and installation the rear door opening limiter
Removal and installation the rear door lock bracket
Rear door handle and lock parts and assemblies
Read similar articles on other Skoda models

➧ Removal and installation the rear door Skoda Fabia 1 (1999-2007)
➧ Rear Door Interior — Exterior Skoda Rapid 1 (2012-2022)
➧ Seat adjustment Skoda Superb 2 (2008-2015)
➧ Adjusting the position of the rear door relative to the body Skoda Kodiaq 1 (2016-2024)
➧ Adjustment of seats, mirrors and steering column Skoda Yeti (2009-2017)
➧ View of the rear part of the bottom Skoda Favorit (1987-1994)
Link to this article in various formats
Reviews and comments of visitors
No comments yet


Add two numbers: 13 + 14


Octavia 3 (2013-2019) 
  • General information
  • User manual
  • Car driving
  • Maintenance
  • Petrol engines 1.2 l
  • Engine repair
  • Cooling system
  • Supply system
  • Petrol engines 1.4 l
  • Engine repair
  • Supply system
  • Petrol engines 1.8/2.0 l
  • Engine repair
  • Cooling system
  • Supply system
  • Diesel engines 1.6/2.0 l
  • Engine repair
  • Cooling system
  • Supply system
  • Transmission
  • Mechanical gearbox 02S
  • Automatic gearbox 0CW
  • Automatic gearbox 0D9
  • Chassis (running gear)
  • Front suspension
  • Rear suspension
  • Brake system
  • Steering
  • Body and interior
  • Doors, locks and windows
  • Exterior (external elements)
  • Interior (internal elements)
  • Ventilation and air conditioning
  • Electrical equipment
  • Equipment and devices
  • Headlights and lighting
  • Wiring diagrams (basic)
  • Wiring diagrams (comfort)
Octavia 1 (1996-2004) 
  • General information
  • Vehicle details
  • Maintenance
  • Power unit
  • Petrol engines 1.6 l AEE
  • Petrol engines 1.8 l AGN
  • Diesel engines 1.9 l AGR
  • Fuel system
  • Exhaust system
  • Cooling system
  • Transmission
  • Clutch
  • Car gearbox
  • Gearbox repair 02J
  • Gearbox repair 02K
  • Chassis (running gear)
  • Wheels and tires
  • Suspension and axles
  • Brake system
  • Body and interior
  • Exterior (external elements)
  • Interior (internal elements)
  • Doors, locks and windows
  • Electrical equipment
  • Equipment and devices
  • Electrical circuits
SkodaBook.ru © 2018–2026 | Mobile version | Articles on Skoda | Sitemap EN BG BY UA RS HR RO PL SK HU | Feedback | Site search | Bookmark
Fabia 1 (1999-2007) | Fabia 2 (2007-2014) | Rapid 1 (2012-2022) | Octavia 1 (1996-2004) | Octavia 3 (2013-2019) | Superb 2 (2008-2015) | Kodiaq 1 (2016-2024) | Yeti (2009-2017) | Favorit (1987-1994) | Felicia (1994-2001) |
By continuing to use the site, you agree to the use of cookies.