
Note: It is not allowed to adjust the seats and steering column while the vehicle is moving. After adjusting the seat, rock it slightly to make sure it is secure.
Seats and headrests - general information
The design of car seats guarantees maximum comfort for the person sitting in them, while at the same time providing conditions for the most efficient functioning of seat belts and airbags. The choice of seat position also affects the safety of the person sitting in it. For example, moving the front seat too far forward increases the risk of injury to the occupant when the airbag deploys, as well as the risk of being thrown through the windshield in a frontal collision. Increasing the inclination of the seat back will worsen the fixation of the body with the seat belt - the more the back is tilted back, the higher the likelihood of the body sitting under the lap section of the belt in a strong frontal impact, and the more severe the injuries can be.
Lock the front seat in a position that is as far away from the steering wheel/dashboard as possible, and at the same time comfortable for driving. The recommended distance from the chest to the frontal airbag pad is at least 25 cm. If there is a knee airbag, the distance from it to the driver's legs should be at least 10 cm. Bring the backrest to a position close to vertical; the slope must not exceed 30°.
The raised front edges of the seat cushions prevent the occupant from slipping out from under the belt in a frontal collision.
Head restraints prevent injury to the cervical spine and head in a rear impact. The head restraint should be adjusted in height so that its top point is on the same level with the top edge of the seated head. The top point should not be lower than the eye level of the seated person.
To raise the head restraint, simply pull it up. To lower the head restraint, press the lock (arrow in illustration 9.1) toward the headrest pillar and push the headrest into the backrest.
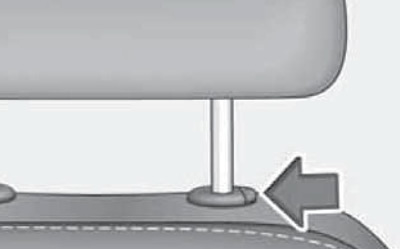
9.1 Headrest release button
To remove the head restraint, first raise it to its maximum height, then press the lock (arrow in illustration 9.1) and pull the headrest out of the backrest. To install the head restraint, press it into the backrest until it clicks into place.
The center rear head restraint has only two adjustment positions. To remove the center rear head restraint, pull it out as high as possible, press the lock (by analogy with illustration 9.1) towards the headrest pillar and at the same time (using a flat-blade screwdriver with a maximum width of 5 mm) in the forward direction.
Seat adjustment and heating
Note: After changing the position of the seat, push it in the appropriate direction to make sure it is secure.
The front seats are standard equipped with a manually operated adjustment mechanism (see illustration 9.2a). On some models, an electric drive for seat adjustment is partially or completely used (see illustration 9.2). The seat adjustment by means of an electric drive works both with the ignition on and with the ignition off. If the battery charge is low, the adjustment e/drive may not work.

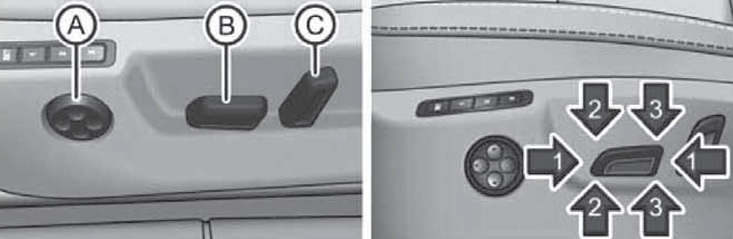
9.2a Driver's seat manual adjustment controls
1 Lever for releasing the fixation of the seat adjustment in the forward-backward direction (pull up)
2 Seat height adjustment lever (pull up or down several times)
3 Rotary backrest adjustment knob (do not lean back when adjusting)
4 Adjustment knob for lumbar support (in the presence of)
Note: If the movement of the seat accidentally stops while adjusting the seat position by means of the electric drive, press the switch again in the appropriate direction and complete the full displacement stroke.
To ensure the comfort of the driver and passengers in some configurations, there is a heating function for the front and sometimes rear seats. The buttons are used to control the heated front seats (9 and 11 in illustration 12.1) in the climate control panel: the left one is for the left seat, and the right one is for the right one. The heated rear seats are controlled using the corresponding buttons on the back of the console between the front seats. The heated front seats have three levels of intensity and only work when the ignition is on. If the maximum power for seat heating is set, it automatically decreases to level 2 after 10 minutes. In the event of a voltage drop in the vehicle's electrical system, the seat heating is automatically switched off in order to ensure that there is enough electricity to control the engine. The degree of heating power can be judged by the number of indicators lit in the regulator.
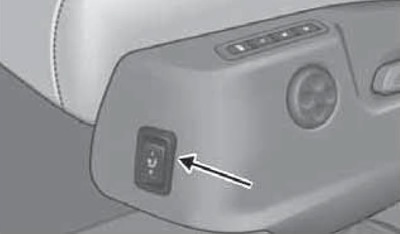
In some configurations, there is a ventilation function for the front seats. Ventilation is switched on/off with a button in the front of the seat cushion (see illustration 9.2c). Pregnant "1" ventilation works at low intensity, and in the position "2" - with high intensity. To turn off the ventilation, move the button to the horizontal position.
9.2b Power driver's seat adjustment controls
A Protrusion adjustment (front and rear grooves) and height (top and bottom grooves) lumbar support (in the presence of)
B Seat height adjustment (move up/down the entire switch)
B1 Moving the seat back and forth
В2/ВЗ Adjusting the height of the front/rear edge of the seat
With backrest tilt adjustment
In order not to discharge the battery, it is recommended to turn on the heating / ventilation while the engine is running. To save energy, heating/ventilation should be turned off when not needed. It is not recommended to turn on the ventilation and seat heating at the same time.
Caution: Heated/ventilated seats should not be used by people with a low threshold for pain or fever.
Note: To avoid damage to the heating elements or the fan, do not kneel on the seats and protect them from other point loads, and do not let the seats get wet. Do not wet clean the seat. Do not turn on the heating when the air temperature in the cabin is more than 25°C.
Memory position of the driver's seat and exterior mirrors
On models with power seat adjustment, up to three seat/mirror positions can be memorized to be recalled using the keys on the driver's seat or applied automatically when the vehicle is unlocked using a specific key fob (via the unlock button or via the system "KESSY").
To memorize the current position of the driver's seat and exterior mirrors with the ignition on, press the button "SET" (And in illustration 9.3), and then within 10 seconds press the key of the corresponding memory location (IN), - successful memorization will be confirmed by a sound signal. If the selected memory location is already occupied, it is overwritten with the new settings.
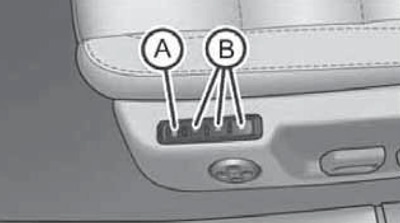
9.3 Key "SET" (A) and keys of memory cells (IN)
Note: For safety reasons, it is not possible to memorize the position when the angle between the cushion and the seatback is more than 102°.
You can also memorize the position of the right outside rear-view mirror, which will be automatically selected when reverse gear is engaged, if the mirror control is in position "R" (see relevant subsection below). To do this, turn on the ignition, set the exterior mirror control to the position "R", engage reverse gear, adjust the right mirror and disengage gear. The reverse mirror position must be memorized each time a new setting is made for the seat/mirrors position. The right mirror, which is automatically set to the reverse position, returns to its normal position when the reverse gear is disengaged or at a speed of more than 15 km/h.
To apply the memorized seat/mirror positions, briefly press the corresponding button (In illustration 9.3) at a speed not exceeding 5 km/h. To interrupt seat/mirror movement, press any button on the seat. To gradually move the seat/mirrors to a predetermined position, hold down the corresponding key (IN).
To save the settings for the current memory location to the remote control, within 10 seconds after saving the settings, remove the key from the ignition and press the unlock button on the remote control. Successful assignment of settings to this remote control is accompanied by a beep. To attach to the key fob system "KESSY" settings set for the current memory location, within 10 seconds after saving the settings, turn off the ignition, open the driver's door and within the next 10 seconds press the unlock button on the remote control. Successful assignment of settings to this remote control is accompanied by a beep and flashing direction indicators.
Note: If a memory location has already been assigned to the remote control, it will be replaced by the newly assigned location. Also, if you assign a memory location already assigned to another remote control to a remote control, the new assignment replaces the previous one.
To adjust the seat and mirrors using the remote control, unlock the car with the remote control and open the driver's door.
Armrests
Note: Carrying passengers on the center armrests is not allowed.
The armrests are molded into the interior trim of the doors. Additionally, there are central front (with appropriate equipment) and rear armrests.
Front center armrest with glove box can be adjusted in height and lengthwise (back and forth). To open the storage compartment simply pull the lid in the direction of the arrow (see illustration 9.4a). To close the storage compartment, flip the lid up until it stops and then lower it. To adjust the height of the armrest, close the cover and then lift it to one of four positions. To adjust the length of the armrest, simply slide the storage compartment cover forward or backward.
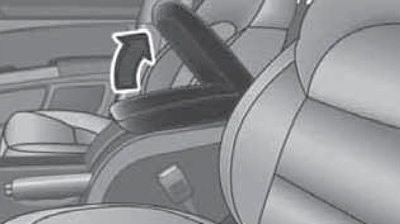
9.4a Central front armrest with stowage compartment
Note: To use the parking brake, the cover must be in the rearmost position.
In some configurations, the glove box can be equipped with MDI and AUX-IN connectors (see Section 15).
The center rear armrest is formed by reclining the back of the center rear seat (see illustration 9.4b). The armrest has a stowage compartment, which can be opened by pressing the top button on the front of the armrest and lifting the lid. When you press the bottom button, two cupholders appear in front of the armrest (see illustration 9.4c). To remove the cup holders, press them in the center and push them into the armrest until they stop. If the center rear seatback remains reclined for a long time, make sure that no seat belt buckles remain under it (so as not to deform the back padding). When the armrest is lowered, a hatch is formed for transporting long loads, such as skis (see Section 12).
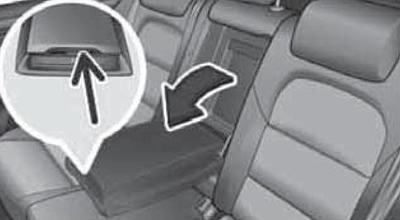
9.4b Rear center armrest with stowage compartment
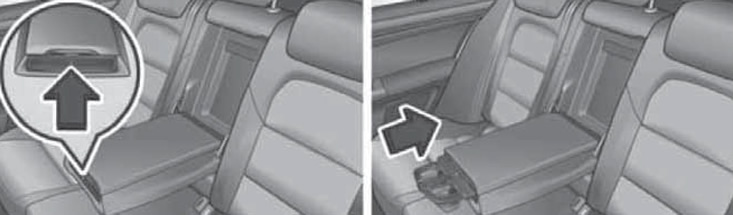
9.4c Cup holders in rear center armrest
Rear seats
The 3-seater rear seat is divided into two parts in a 40:60 ratio. The backrest and / or cushion of each part can be folded separately to increase the volume of the luggage compartment.
Before folding the rear seatback, position the front seats so that they are not damaged. If the front seats are pushed too far back, it is recommended that you first remove the rear head restraints in order to obtain as flat a load surface as possible. On Superb Combi models, the seat cushions must also be folded down first (see below). Press the handle to fold the backrest (And in illustration 9.5a) and lean back forward. To return the backrest to its original position, fold the outermost rear seat belt (WITH) edge of the side trim, and then pull the backrest up until the lock button clicks into place. Finally, make sure that the red mark (IN) is completely hidden, and also tug on the backrest to make sure it is securely fixed.
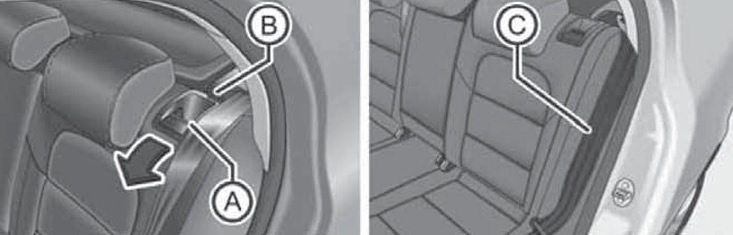
9.5a Reclining the rear seatback
To fold forward the rear seat cushions (on Superb Combi models) lift it in the direction of the arrow (1 in illustration 9.5b) and pull forward (2).
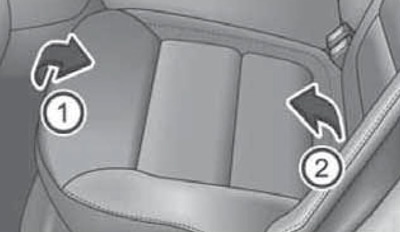
9.5b Reclining rear seat cushion (Combi models only)