
Removing
1. Drain coolant (more, see relevant section in this chapter).
2. Remove alternator (for details, see the relevant section in chapter Engine electrical equipment).
3. Unscrew the fastening screw (arrows), shown in the figure below.
4. Release the clamp securing the air pipe (2), as shown in the figure below.
5. Disconnect the wiring harness connector (1) from the charge air pressure sensor together with the intake air temperature sensor, as shown in the figure below. Then remove the right air outlet as shown in the figure below.
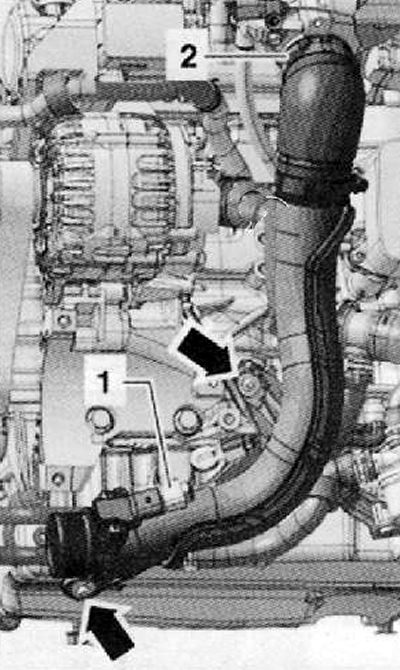
6. Disconnect the wiring harness connector (2) from the throttle control module as shown in the figure below.
7. Unscrew the upper bolt of the oil dipstick guide tube (4). shown in the figure below.
8. Disconnect and remove the throttle valve assembly.

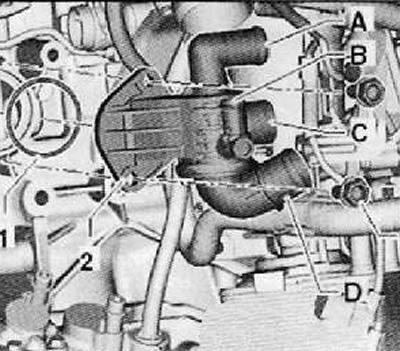
9. Loosen the fastening clamps and disconnect the water hoses (A) (IN) And (D), as shown in the figure below.
10. Unscrew the fastening bolts (3), shown in the figure below.
11. Remove the 4/2-way valve together with the thermostat assembly from the cylinder block, and then disconnect it from the front water pipe, as shown in the figure below.
Installation
Installation is carried out in the reverse order of removal.
Note.
- Replace all o-rings.
- Avoid getting oil products on the air pipes of the intake system.
- Observe the required torque when tightening the hose clamps and fittings.
Moisten the new o-ring (1), shown in the figure below in fresh coolant.
First of all, it is necessary to connect the front water hose to the thermostat housing (WITH), then install the housing on the cylinder block.
Install and tighten mounting bolts (3) thermostat housing with a tightening torque of 15 Nm.
Connect hoses to thermostat housing and 4/2-way valve (A), (IN) And (D), as shown in the figure below.
Fill the cooling system with coolant (more, see relevant section in this chapter).