
Company vehicles Hyundai Company vehicles Kia Company vehicles Lada Company vehicles Mazda Company vehicles Mercedes-Benz Company vehicles Opel Company vehicles Mitsubishi
English Русский
Български
Беларускі
Український
Српски
Hrvatski
Română
Polski
Slovenský
Magyar
Articles   
Bookmark Contacts Sitemap
SkodaBook.ru


Fabia Rapid Octavia Superb Kodiaq Yeti Others
Yeti (2009-2017)

Removal and installation the hood lock holder and its parts (Skoda Yeti 5L)

  • Main
  • Yeti
  • 5L (2009-2017)
  • Body and interior
  • Exterior (external elements)
  • Removal and installation the hood lock holder and its parts
0
Contents: Bringing to service position and…⬇ Removal and installation the hood…⬇
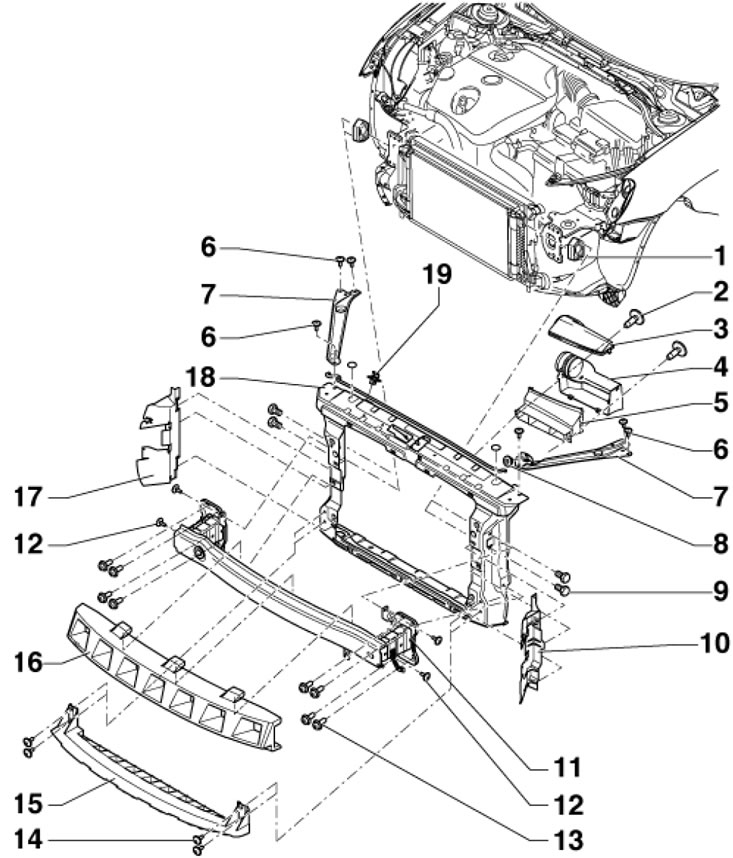
1. The hood latch holder is a safety component and cannot be repaired; if damaged, replacement is carried out. The installation details of the bonnet lock holder are shown in the illustration.

2.1. Bonnet Lock Holder Installation Details 1.…

2.1. Bonnet Lock Holder Installation Details 1. Radiator support; 2. Bolt, 2 Nm; 3. Air duct cover; 4. Air distribution system; 5. Air intake; 6. Bolt, 9 Nm; 7. Support; 8. Rubber support for hood support; 9. Bolt, 4.5 Nm; 10. Left air duct; 11. Front bumper beam; 12. Bolt, 9 Nm; 13. Bolt, 30 Nm; 14. Bolt, 3.5 Nm; 15. Crossbar; 16. Foamed part; 17. Right air duct; 18. Hood lock holder; 19. Wiring Holder


Bringing to service position and returning to normal position


2. If necessary, remove the front bumper cover (see Section 4).

3. Remove the headlights (see Chapter 12).

4. Remove the sound insulation under the engine compartment (see Section 6).

5. Remove the air duct from the hood lock holder (see Chapter 4).

6. Disconnect the hood lock drive cable from the hood lock holder (see Section 7).

7. Cover the corner of the front wing with masking tape.


8. Support the hood securely.

9. Remove the lower bolts (1 in the illustration) and screw in M10x120 bolts instead of them. Then screw in the upper bolts (1) and screw in M 10x120 bolts instead of them.
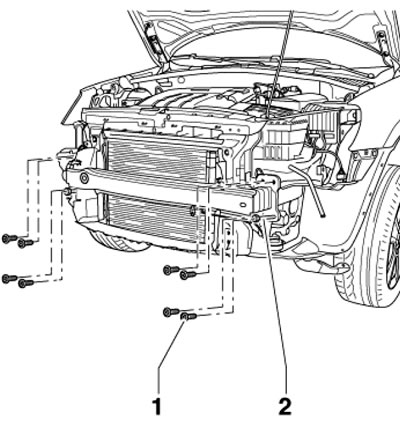
2.9. Front bonnet lock holder bolts

2.9. Front bonnet lock holder bolts


10. Remove the bolts (2 in the illustration) and pull the bonnet lock holder (1) forward approximately 50-70 mm. This makes work in the engine compartment easier.
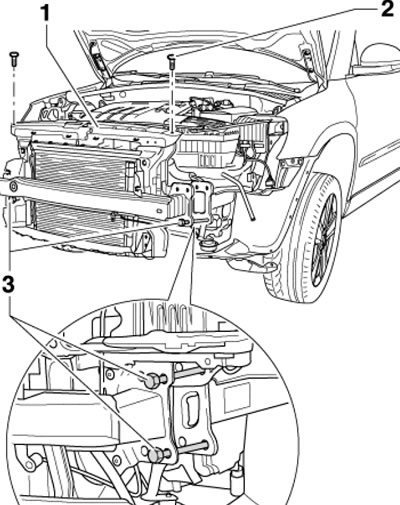
2.10. Upper bonnet lock holder bolts

2.10. Upper bonnet lock holder bolts


11. Return to the normal position is done in the reverse order. Tighten the front bolts to 30 Nm and the upper bolts to 9 Nm. Finally, check the headlight adjustment (see Chapter 12).

Removal and installation the hood lock holder


12. Disconnect the negative cable from the battery.


13. Remove the sound insulation under the engine compartment (see Section 6).

14. Remove the front bumper cover (see Section 4).

15. Remove the foam part (16 in illustration 2.1), unscrew the bolts (14) and remove the crossbar (15).

16. Remove the headlights (see Chapter 12).

17. Remove the front bumper beam (see Section 4).

18. Separate the hood lock drive cable (see Section 7).

19. Remove the top cover (3 in illustration 2.1) air duct and separate the air distribution system (4) from the air duct (5).

The original article is located on www.SkodaBook.ru

20. Disconnect the hood lock wiring connector and release it from the holder.

21. Remove the bolts (6 in illustration 2.1) hood latch holder and secure the radiator and condenser in the engine compartment (do not disconnect the refrigerant lines from the condenser, do not allow them to be stretched).

22. Remove the bolts (9 in the illustration) radiator supports and pull the hood latch holder out of the radiator supports.

23. Installation is carried out in reverse order.
This article is available at russian, bulgarian, belarusian, ukrainian, serbian, croatian, romanian, polish, slovak, hungarian
Article verified: Timur Komissarov
Share with friends:
◀ Previous
Skoda Yeti: Exterior (external elements)
Next ►

Body — general information
Body — specifications
Removal and installation of the front wing and its parts
Removal and installation of bumpers and towing hitch parts
Removal and installation the upper sunroof assembly and roof rails
Removal and installation of sound insulation panels, mudguards, roof…
Removal and installation of the hood and its parts
Read similar articles on other Skoda models

➧ Hood — opening and closing Skoda Fabia 1 (1999-2007)
➧ Removal and installation the hood lock Skoda Rapid 1 (2012-2022)
➧ Parts and components of the hood locking mechanism Skoda Octavia 3 (2013-2019)
➧ Removal and installation the hood lock holder and its parts Skoda Superb 2 (2008-2015)
➧ Hood Lock — removal and installation Skoda Kodiaq 1 (2016-2024)
➧ Hood lock and opening mechanism — removal, installation and adjustment Skoda Favorit (1987-1994)
Link to this article in various formats
Reviews and comments of visitors
No comments yet


Add two numbers: 29 + 32


Yeti (2009-2017) 
  • General information
  • Introduction to manual
  • Controls and instruments
  • Maintenance
  • Power unit
  • Petrol engine 1.2 l
  • Petrol engine 1.4 l
  • Petrol engine 1.8 l
  • Diesel engine 2.0 l
  • Cooling system
  • Power and control system
  • Exhaust system
  • Ignition and preheating systems
  • Starting and charging system
  • Transmission
  • Clutch
  • Manual gearbox
  • 7-speed gearbox DSG «0AM»
  • 6-speed gearbox DSG «02E»
  • Drive shafts
  • Chassis (running gear)
  • Brake system
  • Front suspension
  • Rear suspension
  • Steering
  • Body and interior
  • Heating and air conditioning
  • Exterior (external elements)
  • Interior (internal elements)
  • Electrical equipment
  • Equipment and devices
  • Lighting and signaling
  • Electrical diagrams
SkodaBook.ru © 2018–2026 | Mobile version | Articles on Skoda | Sitemap EN BG BY UA RS HR RO PL SK HU | Feedback | Site search | Bookmark
Fabia 1 (1999-2007) | Fabia 2 (2007-2014) | Rapid 1 (2012-2022) | Octavia 1 (1996-2004) | Octavia 3 (2013-2019) | Superb 2 (2008-2015) | Kodiaq 1 (2016-2024) | Yeti (2009-2017) | Favorit (1987-1994) | Felicia (1994-2001) |
By continuing to use the site, you agree to the use of cookies.