
Company vehicles Hyundai Company vehicles Kia Company vehicles Lada Company vehicles Mazda Company vehicles Mercedes-Benz Company vehicles Opel Company vehicles Mitsubishi
English Русский
Български
Беларускі
Український
Српски
Hrvatski
Română
Polski
Slovenský
Magyar
Articles   
Bookmark Contacts Sitemap
SkodaBook.ru


Fabia Rapid Octavia Superb Kodiaq Yeti Others
Yeti (2009-2017)

Removal and installation of bumpers and towing hitch parts (Skoda Yeti 5L)

  • Main
  • Yeti
  • 5L (2009-2017)
  • Body and interior
  • Exterior (external elements)
  • Removal and installation of bumpers and towing hitch parts
0
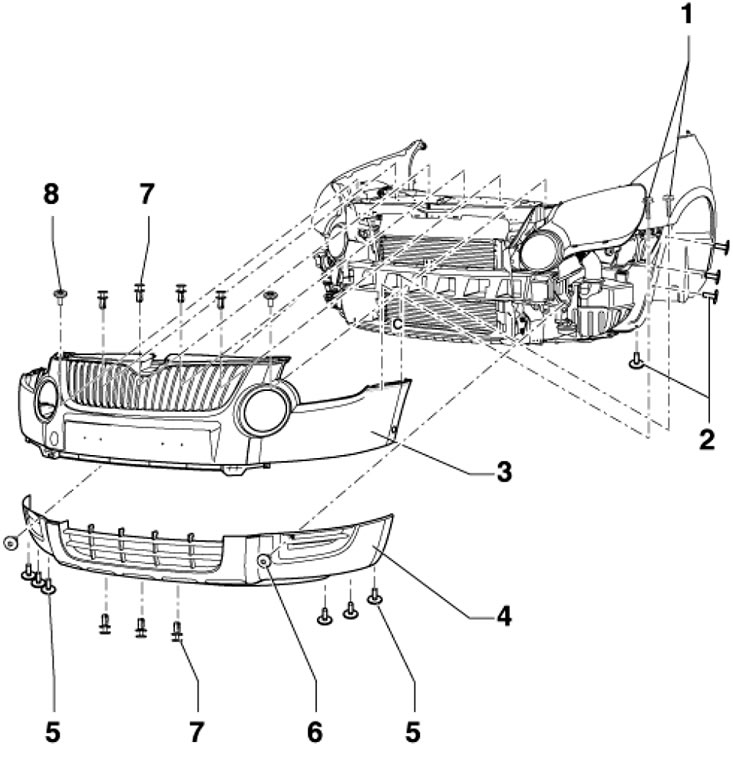
1. Front bumper cover installation details are shown in the illustration. To remove both parts of the trim, unscrew the bolts (6, 1, 2 and 5), remove the rivets (7), unscrew the bolts (8) and pull the trim forward, having first disconnected the connectors of the fog lights and parking sensors, as well as the hoses supplying the washer fluid to the headlights. If necessary, separate the lower part of the overlay from the upper part.

4.1. Front bumper trim installation details 1.…

4.1. Front bumper trim installation details 1. Bolt, 3.5 Nm; 2, 5, 6. Bolt, 1.5 Nm; 3. Upper part of the bumper cover; 4. Lower part of the bumper cover; 7. Rivets; 8. Bolt, 6.6 Nm


2. The installation details of the front bumper beam are shown in the illustration. To remove the beam, remove the bumper cover, remove part (6), disconnect the sensor connector (4), unscrew the bolts (1), support the hood lock holder in a suitable way and unscrew the bolts (3).
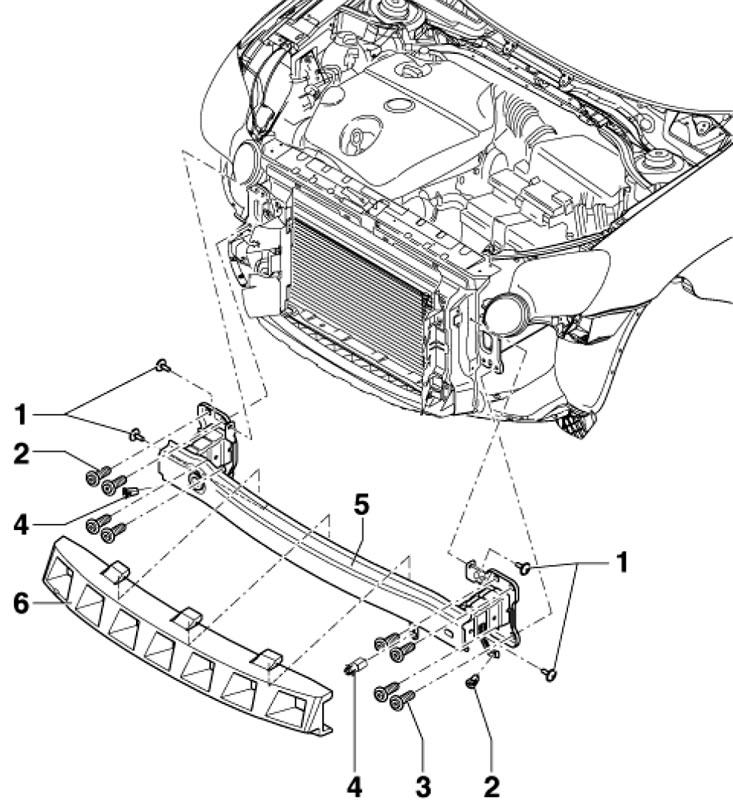
4.2. Front bumper beam installation details 1.…

4.2. Front bumper beam installation details 1. Bolt, 9 Nm; 2. Adjusting nut; 3. Bolts, 30 Nm; 4. Temperature sensor; 5. Front bumper beam; 6. Foamed part


3. The installation details of the rear bumper cover are shown in the illustration. To remove the trim, remove the rear lights (see Chapter 12), unhook the pads (1), unscrew the bolts (6), remove the rivets (4) and loosen the nuts (2).
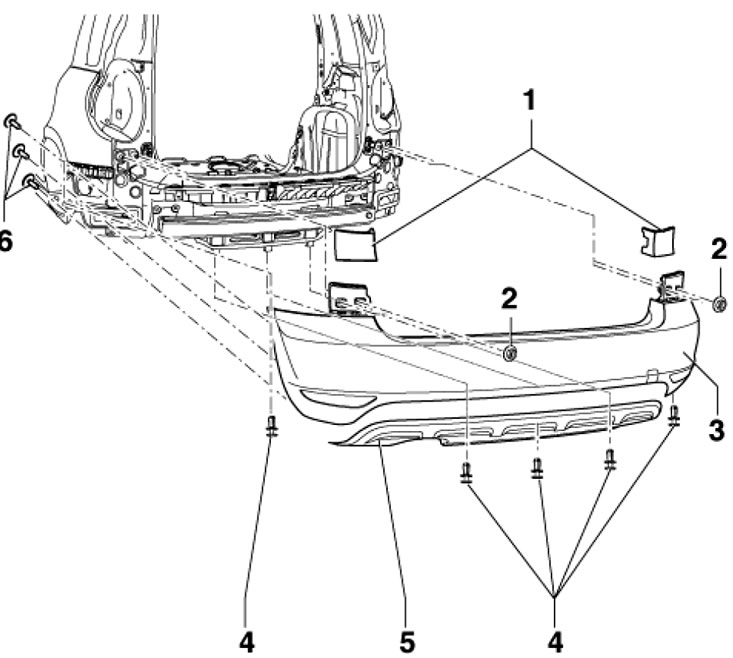
4.3. Rear bumper cover installation details 1.…

4.3. Rear bumper cover installation details 1. Overlay; 2. Nut, 3.5 Nm; 3. Upper part of the overlay; 4. Expansion rivet; 5. Bottom of the overlay; 6. Bolt, 1 Nm


4. The details of the rear bumper beam installation are shown in the illustration. To remove it, remove the bumper cover and unscrew the bolts (5).
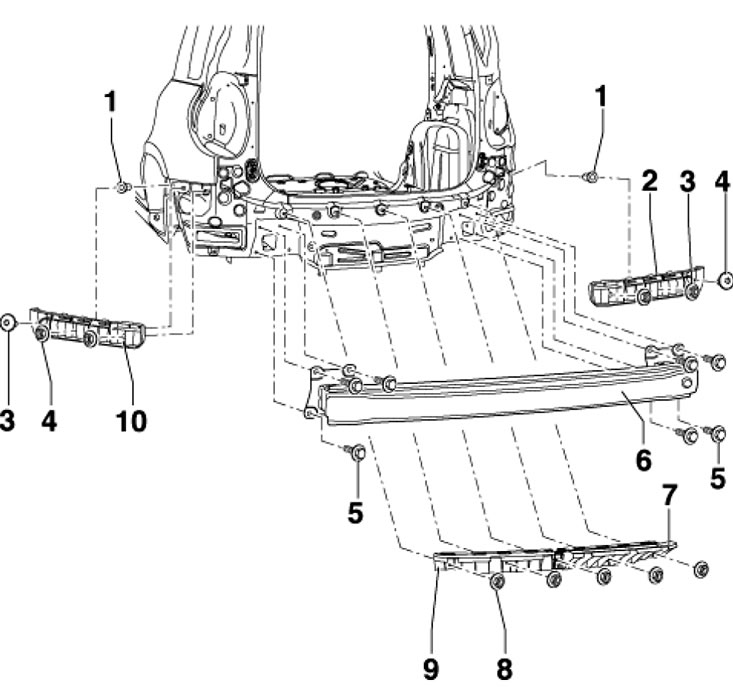
4.4. Rear bumper beam installation details1.…

4.4. Rear bumper beam installation details1. Adjusting nut; 2. Right guide; 3, 8. Nut, 3.5 Nm; 4. Bolt, 1.5 Nm; 5. Bolt, 20 Nm; 6. Bumper beam; 7. Right bracket; 9. Left bracket; 10. Left guide


Text taken from this website: Skodabook.ru

5. To remove the trailer recognition unit (2 in the illustration) disconnect the negative cable from the battery, partially remove the side trim of the luggage compartment (see Part B), disconnect the connector (3) and release the hooks (1).
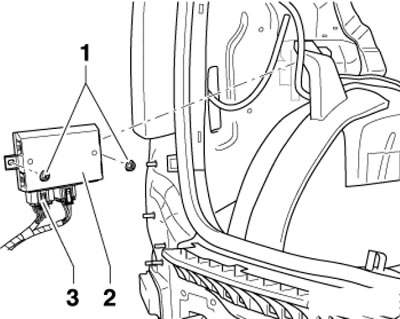
4.5. Trailer recognition unit fastening

4.5. Trailer recognition unit fastening


6. The details of the installation of the towing hitch (THU) are shown in the illustration. To remove the towbar frame, remove the lever (3), insert the plug (4) and remove the rear bumper cover. Remove the connector (6) and bracket (7), pull the wire (8) through the TSU frame and unscrew the bolts (9).
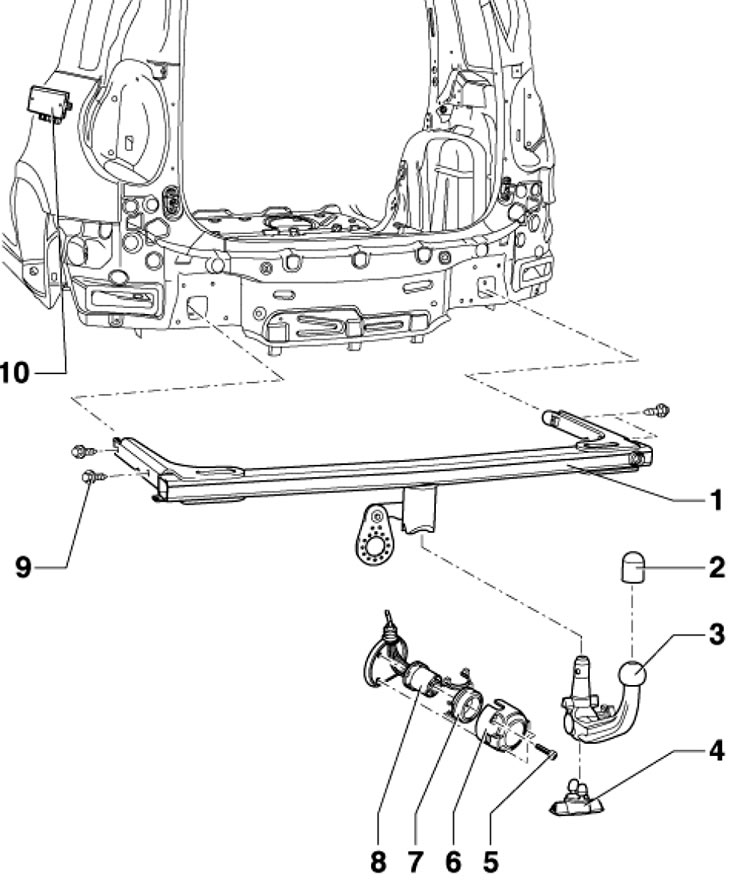
4.6. Fastening parts of the towing hitch (TSU) 1.…

4.6. Fastening parts of the towing hitch (TSU) 1. TSU frame; 2. Protective cap; 3. TSU lever; 4. Plug; 5. Bolt, 2.5 Nm; 6. Connector; 7. Support; 8. Wire with gasket; 9. Bolt, 55 Nm; 10. Trailer detection unit
This article is available at russian, bulgarian, belarusian, ukrainian, serbian, croatian, romanian, polish, slovak, hungarian
Article verified: Timur Komissarov
Share with friends:
◀ Previous
Skoda Yeti: Exterior (external elements)
Next ►

Removal and installation of the front wing and its parts
Removal and installation the hood lock holder and its parts
Body — general information
Body — specifications
Removal and installation the upper sunroof assembly and roof rails
Removal and installation of sound insulation panels, mudguards, roof…
Removal and installation of the hood and its parts
Removal and installation the fuel filler flap with cover
Removal and installation of the tailgate and its parts
Read similar articles on other Skoda models

➧ Removal and installation the towing hitch Skoda Fabia 1 (1999-2007)
➧ Towing a car Skoda Rapid 1 (2012-2022)
➧ Towing hitch — design description Skoda Octavia 3 (2013-2019)
➧ Removal and installation of bumpers and towing hitch parts Skoda Superb 2 (2008-2015)
➧ Towing a car Skoda Kodiaq 1 (2016-2024)
➧ Bumpers — removal and installation Skoda Favorit (1987-1994)
Link to this article in various formats
Reviews and comments of visitors
No comments yet


Add two numbers: 49 + 36


Yeti (2009-2017) 
  • General information
  • Introduction to manual
  • Controls and instruments
  • Maintenance
  • Power unit
  • Petrol engine 1.2 l
  • Petrol engine 1.4 l
  • Petrol engine 1.8 l
  • Diesel engine 2.0 l
  • Cooling system
  • Power and control system
  • Exhaust system
  • Ignition and preheating systems
  • Starting and charging system
  • Transmission
  • Clutch
  • Manual gearbox
  • 7-speed gearbox DSG «0AM»
  • 6-speed gearbox DSG «02E»
  • Drive shafts
  • Chassis (running gear)
  • Brake system
  • Front suspension
  • Rear suspension
  • Steering
  • Body and interior
  • Heating and air conditioning
  • Exterior (external elements)
  • Interior (internal elements)
  • Electrical equipment
  • Equipment and devices
  • Lighting and signaling
  • Electrical diagrams
SkodaBook.ru © 2018–2026 | Mobile version | Articles on Skoda | Sitemap EN BG BY UA RS HR RO PL SK HU | Feedback | Site search | Bookmark
Fabia 1 (1999-2007) | Fabia 2 (2007-2014) | Rapid 1 (2012-2022) | Octavia 1 (1996-2004) | Octavia 3 (2013-2019) | Superb 2 (2008-2015) | Kodiaq 1 (2016-2024) | Yeti (2009-2017) | Favorit (1987-1994) | Felicia (1994-2001) |
By continuing to use the site, you agree to the use of cookies.