
Note: Opening the hood lock if the cable of its drive has burst is quite difficult. Attempting to access from the front of the vehicle will most likely result in damage to the radiator. A more reliable approach is to remove the engine bottom shield and work from underneath using a piece of stiff wire.
Removing
Lock
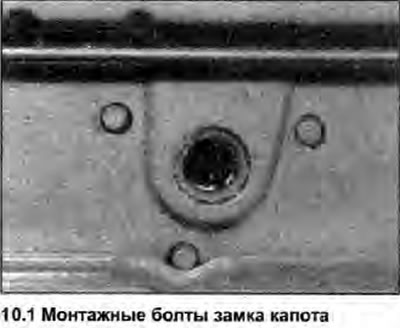
1. Open the hood, trace the hood latch with a pencil, then unscrew the three mounting bolts (see photo) and remove the lock and guide plate so that the hood latch cable can be disconnected.
Blocking pin
2. Open the hood and draw around the mounting plate of the safety latch and locking pin assembly with a pencil, then unscrew the mounting bolts and remove the assembly.
Cable and hood lock lever
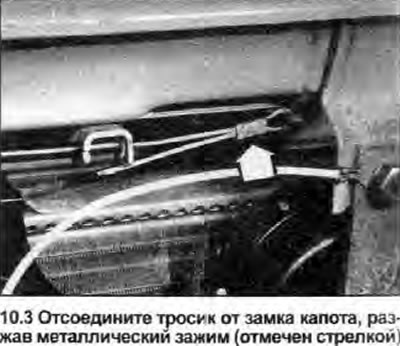
3. Disconnect the cable from the lock by bending the metal clip, and release the cable from the brackets or ties that secure it to the body (see photo).
4. The hood lock lever is located in the passenger footwell (left), below the glove compartment. Displace its rotary axis from the lever, remove the lever and disconnect the cable.
5. Pull the cable into the engine compartment.
Installation
6. Install in the reverse order of removal paying attention to the following:
- a) Align (where necessary) pre-removal marked component: if installing a new hood or its lock plate, center the component on its bolt holes.
- b) Tighten the component fasteners lightly at first, then carefully check the operation and positioning of any disturbed components. If adjustment is necessary, proceed as described below.
- c) Tighten the bolts with a torque specified specifications (where given).
Adjustment
7. If the functioning of any of the components of the hood latch mechanism requires adjustment, first check the centering of the hood relative to adjacent body panels (see chapter 9). Some adjustments are interdependent (height adjustment of the hood, for example, is carried out by changing the length of the locking pin of the lock) and the lock cannot function properly if the hood is not properly aligned with the body.
8. To adjust the position of the lock and/or locking pin assembly, first loosen their mounting bolts, then move their components as needed until the lock pin and safety latch hook are directly centered in their respective lock slots. Tighten the bolts with a torque specified specifications (where given).
9. When the lock and locking pin are aligned, check that the hood closes securely when released from a height of approximately 150mm.
10. If the hood won't close, make sure the locking pin is properly lubricated first (see section 1). Some adjustment can be made by screwing in/out the locking pin, but care must be taken that this does not change the height of the hood (see chapter 9). Replace the lock pin or lock assembly as needed if worn or damaged.
11. If there is any doubt about the safety latch, the locking pin assembly must be replaced.
12. The hood latch cable cannot be adjusted, but the cable housing stops can be bent slightly to make minor adjustments if required. Replace the cable if the hood latch mechanism is not working effectively.