
Installing the master cylinder on a car
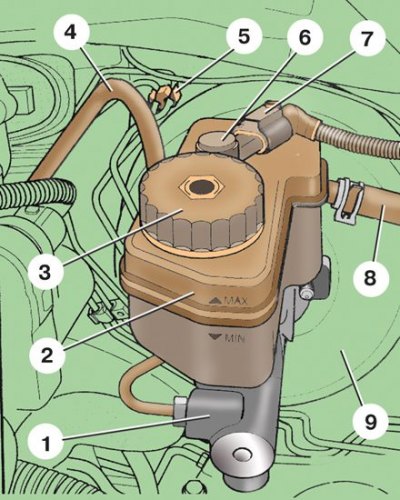
1 – main cylinder; 2 - tank; 3 - tank cap; 4 - vacuum hose; 5 - holder; 6 - brake fluid level sensor; 7 - connecting block; 8 – a hose of the main cylinder of a hydraulic drive of coupling; 9 - vacuum booster
Attention! The master brake cylinder cannot be repaired; in the event of a malfunction, it must be replaced as an assembly.
Attention! After removing the master cylinder, the O-ring and self-locking nuts of the master cylinder must be replaced with new ones.
Examination
A master cylinder failure can be identified by traces of brake fluid leaking from it. A more thorough check can be carried out at a service station using special tools and instruments.
Removing
1. Remove the upper engine cover (see subsection 2.1).
2. Remove the air filter (see subsection 4.1).
3. Disconnect the wire from the terminal «-» battery. On car parts (large battery) Remove the battery and holder to gain easy access to the master cylinder.
4. Disconnect block 7 (see fig. Installing the master cylinder on a car) from sensor 6 of the brake fluid level.
5. Open the cap 3 of the tank 2 and remove as much brake fluid as possible with a rubber bulb. Put rags under the master cylinder 1 so that the brake fluid does not get on the car parts.
6. Take out a vacuum hose 4 from the holder on a tank 2 of the main cylinder.
7. Open the spring clamp and disconnect the hose 8 of the hydraulic clutch master cylinder from the fitting of the reservoir of the brake master cylinder.
8. Remove the brake pipes coming from the master cylinder from the holder 5.
9. Turn away nuts of fastening and disconnect both brake pipes from the main cylinder. Plug the tube holes.
10. Loosen two nuts 3 (see fig. Vacuum booster with master cylinder) fixing the master cylinder 1 to the vacuum booster 10.
11. Remove master cylinder 1 from studs.
12. Turn the master cylinder upside down, install it on the container with the reservoir neck down and let the rest of the brake fluid drain.
13. To remove the tank from the main cylinder, remove the pin 2, and then carefully pull the tank 11 up to remove the tank branch pipes from the sealing bushes 13. Replace the torn or loose bushings 13.
Installation
1. Install the master cylinder in reverse order, replacing the O-ring 4 (see fig. Vacuum booster with master cylinder) regardless of his condition.
2. The self-locking nuts 3 must also be replaced with new ones.
3. Lubricate the sealing sleeves 13 with brake fluid before installing the reservoir.
4. After installing the master cylinder, add fluid to the reservoir and bleed the brake system (see subsection 9.9.6).
Tightening torques, Nm
| Nuts of fastening of the main brake cylinder | 20 |
| Nuts of fastening of brake pipes | 14 |