



Installing a pressure regulator on a car
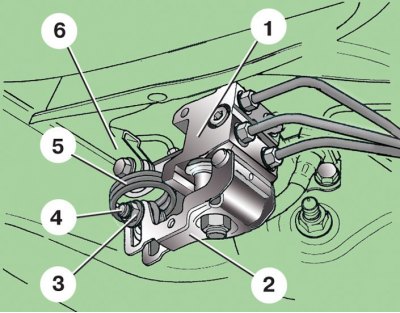
1 – pressure regulator; 2 – lever; 3 – nut; 4 – bolt; 5 – loading spring; 6 – bracket on the rear suspension beam
Pressure regulator parts
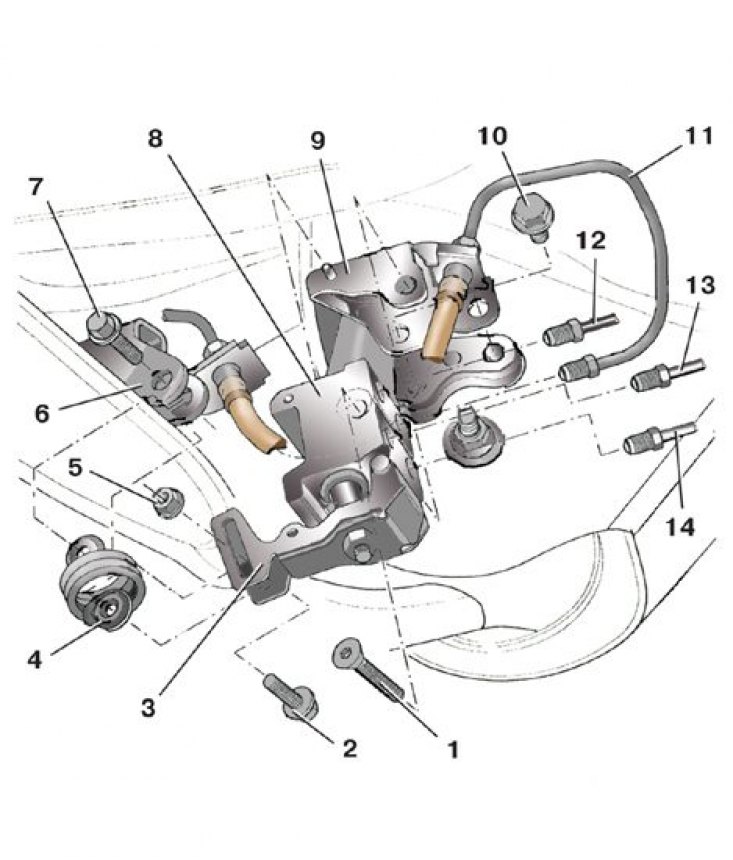
1, 2, 7, 10 – bolts; 3 – lever; 4 – loading spring; 5 – nut; 6 – bracket on the rear suspension beam; 8 – pressure regulator; 9 – bracket; 11 – brake pipe going to the rear left brake mechanism; 12 – brake pipe going to the rear right brake mechanism; 13, 14 – brake pipe coming from the master cylinder
The pressure regulator, installed in front of the rear axle beam, prevents premature locking of the rear wheels relative to the front ones. This allows you to use the vehicle's braking properties more effectively and prevent possible skidding.
Attention! The pressure regulator cannot be repaired; if it malfunctions, it must be replaced as a whole.
Examination
With the vehicle on the ground, the assistant should sharply press the brake pedal - the regulator lever should move. Otherwise, the pressure regulator is faulty and must be replaced.
Adjustment
1. If the pressure regulator is adjusted correctly, when braking on a level section of the road with a hard surface, the front wheels should lock slightly before the rear ones.
2. If the rear wheels lock up before the front ones, a preliminary adjustment can be made by loosening the load spring 5 (see the figure Installing a pressure regulator on a vehicle) (to do this, loosen the nut that secures it to the lever).
3. If the front wheels lock up much earlier than the rear ones, tighten the spring.
4. More precise adjustments can be made at a service station using special tools.
Removal
1. Place a container under the pressure regulator to collect any brake fluid that will flow out of it when removed.
2. Mark brake lines 11–14 (see figure Pressure regulator parts), connected to the pressure regulator to avoid confusion during installation.
3. After unscrewing the mounting nuts, disconnect the four brake pipes from the regulator. Plug the tube openings.
4. Disconnect the regulator lever 3 from the load spring 4 by unscrewing the nut 5 and removing the bolt 2.
5. Unscrew bolt 1 with an internal hexagon and remove the pressure regulator from the bracket on the body.
Installation
1. Install the pressure regulator in reverse order.
2. After installation, add fluid to the reservoir and bleed the brake system (see subsection 9.9.6).
3. Adjust the pressure regulator (see above).
Tightening torques, Nm
| Hollow bolt for fastening the pressure line to the steering gear housing | 35 |
| Nut for fastening the pressure line to the pump | 30 |
| Return line fastening nut to the steering gear housing | 30 |
| Wheel mounting bolts | 120 |