
Wheel cylinder leak test
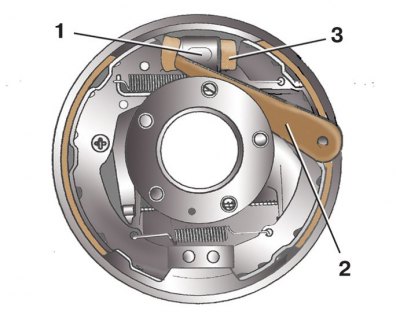
1 – wheel cylinder; 2 - scapula; 3 - protective cap
Examination
1. When removing the brake drum, it is recommended to periodically check the tightness of the wheel cylinder 1 (see fig. Wheel cylinder leak test).
2. To do this, using a wooden or plastic spatula 2, carefully, so as not to damage, wring out the edges of the protective caps 3.
3. If traces of brake fluid are found inside the caps, the wheel cylinder must be replaced.
Replacement
Attention! The wheel brake cylinder cannot be repaired; in the event of a malfunction, it must be replaced as an assembly.
1. Remove the brake pads (see subsection 9.7.1).
2. Loosen the fastening nut and disconnect the brake pipe 10 (see fig. Installing the brake drum mechanism of the rear wheel) from the wheel cylinder. Plug the opening of the tube, for example, with a cap on the air release valve.
3. Remove two bolts 12 (see fig. Parts of the brake drum mechanism of the rear wheel) fasteners and remove the wheel cylinder 11 from the brake shield 14.
4. Install the wheel cylinder in reverse order. Bleed the brake system (see subsection 9.9.6).
Tightening torques, Nm
| Bolts of fastening of the wheel cylinder | 8 |
| Nut of fastening of a brake tube | 14 |