
Caution: Contact with brake fluid is hazardous to health. Do not suck it out by mouth through a hose. Store brake fluid only in a container that is out of reach of children.
1. Brake fluid tends to absorb moisture, as a result of which its boiling point decreases over time, which, if the brakes are heavily loaded, can lead to the formation of vapor bubbles in the brake lines and reduce the effectiveness of the brakes.
2. To change the brake fluid, you will need the help of an assistant, but this procedure can be carried out without assistance using a special device (for example, branded VAS5234), - see the instructions supplied with this device. When using the device, the pressure in the brake system must not exceed 2 bar. When bleeding the brake system, the vehicle must be in a horizontal position in order to correctly monitor the level of brake fluid in the reservoir.
3. Switch off ignition and disconnect a negative wire from the storage battery.
4. Remove the cap from the brake fluid reservoir.
5. Mark the current level of brake fluid on the tank wall with a felt-tip pen to prevent it from being exceeded when replacing the brake pads. Suck out the brake fluid from the reservoir, leaving a layer of fluid approximately 10 mm deep at the bottom.
Note: Do not remove all fluid from the reservoir, otherwise air will enter the brake and clutch hydraulics.
6. Fill the reservoir with fresh brake fluid up to the mark "MAX".
7. On models with manual transmission, remove the cap of the clutch hydraulic bleed valve (on the clutch slave cylinder) and put a hose on it (see resist. illustration). You need to remove the air cleaner to access the bleed valve (see chapter 4) and battery with its holder (see chapter 5). Open the bleeder valve and allow about 100 grams of brake fluid to flow out. Close the fitting, quickly depress the clutch pedal 10-15 times. open the fitting again and let approximately 50 grams of brake fluid flow out. Close the fitting, remove the hose and depress the clutch pedal several times. Put on the protective cap.
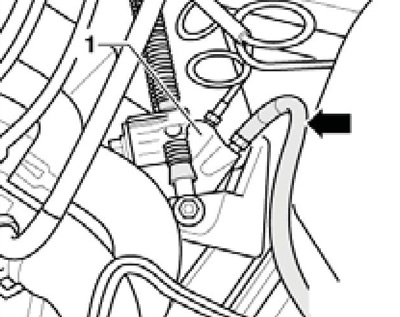
9.7 Bleeding the hydraulic clutch
8. Jack up the car. Thoroughly clean and remove the protective caps of the bleeder fittings. Attach one end of a clean, transparent hose to the rear right brake bleeder port (see resist. illustration), and insert the other end into a container to collect brake fluid. Pour a little brake fluid into the container and constantly make sure that the end of the hose is immersed in it. Also, the container should be raised at least 30 cm above the bleed valve to maintain pressure and prevent air from entering it.
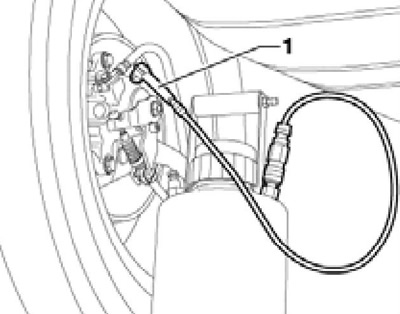
9.8 Bleeding the brake
9. Ask an assistant to sharply squeeze the brake pedal 3-5 times at intervals of 2-3 seconds and release the fitting half a turn with the pedal depressed. After the brake pedal rests on the floor, tighten the fitting. Take your foot off the pedal. By repeating this process, pump out the old brake fluid (before the appearance of a new one, which can be recognized by its light color). About 0.2 liters of brake fluid should be pumped out of each rear bleeder port.
Note: If a liquid layer of less than 10 mm remains at the bottom of the tank, the system will have to be pumped.
10. Tighten the bleeder screw, close its protective cap and add new brake fluid to the reservoir.
11. In the same way, pump out the old brake fluid sequentially from the rear left, front right and front left brake mechanisms. You may need to remove the rear wheels to access the rear bleeder fittings. About 0.3 liters of brake fluid should be pumped out of each front bleeder, and about 0.2 liters from each rear bleeder.
Attention: The drained brake fluid must in any case be clean and free of air bubbles.
12. Correct the brake fluid level according to the pre-marked mark. Press the brake pedal and check its free play. Make sure the brake pedal is not "fails" when it is squeezed out, the free travel of the pedal should be no more than ⅓ of its full travel.
13. Connect the negative cable to the battery and test the brakes on a light road. To do this, make at least one strong braking, at the same time checking the action of the ABS (with appropriate equipment). A sign of proper operation of the ABS is the pulsation of the brake pedal when braking.
Note: The effect of ABS is best seen on unpaved roads.