
Company vehicles Hyundai Company vehicles Kia Company vehicles Lada Company vehicles Mazda Company vehicles Mercedes-Benz Company vehicles Opel Company vehicles Mitsubishi
English Русский
Български
Беларускі
Український
Српски
Hrvatski
Română
Polski
Slovenský
Magyar
Articles   
Bookmark Contacts Sitemap
SkodaBook.ru


Fabia Rapid Octavia Superb Kodiaq Yeti Others
Octavia 1 (1996-2004) Octavia 3 (2013-2019)

Removal and installation glow plugs (Skoda Octavia 5E)

  • Main
  • Octavia
  • 5E (2013-2019)
  • Diesel engines 1.6/2.0 l
  • Supply system
  • Removal and installation glow plugs
0
Contents: Glow plug versions ⬇ Approximate cleaning sequence ⬇ Installation ⬇
Note: This engine uses metal glow plugs.


Glow plug versions
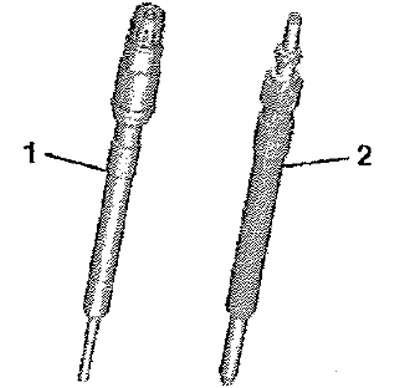


Glow plug versions


1. Glow plug with combustion chamber pressure sensor - only for cylinder 3 of engines with the letter designation CRKB

2. Glow plug without combustion chamber pressure sensor

Turn off the ignition and remove the ignition key from the lock. Remove the upper engine cover.

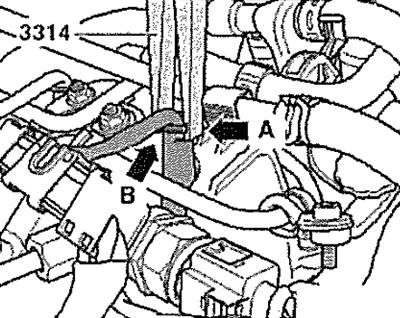
Caution! Risk of damage to mandrels. Only squeeze the 3314 glow plug connector removal pliers just enough to securely grip the mandrel flange without damaging it.


Open the wiring harness retaining clips and remove the glow plug connectors as shown. Install the pliers "3314" so that the grooves of their jaws "arrow A" grip the flange of the mandrel "arrow B" as shown in the figure.

Caution! Carefully disconnect the connectors from the glow plugs. If the connector is damaged during removal, the entire wiring harness must be replaced together with the connector (replacing only one connector is not allowed).

Caution! Carefully disconnect the connectors from…


Disconnect the connectors from the glow plugs. Clean the glow plug well in the cylinder head (getting dirt into the cylinder is unacceptable).


Approximate cleaning sequence


1. Collect the main dirt with a vacuum cleaner.

2. Spray brake cleaner or another suitable cleaner into the glow plug well and, after a short pause, blow out the well with compressed air,

3. Then clean the glow plug channel with a cloth soaked in oil.

To unscrew the glow plugs, use a 10 mm "3220" socket wrench.

Note: On engines with the letter designation CRKB, use the 12 mm socket wrench "VAS 6454" to loosen/tighten the glow plug in cylinder 3.


Installation


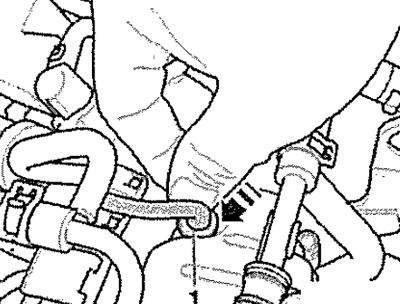
Installation in reverse order. Use 10 mm socket wrench "3220" to tighten glow plugs. Reconnect connectors "1" to glow plugs "arrow".

Note: Check that the connectors are securely fastened.

Note: Check that the connectors are securely…
This article is available at russian, bulgarian, belarusian, ukrainian, serbian, croatian, romanian, polish, slovak, hungarian
Article verified: Anatoly Ovchinnikov
Share with friends:
◀ Previous
Skoda Octavia 3: Supply system
Next ►

Pre-heating system — design description
Removal and installation the EGR radiator
Removal and installation of the actuator motor of the exhaust gas…
Exhaust gas recirculation system actuator motor «V338» — parts and…
EGR with EGR cooler — general installation diagram
Removal and installation of the automatic glow system control unit «J179»
Removal and installation the Hall sensor «G40»
Removal and installation the engine speed sensor «G28»
Read similar articles on other Skoda models

➧ Checking the glow plugs of a 1.9L, 47 kW diesel engine Skoda Fabia 1 (1999-2007)
➧ Removal, installation and inspection of glow plugs (1.6 TDI engine) Skoda Rapid 1 (2012-2022)
➧ Removal and installation glow plugs Skoda Superb 2 (2008-2015)
➧ Identifying engine faults by the condition of spark plugs Skoda Kodiaq 1 (2016-2024)
➧ Removal and installation glow plugs Skoda Yeti (2009-2017)
➧ Checking the condition, removing and installing glow plugs Skoda Felicia (1994-2001)
Link to this article in various formats
Reviews and comments of visitors
No comments yet


Add two numbers: 18 + 23


Octavia 3 (2013-2019) 
  • General information
  • User manual
  • Car driving
  • Maintenance
  • Petrol engines 1.2 l
  • Engine repair
  • Cooling system
  • Supply system
  • Petrol engines 1.4 l
  • Engine repair
  • Supply system
  • Petrol engines 1.8/2.0 l
  • Engine repair
  • Cooling system
  • Supply system
  • Diesel engines 1.6/2.0 l
  • Engine repair
  • Cooling system
  • Supply system
  • Transmission
  • Mechanical gearbox 02S
  • Automatic gearbox 0CW
  • Automatic gearbox 0D9
  • Chassis (running gear)
  • Front suspension
  • Rear suspension
  • Brake system
  • Steering
  • Body and interior
  • Doors, locks and windows
  • Exterior (external elements)
  • Interior (internal elements)
  • Ventilation and air conditioning
  • Electrical equipment
  • Equipment and devices
  • Headlights and lighting
  • Wiring diagrams (basic)
  • Wiring diagrams (comfort)
Octavia 1 (1996-2004) 
  • General information
  • Vehicle details
  • Maintenance
  • Power unit
  • Petrol engines 1.6 l AEE
  • Petrol engines 1.8 l AGN
  • Diesel engines 1.9 l AGR
  • Fuel system
  • Exhaust system
  • Cooling system
  • Transmission
  • Clutch
  • Car gearbox
  • Gearbox repair 02J
  • Gearbox repair 02K
  • Chassis (running gear)
  • Wheels and tires
  • Suspension and axles
  • Brake system
  • Body and interior
  • Exterior (external elements)
  • Interior (internal elements)
  • Doors, locks and windows
  • Electrical equipment
  • Equipment and devices
  • Electrical circuits
SkodaBook.ru © 2018–2026 | Mobile version | Articles on Skoda | Sitemap EN BG BY UA RS HR RO PL SK HU | Feedback | Site search | Bookmark
Fabia 1 (1999-2007) | Fabia 2 (2007-2014) | Rapid 1 (2012-2022) | Octavia 1 (1996-2004) | Octavia 3 (2013-2019) | Superb 2 (2008-2015) | Kodiaq 1 (2016-2024) | Yeti (2009-2017) | Favorit (1987-1994) | Felicia (1994-2001) |
By continuing to use the site, you agree to the use of cookies.