
2.0l TDI-CR engines (CFFB, CFGB, CLJA)
1. Remove the key from the ignition switch.
2. Remove the engine top cover.
3. If available, remove the sound insulation from the nozzles.
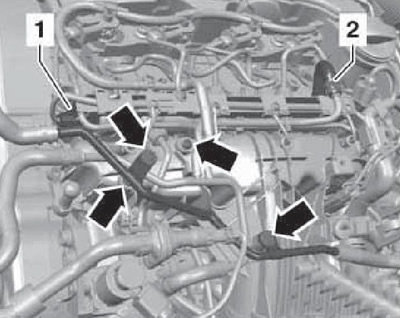
4. Disconnect the connector (1 per resist. illustrations) sensor "G247" fuel pressure, remove the bolts (arrows) upper coolant pipe and fuel return pipe. Disconnect the hose from the fuel return line (2).
8.4 Connections above glow plugs
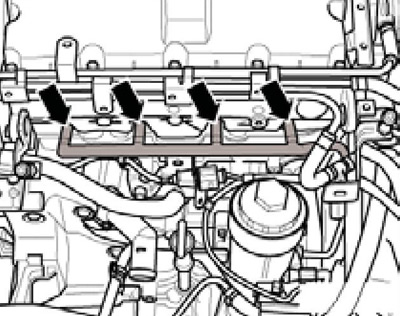
5. Open the latches (see resist. illustration) cable channel and release the wiring.

8.5 Fasteners for the cable duct of the glow plugs
6. Carefully disconnect the glow plug connectors using a 12 mm open end wrench (see resist. illustration), without damaging them.
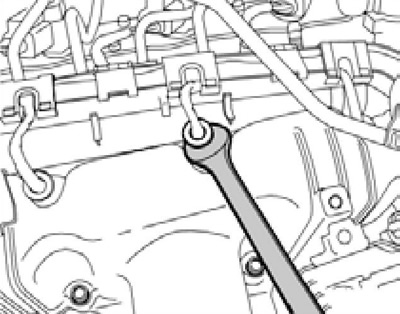
8.6 Glow plug connector
Caution: If the connector is damaged, the entire wiring harness will need to be replaced.
5. Clean the glow plug well in the cylinder head to prevent dirt from entering the cylinder. Use a grease remover to do this, and then blow out the dirt with compressed air.
6. Unscrew the glow plugs using a 10 mm long swivel head.
7. Installation is carried out in the reverse order. Tighten the glow plugs to 16-18 Nm. Make sure the connectors are in good contact. Finally, clear the ECM fault memory.
1.9l TDI-PD engines (WHE, BLS)
8. Remove the key from the ignition lock.
9. Remove the engine top cover.
10. Disconnect the glow plug connectors (see resist. illustration) and turn them out with a long swivel head (for example, No. 3220). If ceramic glow plugs are fitted, do not use more than 20 Nm to loosen them. If this force is not sufficient when using a wrench, use alternative tools to loosen the fasteners, also not exceeding 20 Nm. If it is also not possible to loosen the spark plug with alternative tools, it should be turned out with the cylinder head removed. After loosening the ceramic candle, put a long hose on it (about 25 cm) and unscrew it without warping and hitting adjacent parts.
8.10 Glow plug connectors for 1.9l TDI-PD engines
11. Check the electrical resistance of the candles - it should not exceed 1 ohm.
12. Installation is carried out in the reverse order. Tighten metal glow plugs to 15 Nm and ceramic to 12 Nm.