
Engine Exhaust System 1.0L 37kW and 1.4L 50kW
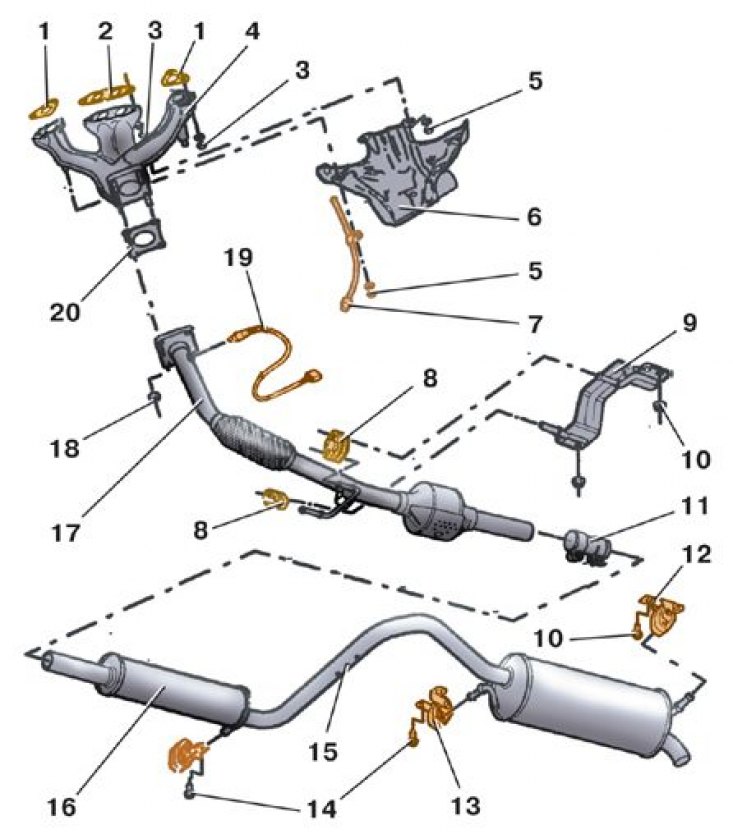
1 - extreme gasket of the exhaust manifold; 2 – an average laying of a final collector; 3 – a nut of fastening of a final collector; 4 - exhaust manifold; 5, 10 - nuts; 6 - shield; 7 - guide tube of the oil level indicator; 8 - pillow; 9 - bracket; 11 - connecting sleeve; 12 - bracket with rear silencer mounting cushion; 13 - bracket with a pillow; 14 – a bolt of fastening of an arm with a pillow; 15 - marks on the muffler pipe; 16 - muffler with resonator assembly; 17 – a reception pipe of the muffler; 18 – a nut of fastening of a receiving pipe; 19 - oxygen sensor (Lambda probe); 20 – laying of a reception pipe of the muffler
Exhaust system for 1.4L engine, 55 and 74 kW
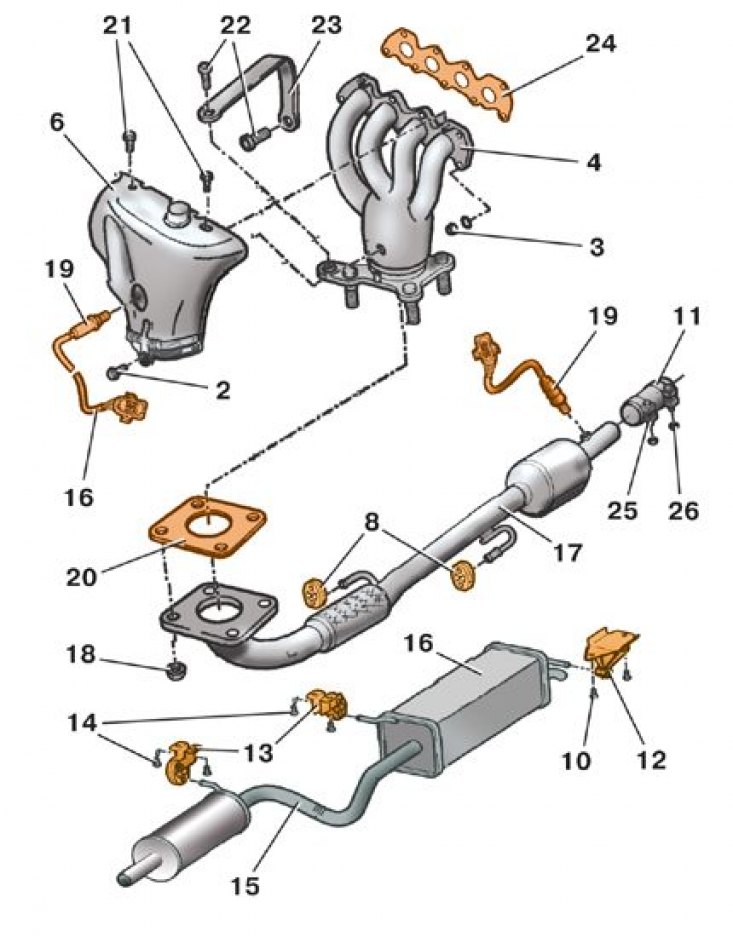
1 - extreme gasket of the exhaust manifold; 2 – an average laying of a final collector; 3 – a nut of fastening of a final collector; 4 - exhaust manifold; 5, 10 - nuts; 6 - shield; 7 - guide tube of the oil level indicator; 8 - pillow; 9 - bracket; 11 - connecting sleeve; 12 - bracket with rear silencer mounting cushion; 13 - bracket with a pillow; 14 – a bolt of fastening of an arm with a pillow; 15 - marks on the muffler pipe; 16 - muffler with resonator assembly; 17 – a reception pipe of the muffler; 18 – a nut of fastening of a receiving pipe; 19 - oxygen sensor (Lambda probe); 20 – laying of a reception pipe of the muffler; 21 - shield fastening bolts; 22 – a bolt of fastening of an arm; 23 - bracket; 24 - exhaust manifold gasket; 25 - coupling bolt; 26 - nut
1. Disconnect the wire from the terminal «-» battery.
2. Disconnect the oxygen sensor harness (Lambda probe) 19 (see fig. The exhaust system of the engine 1.0 l, 37 kW and 1.4 l, 50 kW and fig. Engine exhaust system 1.4 l, 55 and 74 kW).
3. Loosen the clamps fastening the connecting sleeve 11 of the exhaust pipe and the muffler assembly.
4. Unscrew four nuts 18 fastening the intake pipe 17 to the exhaust manifold 4.
5. Carefully separate the flanges of the downpipe 17 and the exhaust manifold 4.
6. Disconnect the lower ends of suspension pads 8 from the bracket on the pipe and remove the downpipe 17 from under the car.
7. If it is necessary to replace the downpipe, remove the oxygen sensor 19 from it.
Attention! Be sure to replace the gasket 20 with a new one, as when tightening the downpipe fastening nuts, it is strongly compressed and becomes unsuitable for reuse.
8. Thoroughly clean the exhaust manifold flange 4 from the remnants of the old gasket.
9. Install a new gasket 20.
10. Reinstall the downpipe 17 with the connecting sleeve 11, connecting the lower ends of the suspension pads 8 to the bracket. For the convenience of work, it is recommended to have the coupling bolts of the collars of fastening of the connecting sleeve 11 with their heads down.
11. Screw in new nuts 18 (because they are self-locking) attaching the intake pipe to the exhaust manifold.
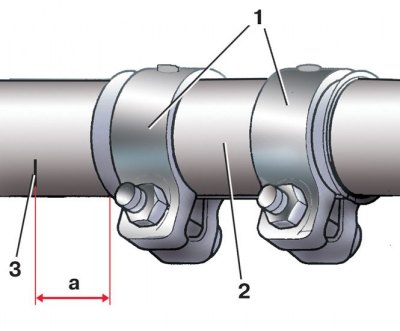
12. Install the connecting sleeve 2 so that its edge is at a distance a equal to 5 mm from mark 3 on the front pipe. In this position, lightly tighten the coupling bolt of the clamp 1 of the bushing on the exhaust pipe.
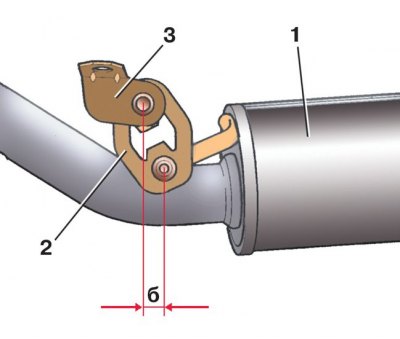
13. Move the muffler 1 as an assembly towards the front of the car so that the distance b, measured between the centers of the upper and lower axes of the holes of the cushion 2 of the suspension of the front mounting of the muffler assembly, is from 3 to 7 mm.
14. In this position, finally and evenly tighten both coupling bolts of the clamps securing the connecting sleeve. After that, check the distance b again and correct it if necessary. Connect the connector to the oxygen sensor wires (Lambda probe).
Tightening torques, Nm
| Nuts of fastening of a reception pipe to a final collector | 40 |
| Coupling bolts of collars of fastening of the connecting plug | 25 |