



Car doors, locks, and windows Skoda Kodiaq 1

Glazing — precautions when working with car body glazing
Carefully read the glue production date indicated on the packaging. The shelf life of glass glue is limited to six months from the date of manufacture. Do not use expired glue. Store adhesives and primers in a cool, dry...
Carefully read the glue production date indicated on the packaging. The shelf life of glass glue is limited to six months from the date of manufacture. Do not use expired glue. Store adhesives and primers in a cool, dry...

Windshield — removal and installation
Removal 1. Remove the front body pillar trim panel (on both sides) ( for more details, see the relevant section in this chapter ). 2. Remove both sun visors. 3. Remove the interior rearview mirror. 4. The roof trim...
Removal 1. Remove the front body pillar trim panel (on both sides) ( for more details, see the relevant section in this chapter ). 2. Remove both sun visors. 3. Remove the interior rearview mirror. 4. The roof trim...

Windshield — removing a broken rear window
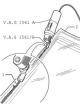
1. Protect the body and interior from glass fragments. 2. Remove pieces of glass down to the adhesive sealant. 3. Disconnect the glass heating and antenna connectors. 4. Cover opening "2" around the perimeter with...
1. Protect the body and interior from glass fragments. 2. Remove pieces of glass down to the adhesive sealant. 3. Disconnect the glass heating and antenna connectors. 4. Cover opening "2" around the perimeter with...
Windshield — preparing undamaged glass for reinstallation
Cutting off the adhesive layer Note: When reinstalling undamaged glass, shortly before gluing it, cut off the remaining adhesive sealant to a thickness of 1...2 mm. In this case, do not allow damage to the soil and...
Cutting off the adhesive layer Note: When reinstalling undamaged glass, shortly before gluing it, cut off the remaining adhesive sealant to a thickness of 1...2 mm. In this case, do not allow damage to the soil and...

Glass Installation Instructions
Using a two-tube gun "VAS 5237", holding it at a right angle to the glass, apply glue along the perimeter of the surface "1" treated with primer or on the old adhesive layer remaining after cutting. Attention: The glass...
Using a two-tube gun "VAS 5237", holding it at a right angle to the glass, apply glue along the perimeter of the surface "1" treated with primer or on the old adhesive layer remaining after cutting. Attention: The glass...

Removal and installation the door
Removal 1. Remove the corrugated cover (2) by pressing the "arrow a" lock and detach it from the A-pillar, as shown in the figure below. 2. Press the clamps (3) of the connector (4) "arrows b" and turn the connector...
Removal 1. Remove the corrugated cover (2) by pressing the "arrow a" lock and detach it from the A-pillar, as shown in the figure below. 2. Press the clamps (3) of the connector (4) "arrows b" and turn the connector...
Removal and installation the lock cylinder cover
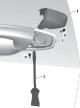
Removal Note: When removing the lock cylinder cover, do not turn the screwdriver and the lever together with it. 1. Remove the door handle. 2. Insert a flat-head screwdriver (3) into the hole at the bottom of the cover...
Removal Note: When removing the lock cylinder cover, do not turn the screwdriver and the lever together with it. 1. Remove the door handle. 2. Insert a flat-head screwdriver (3) into the hole at the bottom of the cover...

Removal and installation the lock cylinder
Removal Note: The lock cylinder is installed in the driver's door only. 1. Remove the plugs (4) and (6) shown in the figure below. Or the common plug (7) shown in the figure below. 2. Unscrew the mounting bolt (5) as...
Removal Note: The lock cylinder is installed in the driver's door only. 1. Remove the plugs (4) and (6) shown in the figure below. Or the common plug (7) shown in the figure below. 2. Unscrew the mounting bolt (5) as...

Removal and installation the handle cover (without the lock cylinder)
Removal 1. Remove the plug on the end of the door (3) as shown in the figure below. 2. Insert a special tool (T10389) approximately 55 mm long into the door through the service hole so that the end of the tool is under...
Removal 1. Remove the plug on the end of the door (3) as shown in the figure below. 2. Insert a special tool (T10389) approximately 55 mm long into the door through the service hole so that the end of the tool is under...

Removal and installation the door handle
Removal 1. Remove the lock cylinder (if the door is the driver's door) or the pen cap (if the door is a passenger door) ( for more details, see the relevant section in this chapter ). 2. Move the door opening handle (1)...
Removal 1. Remove the lock cylinder (if the door is the driver's door) or the pen cap (if the door is a passenger door) ( for more details, see the relevant section in this chapter ). 2. Move the door opening handle (1)...

Removal and installation the door lock
Removal 1. Remove the front door trim panel assembly ( for more details, see the relevant section in this chapter ). 2. Remove the front door cover ( for more details, see the relevant section in this chapter ). 3....
Removal 1. Remove the front door trim panel assembly ( for more details, see the relevant section in this chapter ). 2. Remove the front door cover ( for more details, see the relevant section in this chapter ). 3....

Removal and installation front door glass
Removal 1. Remove the front door trim panel ( for more details, see the relevant section in this chapter ). 2. Remove the service hole plug (6) shown in the figure below. 3. Lower the door window (1) until the fastening...
Removal 1. Remove the front door trim panel ( for more details, see the relevant section in this chapter ). 2. Remove the service hole plug (6) shown in the figure below. 3. Lower the door window (1) until the fastening...

Removal and installation the window lifter servo motor
Removal 1. Remove the front door trim panel ( for more details, see the relevant section in this chapter ). 2. Fix the door glass using adhesive tape to prevent it from falling inside the door. 3. Disconnect the wiring...
Removal 1. Remove the front door trim panel ( for more details, see the relevant section in this chapter ). 2. Fix the door glass using adhesive tape to prevent it from falling inside the door. 3. Disconnect the wiring...

Removal and installation the front door window lift mechanism
Removal 1. Remove the front door trim panel assembly ( for more details, see the relevant section in this chapter ). 2. Remove the front door glass assembly ( for more details, see the relevant section in this chapter...
Removal 1. Remove the front door trim panel assembly ( for more details, see the relevant section in this chapter ). 2. Remove the front door glass assembly ( for more details, see the relevant section in this chapter...

Removal and installation the front door glass guide
Note: When removing the glass seal, avoid excessive bending or twisting. Removal Note: Make sure the outside rearview mirror and door glass seal are removed. 1. Disconnect the glass guide seal, starting from the inside...
Note: When removing the glass seal, avoid excessive bending or twisting. Removal Note: Make sure the outside rearview mirror and door glass seal are removed. 1. Disconnect the glass guide seal, starting from the inside...

Rear doors — removal and installation
Removal 1. Install the special tool (T10383/1) between the sleeve (3) and the grip 9 (2), as shown in the figure below (arrow a). 2. Press out the clamp (2) together with the special tool (T10383/1) in the upward...
Removal 1. Install the special tool (T10383/1) between the sleeve (3) and the grip 9 (2), as shown in the figure below (arrow a). 2. Press out the clamp (2) together with the special tool (T10383/1) in the upward...

Adjusting the position of the rear door relative to the body
Note: Place the vehicle on a flat, horizontal surface. The door is adjusted properly if it opens and closes without undue effort, and if there is a uniform gap around its perimeter with the door opening, if the door is...
Note: Place the vehicle on a flat, horizontal surface. The door is adjusted properly if it opens and closes without undue effort, and if there is a uniform gap around its perimeter with the door opening, if the door is...

Removal and installation the rear door lock
Removal 1. Remove the rear door trim panel ( for more details, see the relevant section in this chapter ). 2. Remove the rear door cover ( for more details, see the relevant section in this chapter ). 3. Unscrew the...
Removal 1. Remove the rear door trim panel ( for more details, see the relevant section in this chapter ). 2. Remove the rear door cover ( for more details, see the relevant section in this chapter ). 3. Unscrew the...

Removal and installation rear door glass
Removal 1. Remove the rear door trim panel ( for more details, see the relevant section in this chapter ). 2. Remove the inner rear door seal. 3. Remove the cover (6) shown in the figure below. 4. Lower the rear door...
Removal 1. Remove the rear door trim panel ( for more details, see the relevant section in this chapter ). 2. Remove the inner rear door seal. 3. Remove the cover (6) shown in the figure below. 4. Lower the rear door...

Removal and installation the window lifter servo motor
Removal 1. Remove the rear door trim panel ( for more details, see the relevant section in this chapter ). 2. Fix the door glass using pieces of adhesive tape. 3. Disconnect the wiring harness connector (4) shown in the...
Removal 1. Remove the rear door trim panel ( for more details, see the relevant section in this chapter ). 2. Fix the door glass using pieces of adhesive tape. 3. Disconnect the wiring harness connector (4) shown in the...
This section is available on russian, bulgarian, belarusian, ukrainian, serbian, croatian, romanian, polish, slovak, hungarian
Read similar sections on other Skoda models
➧ Body and interior: Doors, locks and windows Skoda Rapid 1 (2012-2022)
➧ Body and interior: Doors, locks and windows Skoda Octavia 3 (2013-2019)
➧ Body and interior: Doors, locks and windows Skoda Felicia (1994-2001)
Link to this section in various formats
TEXTHTMLBB Code
- General information
- User manual
- Controls and instruments
- Maintenance
- Power unit
- Petrol engine 1.4 l
- Petrol engine 2.0 l
- Diesel engine 2.0 l
- Fuel and control (petrol)
- Fuel and control (diesel)
- Cooling system (petrol 1.4 l)
- Cooling system (petrol 2.0 l)
- Cooling system (diesel 2.0 l)
- Lubrication system (petrol)
- Lubrication system (diesel)
- Intake and exhaust (petrol 1.4 l)
- Intake and exhaust (petrol 2.0 l)
- Intake and exhaust (diesel 2.0 l)
- Transmission
- Clutch
- Manual gearbox
- Automatic gearbox
- Drive shafts
- Chassis (running gear)
- Front suspension
- Rear suspension
- Wheels and tires
- Brake system
- Steering system
- Body and interior
- Exterior (external elements)
- Interior (internal elements)
- Doors, locks and windows
- Heating and air conditioning
- Security systems
- Electrical equipment
- Power devices
- Equipment and devices
- Electrical circuits
- Electrical circuits (petrol 2.0 l)
- Electrical circuits (halogen headlights)
- Electrical circuits (LED headlights)
- Electrical circuits (Climatronic)