



Automatic transmission of car Skoda Kodiaq 1

Oil and oil filter — removal
Replace the oil filter Note: The oil filter does not usually need to be replaced. Removal 1. Move the selector lever to position "P". 2. Remove the air filter. 3. Remove the battery with the bracket (for more details,...
Replace the oil filter Note: The oil filter does not usually need to be replaced. Removal 1. Move the selector lever to position "P". 2. Remove the air filter. 3. Remove the battery with the bracket (for more details,...

Oil and oil filter installation
1. Installation is carried out in reverse order. In this case, it is necessary to take into account the following: Thoroughly clean oil-stained areas on the gearbox. Insert the oil filter with the "arrow" belt facing...
1. Installation is carried out in reverse order. In this case, it is necessary to take into account the following: Thoroughly clean oil-stained areas on the gearbox. Insert the oil filter with the "arrow" belt facing...

Draining and filling oil
Brief description First, the oil temperature value is read. If it exceeds 50°C, the gearbox needs to be allowed to cool down. with the engine not running, unscrew the overflow tube and let the oil drain. Then screw the...
Brief description First, the oil temperature value is read. If it exceeds 50°C, the gearbox needs to be allowed to cool down. with the engine not running, unscrew the overflow tube and let the oil drain. Then screw the...

Clutch housing cover — removal and installation
Removal Note: The clutch housing cover is held in position by a retaining ring. After removing the retaining ring, the clutch housing cover can be removed. The clutch housing cover and retaining ring must always be...
Removal Note: The clutch housing cover is held in position by a retaining ring. After removing the retaining ring, the clutch housing cover can be removed. The clutch housing cover and retaining ring must always be...

Double Clutch — removal and installation
Removal Note: Necessary special devices, control and measuring instruments, as well as auxiliary means Transmission support (T30109(VW353)). Gearbox support (T30108). Assembly stand (MP9-101). To remove and install the...
Removal Note: Necessary special devices, control and measuring instruments, as well as auxiliary means Transmission support (T30109(VW353)). Gearbox support (T30108). Assembly stand (MP9-101). To remove and install the...

Gearbox Assembly — precautions
Precautionary measures Precautions when working with the on-board diagnostics (OBD) system of the engine and automatic transmission. The engine control unit (ECM) is equipped with an on-board diagnostic system. If the...
Precautionary measures Precautions when working with the on-board diagnostics (OBD) system of the engine and automatic transmission. The engine control unit (ECM) is equipped with an on-board diagnostic system. If the...

Maintenance Recommendations and Warnings
Reuse of drained transfer case fluid is prohibited. Check the level and change the working fluid only when the car is on a level surface. when removing or installing the transfer case, do not allow dust or dirt to get...
Reuse of drained transfer case fluid is prohibited. Check the level and change the working fluid only when the car is on a level surface. when removing or installing the transfer case, do not allow dust or dirt to get...

Gearbox assembly — removal
Note: When removing the gearbox without the engine, it drops down. The following work is carried out from above: The battery with the casing, air filter and starter are removed. The cooling system hoses are pinched....
Note: When removing the gearbox without the engine, it drops down. The following work is carried out from above: The battery with the casing, air filter and starter are removed. The cooling system hoses are pinched....

Gearbox assembly — installation
Note: Always replace all self-locking bolts and fastening nuts after disassembly. After disassembly, it is always necessary to replace the mounting bolts, which must be tightened to a certain angle. All pipes and hoses...
Note: Always replace all self-locking bolts and fastening nuts after disassembly. After disassembly, it is always necessary to replace the mounting bolts, which must be tightened to a certain angle. All pipes and hoses...

Oil pan, mechatronics module
Components 1. Drain and inspection plug, tightening torque 45 N·m 2. O-ring 3. Overflow pipe 4. Fastening bolt 5. Oil pan 6. Fastening bolt 7. O-ring 8. Mechatronics module 9. Vent fitting cover 10. Vent pipe 11. Oil...
Components 1. Drain and inspection plug, tightening torque 45 N·m 2. O-ring 3. Overflow pipe 4. Fastening bolt 5. Oil pan 6. Fastening bolt 7. O-ring 8. Mechatronics module 9. Vent fitting cover 10. Vent pipe 11. Oil...

Oil pan — removal and installation
Removal Note: After disconnecting and then reconnecting the wire connecting the battery terminal to the vehicle ground (body), additional work must be performed. 1. With the ignition off, disconnect the wire connecting...
Removal Note: After disconnecting and then reconnecting the wire connecting the battery terminal to the vehicle ground (body), additional work must be performed. 1. With the ignition off, disconnect the wire connecting...

Gearbox mechatronics module — removal
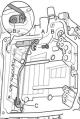
Removal 1. Move the gear selector to position "P". 2. Disconnect the negative terminal from the battery. 3. Remove the soundproofing coating. 4. Remove the front left wheel arch liner (for more details, see the...
Removal 1. Move the gear selector to position "P". 2. Disconnect the negative terminal from the battery. 3. Remove the soundproofing coating. 4. Remove the front left wheel arch liner (for more details, see the...
Gearbox mechatronics module — installation
1. Before installation, make sure that the gearbox input shaft speed sensor "G182" and the multi-plate clutch oil temperature sensor "G509" (A) are installed, as shown in the figure below. If the sensor lever (arrow)...
1. Before installation, make sure that the gearbox input shaft speed sensor "G182" and the multi-plate clutch oil temperature sensor "G509" (A) are installed, as shown in the figure below. If the sensor lever (arrow)...

Transmission Oil Cooler — removal
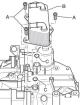
1. Move the gearbox mode selector to position "P". 2. Remove the upper decorative engine cover. 3. Remove the air filter housing assembly (for more details, see the relevant section in the chapter " Intake and exhaust...
1. Move the gearbox mode selector to position "P". 2. Remove the upper decorative engine cover. 3. Remove the air filter housing assembly (for more details, see the relevant section in the chapter " Intake and exhaust...
Transmission Oil Cooler — installation
1. Replace the O-rings (C) on the oil cooler (B) as shown in the figure below. 2. Install the oil cooler (B), paying particular attention to the O-rings (C), as shown in the figure below. 3. Install new mounting screws...
1. Replace the O-rings (C) on the oil cooler (B) as shown in the figure below. 2. Install the oil cooler (B), paying particular attention to the O-rings (C), as shown in the figure below. 3. Install new mounting screws...

Gearbox oil pump — removal
1. Remove the lower protective cover of the engine compartment (for more details, see the corresponding section in the chapter " Body "). 2. Remove the left front wheel. 3. Remove the left front wheel arch liner...
1. Remove the lower protective cover of the engine compartment (for more details, see the corresponding section in the chapter " Body "). 2. Remove the left front wheel. 3. Remove the left front wheel arch liner...

Transmission oil pump for gearbox — installation
1. Insert the drive shaft (A) of the transmission oil pump into the gearbox until it stops, as shown in the figure below. The drive shaft should be turned slightly. 2. Replace the transmission oil pump seal (B) on the...
1. Insert the drive shaft (A) of the transmission oil pump into the gearbox until it stops, as shown in the figure below. The drive shaft should be turned slightly. 2. Replace the transmission oil pump seal (B) on the...

Replacing the gear shift control shaft seal
Note: Necessary special devices, control and measuring instruments, as well as auxiliary means Special tool "MRZ-479 (VW423)". Puller "T20143/1". Removal the sealing ring (oil seal) 1. Remove the cable tightening the...
Note: Necessary special devices, control and measuring instruments, as well as auxiliary means Special tool "MRZ-479 (VW423)". Puller "T20143/1". Removal the sealing ring (oil seal) 1. Remove the cable tightening the...

Gearshift drive monitoring
1. In the selector lever positions "S", "D", "R" and in Tiptronic mode the engine cannot be started. 2. At speeds above 5 km/h and when the selector lever is moved to the "N" position, the electromagnet for locking the...
1. In the selector lever positions "S", "D", "R" and in Tiptronic mode the engine cannot be started. 2. At speeds above 5 km/h and when the selector lever is moved to the "N" position, the electromagnet for locking the...

Checking and adjusting the automatic transmission mode selection cable fastening
Control 1. Move the selector lever to position "P". 2. Turn off the ignition. 3. Remove the engine cover (for more details, see the relevant section in the chapter " Body "). 3. Remove the air filter assembly (for more...
Control 1. Move the selector lever to position "P". 2. Turn off the ignition. 3. Remove the engine cover (for more details, see the relevant section in the chapter " Body "). 3. Remove the air filter assembly (for more...
This section is available on russian, bulgarian, belarusian, ukrainian, serbian, croatian, romanian, polish, slovak, hungarian
Read similar sections on other Skoda models
➧ Transmission: Automatic gearbox Skoda Rapid 1 (2012-2022)
➧ Transmission: Automatic gearbox 0CW Skoda Octavia 3 (2013-2019)
Link to this section in various formats
TEXTHTMLBB Code
- General information
- User manual
- Controls and instruments
- Maintenance
- Power unit
- Petrol engine 1.4 l
- Petrol engine 2.0 l
- Diesel engine 2.0 l
- Fuel and control (petrol)
- Fuel and control (diesel)
- Cooling system (petrol 1.4 l)
- Cooling system (petrol 2.0 l)
- Cooling system (diesel 2.0 l)
- Lubrication system (petrol)
- Lubrication system (diesel)
- Intake and exhaust (petrol 1.4 l)
- Intake and exhaust (petrol 2.0 l)
- Intake and exhaust (diesel 2.0 l)
- Transmission
- Clutch
- Manual gearbox
- Automatic gearbox
- Drive shafts
- Chassis (running gear)
- Front suspension
- Rear suspension
- Wheels and tires
- Brake system
- Steering system
- Body and interior
- Exterior (external elements)
- Interior (internal elements)
- Doors, locks and windows
- Heating and air conditioning
- Security systems
- Electrical equipment
- Power devices
- Equipment and devices
- Electrical circuits
- Electrical circuits (petrol 2.0 l)
- Electrical circuits (halogen headlights)
- Electrical circuits (LED headlights)
- Electrical circuits (Climatronic)