



Electrical equipment and devices Skoda Kodiaq 1

Audio system — components
Components 1. Front tweeter; 2. Central speaker; 3. Rear tweeter; 4. Subwoofer; 5. Rear woofer; 6. Digital audio system control unit; 7. Front woofer.
Components 1. Front tweeter; 2. Central speaker; 3. Rear tweeter; 4. Subwoofer; 5. Rear woofer; 6. Digital audio system control unit; 7. Front woofer.

Digital Control Module/Audio Amplifier — removal and installation
1. Turn off all electrical consumers and remove the key from the ignition switch. 2. Adjust the driver's seat to the rearmost position. 3. Drill out the rivets (2) and remove the cover (1) in an upward direction as...
1. Turn off all electrical consumers and remove the key from the ignition switch. 2. Adjust the driver's seat to the rearmost position. 3. Drill out the rivets (2) and remove the cover (1) in an upward direction as...
Rear tweeter — removal and installation
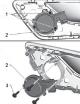
Removal 1. Turn off the ignition and all power consumers. 2. Remove the ignition key from the vehicle to prevent the ignition from turning on accidentally. 3. Remove the rear left door trim panel (for more details, see...
Removal 1. Turn off the ignition and all power consumers. 2. Remove the ignition key from the vehicle to prevent the ignition from turning on accidentally. 3. Remove the rear left door trim panel (for more details, see...

Front Subwoofer — removal and installation
Removal 1. Turn off the ignition and all power consumers. 2. Remove the ignition key from the vehicle to prevent the ignition from turning on accidentally. 3. Remove the front left door trim panel (for more details, see...
Removal 1. Turn off the ignition and all power consumers. 2. Remove the ignition key from the vehicle to prevent the ignition from turning on accidentally. 3. Remove the front left door trim panel (for more details, see...
Instrument panel (dashboard) — removal and installation
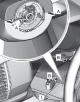
1. Turn off all electrical consumers of the vehicle. 2. Turn the steering wheel until it locks. 3. Using a suitable tool, lift the upper steering column trim panel in the direction of the arrows (arrows A), then remove...
1. Turn off all electrical consumers of the vehicle. 2. Turn the steering wheel until it locks. 3. Using a suitable tool, lift the upper steering column trim panel in the direction of the arrows (arrows A), then remove...

Windshield wiper components
Components 1. Fastening nut, tightening torque during installation 5 Nm; 2. Windshield wiper mechanism assembly; 3. Fastening screw, tightening torque 8 Nm; 4. Fastening nut, tightening torque 21 Nm; 5. Lid; 6....
Components 1. Fastening nut, tightening torque during installation 5 Nm; 2. Windshield wiper mechanism assembly; 3. Fastening screw, tightening torque 8 Nm; 4. Fastening nut, tightening torque 21 Nm; 5. Lid; 6....

Setting the windshield wipers to the service position
Caution: To avoid damaging the hood's paintwork, adjust the wiper arms' service position. 1. Turn on the ignition for a short period of time, then turn off the ignition. 2. Activate the wiper lever in the wipe position...
Caution: To avoid damaging the hood's paintwork, adjust the wiper arms' service position. 1. Turn on the ignition for a short period of time, then turn off the ignition. 2. Activate the wiper lever in the wipe position...

Windshield wiper blade
Replacement 1. Set the windshield wiper to the service position. 2. Lift the wiper arm away from the windshield. 3. Press the locking catch (arrow A) and pull the wiper blade (1) to remove it from the lever (2) in the...
Replacement 1. Set the windshield wiper to the service position. 2. Lift the wiper arm away from the windshield. 3. Press the locking catch (arrow A) and pull the wiper blade (1) to remove it from the lever (2) in the...
Windshield wiper arms
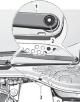
Removal 1. Set the windshield wiper to the service position. 2. Using a screwdriver, remove the covers (3) of the wiper arms (1), as shown in the figure below. 3. Loosen the fastening nuts (2) a few turns. Attention: Be...
Removal 1. Set the windshield wiper to the service position. 2. Using a screwdriver, remove the covers (3) of the wiper arms (1), as shown in the figure below. 3. Loosen the fastening nuts (2) a few turns. Attention: Be...

Windshield wiper mechanism — removal and installation
1. Set the windshield wiper to the parking position. 2. Turn off the ignition and all consumers, remove the ignition key from the vehicle. 3. Remove the windshield wiper arm ( for more details, see the relevant section...
1. Set the windshield wiper to the parking position. 2. Turn off the ignition and all consumers, remove the ignition key from the vehicle. 3. Remove the windshield wiper arm ( for more details, see the relevant section...

Windshield washer reservoir — removal and installation
Removal 1. Remove the front left wheel arch liner (for more details, see the corresponding section in the chapter " Body "). 2. Remove the headlight assembly on the left side ( for more details, see the relevant section...
Removal 1. Remove the front left wheel arch liner (for more details, see the corresponding section in the chapter " Body "). 2. Remove the headlight assembly on the left side ( for more details, see the relevant section...

Headlights — components
Halogen lamps 1. Fastening screw, tightening torque 3.5 Nm; 2. Hollow mounting bolt; 3. Headlamp housing; 4. Headlamp high beam bulb, H7; 5. Parking light bulb, W5WLL; 6. Lid; 7. Lid; 8. Turn signal lamp, PWY24W; 9. Fog...
Halogen lamps 1. Fastening screw, tightening torque 3.5 Nm; 2. Hollow mounting bolt; 3. Headlamp housing; 4. Headlamp high beam bulb, H7; 5. Parking light bulb, W5WLL; 6. Lid; 7. Lid; 8. Turn signal lamp, PWY24W; 9. Fog...

Removal and installation headlights
Removal Attention: If removed incorrectly, damage to the headlight or the protective element of the front bumper may occur. The protective element of the front bumper may be scratched. When removing the headlight, be...
Removal Attention: If removed incorrectly, damage to the headlight or the protective element of the front bumper may occur. The protective element of the front bumper may be scratched. When removing the headlight, be...

Adjusting the headlights relative to the body
1. Remove the front bumper panel assembly (for more details, see the relevant section in the chapter " Body "). 2. Loosen the mounting bolts. 3. Make sure that there is a uniform gap between the headlight and the...
1. Remove the front bumper panel assembly (for more details, see the relevant section in the chapter " Body "). 2. Loosen the mounting bolts. 3. Make sure that there is a uniform gap between the headlight and the...

Headlight adjustment (if provided)
Preparing for visual adjustment The headlight adjustment must be checked in the following cases: When installing a new headlight capsule. If, during repair or maintenance of the front end of the vehicle, the headlights...
Preparing for visual adjustment The headlight adjustment must be checked in the following cases: When installing a new headlight capsule. If, during repair or maintenance of the front end of the vehicle, the headlights...

Direction indicator lamp (halogen headlights) — removal and installation
Caution: Incandescent bulbs are under pressure and may rupture when replacing them, which could result in injury. Before starting work on replacing lamps, wear protective gloves and glasses. Attention: When replacing an...
Caution: Incandescent bulbs are under pressure and may rupture when replacing them, which could result in injury. Before starting work on replacing lamps, wear protective gloves and glasses. Attention: When replacing an...

Low beam headlight bulb (halogen headlights) — removal and installation
Caution: Incandescent bulbs are under pressure and may break when replaced, which could result in injury. Before starting work on replacing lamps, wear protective gloves and glasses. Attention: When replacing an...
Caution: Incandescent bulbs are under pressure and may break when replaced, which could result in injury. Before starting work on replacing lamps, wear protective gloves and glasses. Attention: When replacing an...

High beam headlight bulb (halogen headlights) — removal and installation
Caution: Incandescent bulbs are under pressure and may rupture when replacing them, which could result in injury. Before starting work on replacing lamps, put on protective gloves. Attention: When replacing an...
Caution: Incandescent bulbs are under pressure and may rupture when replacing them, which could result in injury. Before starting work on replacing lamps, put on protective gloves. Attention: When replacing an...

Relays and Fuses — location of fuse boxes (sa) in block e
Models produced since October 2016 No. Designation on the electrical circuit Rated current Functionality/Component Terminal/Output 1 Fuse 1 in fuse holder A "SA1" 125A Power for pin 30_1 30a 2 Fuse 2 in fuse holder A...
Models produced since October 2016 No. Designation on the electrical circuit Rated current Functionality/Component Terminal/Output 1 Fuse 1 in fuse holder A "SA1" 125A Power for pin 30_1 30a 2 Fuse 2 in fuse holder A...
Location of fuses (SB) on the E block, on the left in the engine compartment
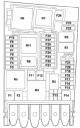
Models produced since October 2016 No. Designation on the electrical circuit Rated current Functionality/Component Terminal/Output F1 Fuse 1 in fuse holder B "SB1" 40A ABS control module -L 04- AS 30a F2 Fuse 2 in fuse...
Models produced since October 2016 No. Designation on the electrical circuit Rated current Functionality/Component Terminal/Output F1 Fuse 1 in fuse holder B "SB1" 40A ABS control module -L 04- AS 30a F2 Fuse 2 in fuse...

Location of fuses (SC) under the left side of the instrument panel
For models produced since October 2016 No. Designation on the electrical circuit Rated current Functionality/Component Terminal/Output F1 Fuse 1 in fuse holder C-SC1- F2 Fuse 2 in fuse holder C "SC2" F3 Fuse 3 in fuse...
For models produced since October 2016 No. Designation on the electrical circuit Rated current Functionality/Component Terminal/Output F1 Fuse 1 in fuse holder C-SC1- F2 Fuse 2 in fuse holder C "SC2" F3 Fuse 3 in fuse...
Possible malfunctions and how to fix them
Name Cause Solution The engine does not start or starting is difficult Ignition switch malfunction Ignition coil malfunction Spark plug failure System connections are broken High voltage wires faulty Check the ignition...
Name Cause Solution The engine does not start or starting is difficult Ignition switch malfunction Ignition coil malfunction Spark plug failure System connections are broken High voltage wires faulty Check the ignition...
This section is available on russian, bulgarian, belarusian, ukrainian, serbian, croatian, romanian, polish, slovak, hungarian
Read similar sections on other Skoda models
➧ Electrical equipment: Equipment and devices Skoda Fabia 2 (2007-2014)
➧ Electrical equipment: Equipment and devices Skoda Rapid 1 (2012-2022)
➧ Electrical equipment: Equipment and devices Skoda Octavia 1 (1996-2004)
➧ Electrical equipment: Equipment and devices Skoda Superb 2 (2008-2015)
➧ Electrical equipment: Equipment and devices Skoda Yeti (2009-2017)
➧ Electrical equipment: Equipment and devices Skoda Favorit (1987-1994)
Link to this section in various formats
TEXTHTMLBB Code
- General information
- User manual
- Controls and instruments
- Maintenance
- Power unit
- Petrol engine 1.4 l
- Petrol engine 2.0 l
- Diesel engine 2.0 l
- Fuel and control (petrol)
- Fuel and control (diesel)
- Cooling system (petrol 1.4 l)
- Cooling system (petrol 2.0 l)
- Cooling system (diesel 2.0 l)
- Lubrication system (petrol)
- Lubrication system (diesel)
- Intake and exhaust (petrol 1.4 l)
- Intake and exhaust (petrol 2.0 l)
- Intake and exhaust (diesel 2.0 l)
- Transmission
- Clutch
- Manual gearbox
- Automatic gearbox
- Drive shafts
- Chassis (running gear)
- Front suspension
- Rear suspension
- Wheels and tires
- Brake system
- Steering system
- Body and interior
- Exterior (external elements)
- Interior (internal elements)
- Doors, locks and windows
- Heating and air conditioning
- Security systems
- Electrical equipment
- Power devices
- Equipment and devices
- Electrical circuits
- Electrical circuits (petrol 2.0 l)
- Electrical circuits (halogen headlights)
- Electrical circuits (LED headlights)
- Electrical circuits (Climatronic)