
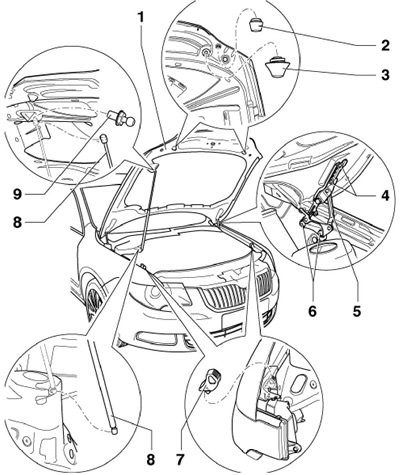
7.1 Hood installation details
1 Hood
2, 3 Stop buffer
4 Nut, 20 Nm
5 Loop
6 Corks
7 Guide piece
8 Gas rack
9 Hinge, 20 Nm
2. To remove the hood, remove the washer fluid nozzles on the windshield (see chapter 12) and pull the hoses and injector wiring out of the hood opening. Ask an assistant to hold the hood, give (4 in illustration 7.1) on both hinges, remove the support post (pry the retainer with a screwdriver and separate the rack from the hinge) and remove the hood from its hinges.
Note: When separating the stand, do not pull out the latch completely.
Installation is carried out in the reverse order. Take measures to prevent the development of corrosion between the hinge and the hood. Keep track of gaps (see specs). Adjust the buffer and check the opening and closing of the hood.
3. Details of the hood release drive are indicated on the resist. illustrations. You can remove the front and back of the cable separately by separating it. To separate the cable, pry off the connection cover with a flat screwdriver and open it, and then remove the cable from the connection. To remove the hood lock, disconnect its connector, unhook the cable (5), remove the bolts (7 and 8), slightly pull out the lock and unhook the cable from it.
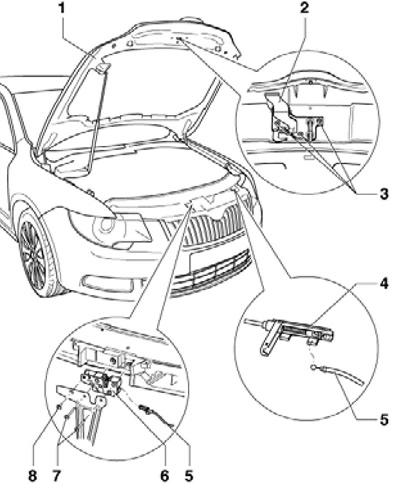
7.3 Bonnet release parts
1 Hood
2 safety hook
3 Bolt, 9 Nm
4 Rope connection
5 Rope
6 Hood lock
7, 8 Bolt, 12 Nm