
Removal and installation of a rack
1. Details of the assembly of the suspension strut are indicated on resist. illustrations.
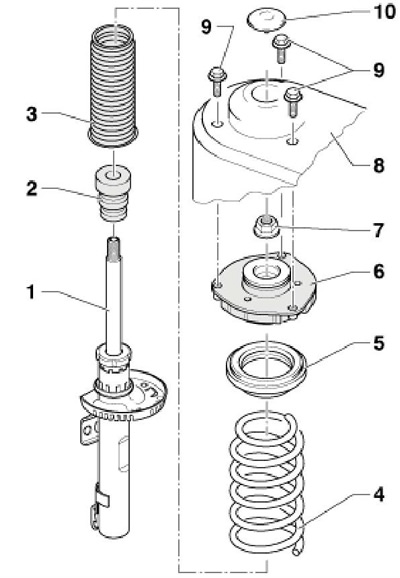
7.1 Suspension strut assembly parts
1 shock absorber
2 Rebound damper
3 Protective sleeve
4 Spring (definition - by PR number)
5 Groove bearing
6 Stand support
7 Self-locking nut, replaceable, 60 Nm
8 Body (rack support)
9 Bolt, to be replaced, 15 Nm, then retighten 90°
10 Plug
2. Loosen the bolt securing the drive shaft to the hub assembly (see Section 2 of Chapter 8).
3. Remove the wheel.
4. Give a nut of fastening of a rack of the stabilizer on a rack of a suspension bracket (see resist. illustration). Disconnect the ABS sensor wire from the suspension strut.
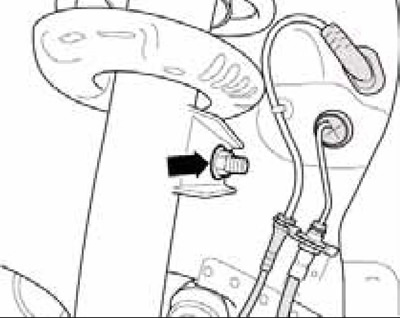
7.4 Stabilizer strut mounting nut on suspension strut
5. Give nuts (see illustration 4.5 of chapter 8) and separate the steering knuckle together with the ball joint from the suspension arm.
6. Pull the driveshaft outer CV joint out of the hub assembly. Secure the drive shaft to the body with wire.
Note: Do not allow the shaft to hang under its own weight.
7. Reattach the ball joint to the arm.
8. Mount the transmission jack with support T10149 on the hub assembly (see illustration 2.4).
9. Give the fasteners of the suspension strut on the steering knuckle (see illustration 6.8).
10. Expand the slot in the steering knuckle by inserting and turning wedge #3424 in it (see illustration 6.9).
11. Push the brake disc towards the suspension strut so that the strut does not jam in the steering knuckle.
12. Pull the steering knuckle down, separating it from the suspension strut, and lower it on the transmission jack so that the strut is completely out of the steering knuckle. Tie the steering knuckle to the subframe or console with wire and remove the jack.
13. Remove the windshield fairing.
14. Remove the cover of the air intake chamber, unscrew the bolts of the upper support of the suspension strut and remove the strut (see resist. illustration). Repair the removed rack if necessary (see subsection below).
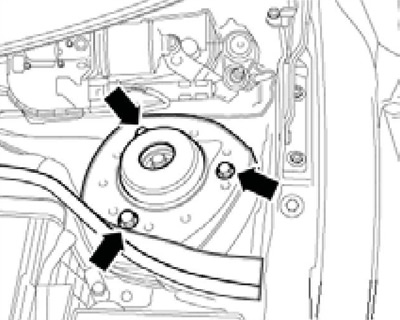
7.14 Suspension strut upper bolts
15. Insert the stand so that one of the arrows on its support points in the direction of travel (see resist. illustration). Tighten the upper strut mounting bolts and install the windshield fairing.

7.15 Rack post marks
16. Mount the transmission jack with support T10149 on the hub assembly (see illustration 2.4). Position the strut on the steering knuckle, carefully raise the steering knuckle on the jack and secure to the strut by inserting the bolt.
Note: When lifting the steering knuckle, press the brake disc against the strut. Remove wedge #3424 and tighten the strut fasteners on the steering knuckle.
17. Give nuts (see illustration 4.5 of chapter 8), pull the ball knuckle away from the arm, insert the drive shaft into the hub, reinsert the ball knuckle into the arm, and tighten the three nuts.
18. Install the remaining parts in reverse order. When tightening the hub bolt, following the sequence described in Section 2 Chapter 8.
Suspension strut repair (Removing and installing spring)
19. Fix the VAG1752/1 spring compressor with accessories in a vice and insert the suspension strut into it so that the spring coils are correctly located in the holder (see resist. illustration). Compress the spring just enough to release the bearing.
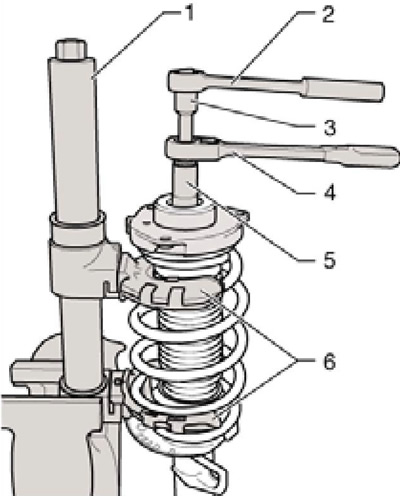
7.19 Compressing the spring
1 Spring compressor tool VAG1752/1
2 Torque wrench
3 Head Т10001/8
4 Ratchet Т10001/11
5 Head Т10001/5
6 Spring holder VAG1752/4
20. Give the hexagon nut on the piston rod and remove the rack support, the upper spring plate with a striker and the bearing with anther from it.
21. Remove the spring from the shock absorber on the compression tool. If necessary, loosen the tension and install a new spring in the fixture.
22. Installation is carried out in the reverse order. Make sure that the boot is properly seated on the thrust bearing. Do not bend the boot, and if it is bent, immediately return it to its normal position. Make sure that the striker is seated correctly in the upper spring plate. Use a new damper rod nut. Before loosening the spring, rotate its lower edge until it stops.