
Camber adjustment
Note: Camber adjustment is not provided, but can be leveled by moving the subframe.
1. Remove the sound insulation under the engine compartment (see chapter 11).
2. Loosen the bolts (1 per resist. illustrations) consoles/subframe (2) on both sides and move the subframe in the direction of the arrows (3) left or right.

19.2 Adjusting the camber of the front wheels
Note: Never move the subframe forward or backward.
The camber adjustment range is limited by the tolerances of the holes in the subframe. If the required value is not achieved by moving the components, check these components as well as the bodywork. After adjustment, tighten the new subframe bolts to the body (see specs).
3. After shifting the subframe and, accordingly, the steering mechanism, you should check the gap between the steering column hinge and the edges of the opening in the bulkhead of the engine compartment. To do this, remove the screws (see illustration 5.2) and remove the pad behind the pedals. Gap between hinge (2 in illustration 5.3) and the edges of the opening should be at least 5 mm around the entire circumference.
Convergence adjustment
4. Loosen locknut (2 in illustration 17.1), while holding the tip (1 or 11) steering traction. Loosen clamp (3), pull it off the boot. Adjust the toe-in by turning the left and/or right tie rod with an open end wrench on the hex on it.
5. After turning the rods, make sure that the anthers are not twisted, because. this will cause them to wear out quickly.
6. Tighten the locknut with a VAG1332/11 open-end wrench to 70 Nm while holding the tip (1 per resist. illustrations) traction, and check the convergence again.
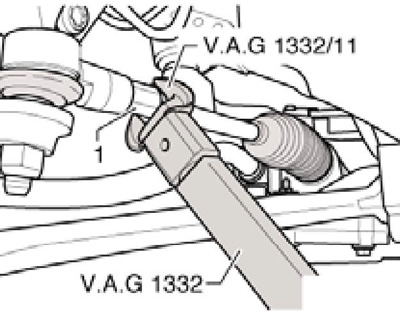
19.6 Tightening the locknut
7. After obtaining the desired result, tighten the boot collar.