Company vehicles Hyundai Company vehicles Kia Company vehicles Lada Company vehicles Mazda Company vehicles Mercedes-Benz Company vehicles Opel Company vehicles Mitsubishi
English Русский
Български
Беларускі
Український
Српски
Hrvatski
Română
Polski
Slovenský
Magyar
Articles   
Bookmark Contacts Sitemap
SkodaBook.ru


Fabia Rapid Octavia Superb Kodiaq Yeti Others
Superb 2 (2008-2015)

Removal and installation the trailing arm and hub assembly holder (Skoda Superb B6)

  • Main
  • Superb
  • B6 (2008-2015)
  • Chassis (running gear)
  • Rear suspension
  • Removal and installation the trailing arm and hub assembly holder
0
Note: The removal and installation of the hub assembly holder is described in Section 3 Chapter 8.


1. Remove the rear wheel and rear suspension spring (see Section 12).

2. Remove the parking brake cable holder mounting bolt on the trailing arm.

3. Remove the stand (1 in illustration 3.14 Chapter 8, using the AWD models as an example) from the stabilizer of the trailing arm and unscrew the bolts (arrows) securing the trailing arm to the hub assembly holder.

4. Mark the position of the bracket relative to the body, unscrew the bolts (see illustration 9.11) and remove the lever together with the bracket.

(Article published on the website: SkodaBook.ru)

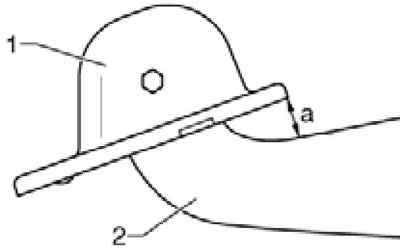
5. If after this from the longitudinal lever (2 on the accompanying illustration) the bracket (1) was separated, after installation the distance (a) should be 34±1 mm.

11.5 Installation position of the bracket on the…

11.5 Installation position of the bracket on the longitudinal arm


6. The threaded connections of the trailing arm and the hub assembly holder can only be tightened after all components have been installed (in particular, the spring and shock absorber). To tighten, the suspension must be unloaded (see Section 2). Only then move the trailing arm and the hub assembly holder to the desired position (arrows in illustration 3.22 Chapter 8). Follow the following sequence.


7. Position the trailing arm on the hub assembly holder and secure with bolts (arrows in illustration 3.23 Chapter 8), without tightening them completely. Fasten the stabilizer bar (2) to the trailing arm by hand.

8. Raise the suspension using a transmission jack with support T10149 (see illustration 2.4), so that the support bracket touches the body. Tighten the bracket bolts, positioning it according to the previous marks.

9. Lower the suspension on the jack and separate the T10149 support from it.

10. Install the spring.

11. Tighten the bolts completely (arrows in illustration 3.14 Chapter 8) of the trailing arm, tighten the nut (1) of the stabilizer bar on the trailing arm and on the hub assembly holder. Install the parking brake cable holder.

12. Install the wheel and perform a road test (see Chapter 1). Finally, check the wheel alignment angles (see Part D).
This article is available at russian, bulgarian, belarusian, ukrainian, serbian, croatian, romanian, polish, slovak, hungarian
Article verified: Leonid Vladimirov
Share with friends:
◀ Previous
Skoda Superb 2: Rear suspension
Next ►

Removal and installation the guide and transverse suspension arms
Removal and installation the subframe
Removal and installation the shock absorber and spring
Removal and installation the anti-roll bar
Removal and installation the rear suspension height sensor
Checking the camber and toe-in of the rear wheels
Read similar articles on other Skoda models

➧ Removal and installation the hydraulic control device holder Skoda Fabia 2 (2007-2014)
➧ Oil filter holder (1.6L TDI engine) Skoda Rapid 1 (2012-2022)
➧ Removal and installation the trailing arm with support bracket Skoda Octavia 3 (2013-2019)
➧ Oil filter with holder Skoda Kodiaq 1 (2016-2024)
➧ Removal and installation the trailing arm and hub assembly holder Skoda Yeti (2009-2017)
➧ Replacing the brush holder/voltage regulator module Skoda Felicia (1994-2001)
Link to this article in various formats
Reviews and comments of visitors
No comments yet


Add two numbers: 34 + 50


Superb 2 (2008-2015) 
  • General information
  • User manual
  • Car driving
  • Maintenance
  • Power unit
  • Petrol engines 3.6 l
  • Petrol engines 1.4 l
  • Petrol engines 1.8/2.0 l
  • Diesel engines 2.0 l
  • Diesel engines 1.9 l
  • Cooling system
  • Climate system
  • Power and exhaust system
  • Ignition and preheat system
  • Launch and charge system
  • Transmission
  • Manual gearbox and clutch
  • 7-speed DSG gearbox
  • 6-speed DSG gearbox
  • Transmission line
  • Chassis (running gear)
  • Brake system
  • Front suspension
  • Rear suspension
  • Steering
  • Body and interior
  • Exterior (external elements)
  • Interior (internal elements)
  • Electrical equipment
  • Equipment and devices
  • Lighting and signaling
SkodaBook.ru © 2018–2026 | Mobile version | Articles on Skoda | Sitemap EN BG BY UA RS HR RO PL SK HU | Feedback | Site search | Bookmark
Fabia 1 (1999-2007) | Fabia 2 (2007-2014) | Rapid 1 (2012-2022) | Octavia 1 (1996-2004) | Octavia 3 (2013-2019) | Superb 2 (2008-2015) | Kodiaq 1 (2016-2024) | Yeti (2009-2017) | Favorit (1987-1994) | Felicia (1994-2001) |
By continuing to use the site, you agree to the use of cookies.