



Contents: Driver's front airbag ⬇ Spiral spring with return ring…⬇ Coil spring with return ring and…⬇ Knee airbag ⬇
Driver's front airbag
Note: To remove it you will need a screwdriver approximately 170 mm long and with a blade width of approximately 5 mm.
1. Turn on the ignition and disconnect the negative battery cable (see Chapter 5).
2. Lower and pull out the steering column to the stop. Set the steering wheel to the position shown in the accompanying illustration.
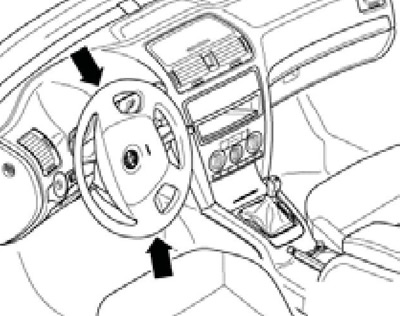
14.2 Steering wheel position for airbag removal
3. Insert a screwdriver into the hole on the back of the steering wheel until it stops and press the spring (And on the accompanying illustration) in the direction of the arrow (B), while simultaneously separating the airbag from the steering wheel. Turn the steering wheel 180° and loosen the lock on the other side in the same way.
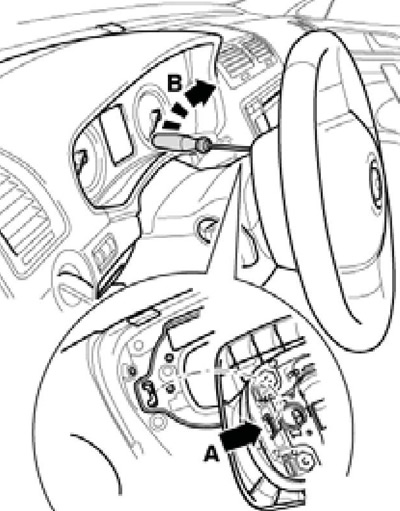
14.3 Separating the airbag from the steering wheel
4. Separate the airbag from the steering wheel, discharge any static electricity from yourself and disconnect the connectors (1 and 2 in the accompanying illustration). Place the airbag face up.
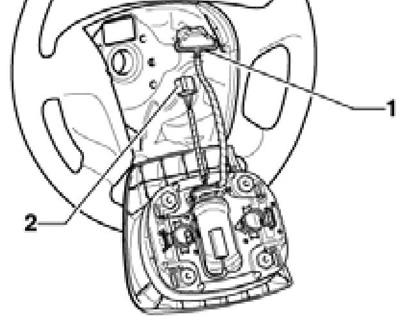
14.4 Steering wheel (2) and airbag (1) connectors
5. Installation is carried out in reverse order.
Spiral spring with return ring (models before 05.2010.)
6. Remove the steering column electronics control unit (see Section 17).
7. Carefully press the locking tabs (arrows in the accompanying illustration) and remove the coil spring (1) from the steering column paddle shifter support.
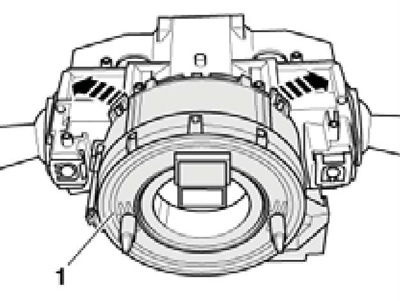
14.7 Removing the coil spring (until 05.2010.)
8. When installing, the coil spring should be in the center position and the front wheels should be in the straight-ahead position. If there is any doubt about the center position of the spring, adjust it as described in the next paragraph.
9. Set the front wheels to the straight-ahead position. Slowly turn the spring rotor by hand to the right until it stops, and then slowly turn it to the left until it stops, counting the revolutions. Slowly turn the spring rotor to the right by half the total number of revolutions - the upper connector should be horizontal. If necessary, fix the spring with adhesive tape.
Coil spring with return ring and steering column electronics control unit (models from 06.2010.)
Note: The coil spring and the steering column electronics control unit are combined into a non-separable module.
10. Remove the steering wheel and both steering column covers (see Chapter 10).
11. Using sticky tape (2 on the accompanying illustration) fix the coil spring (4) in the central position, i.e. when the connector (3) is located horizontally at the top. Unscrew the bolts (arrows), disconnect the connector (1) and slide the spring off the steering column.
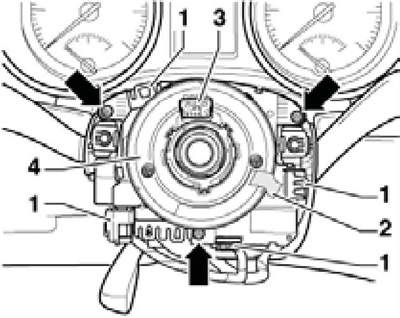
14.11 Removing the coil spring (since 06.2010.)
12. When installing, the coil spring must be in the central position and the front wheels in the straight-ahead position. If there is any doubt about the central position of the spring, set it as described in paragraph 9. The left steering column switch must be in the neutral position to avoid breaking its segment. After installing the new steering column control unit, it must be programmed.
Knee airbag
13. Turn on the ignition and disconnect the negative cable from the battery.
14. Remove the air duct in the driver's footwell.
15. Disconnect the connector (1 on the accompanying illustration). Open the driver's storage compartment, unhook it and remove the nuts (3). Remove the airbag (2) from the holder on the instrument panel beam.
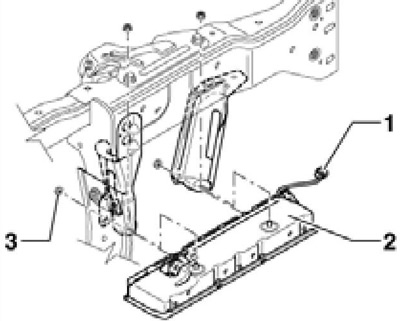
14.15 Removing the knee airbag
16. Installation is carried out in the reverse order. Tighten the nuts with a force of 9 Nm.