



Warning: Do not be distracted by the audio system, navigation system or mobile phone if traffic conditions do not allow it.
Depending on the configuration, one of several standard audio units may be installed. Some of them are combined with the navigation system unit. The audio unit is installed in the center console (12 in illustration 12.1). Depending on the number of speakers, they are designed for an amplifier output power of 4x20 W, or 4x50 W + 6x25 W.
The operating instructions for a specific model of audio system or navigation system are included with the vehicle that has the corresponding configuration.
In some trim levels, AUX-IN and MDI connectors may be installed under the central front armrest. These connectors are used to connect external audio devices (for example, iPod or MP3 player) and to output sound from these devices via the standard audio/navigation system. A description of the use of the AUX-IN and MDI inputs is given in the instructions for the audio/navigation system.
In some trim levels, a CD changer may be installed in the left side trim of the luggage compartment (see illustration 15.2) for the audio/navigation system. To insert a compact disc (CD), briefly press the button (C) - the indicators of the keys (D) corresponding to the free slots will flash, and the indicators in the keys corresponding to the occupied slots will light continuously. Then briefly press the button (D) with the corresponding free number and insert the disc into the slot (B) with the label facing up - it will automatically be drawn in and installed in the corresponding slot. If you do not press the button (D), the disc will be installed in the lowest free slot. If you press the button with a continuously lit indicator, the disc will be ejected from the corresponding slot. To install several CDs, hold down the button (C) and then sequentially insert up to 6 discs into the slot (B) (by the number of buttons with flashing indicators). After this, the indicators in all buttons stop flashing. To remove a CD, briefly press button (A) - the indicators in buttons (D) corresponding to the occupied cells will light up. Press the desired button (D) and pull the disc out of the slot (B). To remove all discs from the CD changer, hold button (A) down for at least two seconds and pull the discs out of the slot (D) one by one.
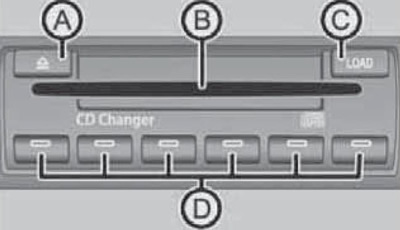
15.2 CD changer
Some trim levels feature DVD player on the rear of the front seat backs (see illustration 15.3). DVD players and their brackets can be selected from the Skoda accessories range. Installation and operating instructions are included with the DVD player.
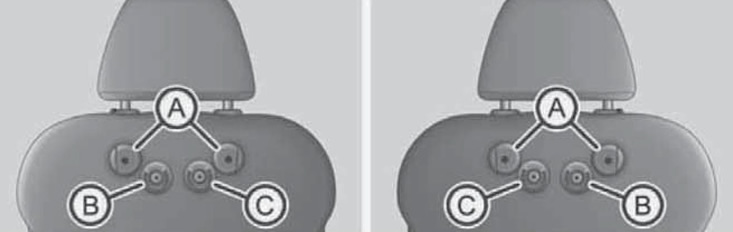
15.3 DVD preparation on the back of the left front seat (symmetrically on the right seat)
A Holes for mounting DVD player bracket
In Audio/video input
With DVD Player Input
Caution: Do not install the bracket without the DVD player if there are people sitting in the rear seats. The bracket should also be removed before folding the rear seat back.
If the steering wheel is equipped with a multifunction steering wheel, there are buttons on its left spoke (see illustration 15.1), designed to control the audio/navigation system and the telephone. The purpose of these buttons is described in the table.
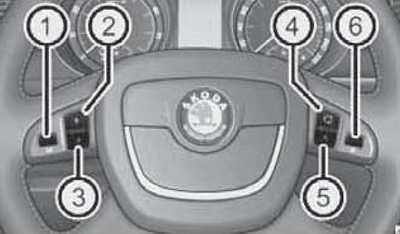
15.1 Buttons on the multifunction steering wheel (the purpose of the keys is indicated in the table)
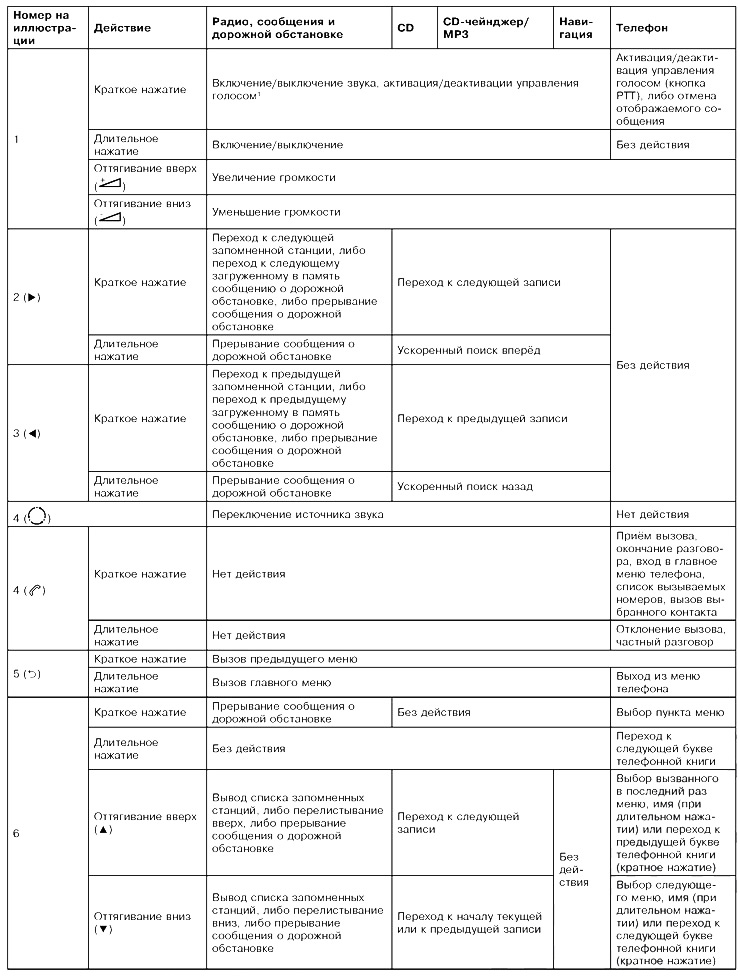
¹ Only for the "Columbus" navigation system.
The use of radios in a car is permitted only if there is a correctly installed external antenna and the transmitter power is no more than 10 W. Radios with a transmitter power of more than 10 W must be installed at a Skoda service station.
When using a mobile phone in a car without a phone adapter inserted and therefore not connected to an external antenna, the electromagnetic radiation limits may be exceeded. This may cause malfunction of the car's electronic systems, especially if the transmitter power exceeds 10 W. In this regard, and to improve the quality of communication, it is recommended to use a mobile phone in a car only when it is connected to an external antenna via a phone adapter.