



Warning: Do not turn on the independent heater (including not programming the time of its switching on accordingly) and do not leave it running in unventilated areas or closed rooms, otherwise there is a risk of carbon monoxide poisoning. If the independent heater is programmed to turn on during parking, do not leave the car parked over dry grass to prevent the grass from catching fire due to the heating of the exhaust system of the independent heater. Make sure that the heater outlet pipe is not blocked (for example, snow or mud).
There are two modes of operation of the autonomous heater: heating and ventilation. The operating mode is selected through the instrument cluster display menu (see Section 13). The "heating" mode allows you to preheat the coolant, clear the windshield from ice or condensation, and melt a thin layer of snow before starting a trip. The ventilation mode allows you to ventilate and cool a heated car before starting a trip. When the independent heater is operating, it is recommended to keep the climate system at 22°C and in the air supply mode to the windshield.
You can turn on the autonomous heater manually or program the time of its switching on (see below). Manual switching on/off is carried out using the key
 on the climate control panel or via the remote control (see below). The operation of the independent heater is indicated by a lit indicator in the " key
  ". The independent heater does not switch on/off automatically if: the programmed operating time has expired, or the reserve fuel supply has begun to be used, as well as when the battery charge is critically low. After the independent heater is switched off, the coolant pump continues to operate for some time.
To program the time for switching on the independent heater, use the "Additional heating" menu of the display in the instrument cluster (see section 13). You can program three options for the heater's turn-on time (including days of the week), as well as the duration of its operation in the selected mode. To work properly, make sure that the time on the clock and the day of the week in the menu "Add. otop.>Day of the week" is set correctly. The selected start-up time applies only to one cycle of automatic heater start-up. In order for the heater to turn on next time, the required time must be activated again. After each time the autonomous heater is switched on and the ignition is switched off, the battery should be recharged by driving the car for the same amount of time as the heater was running.
Remote control for autonomous heater
A separate remote control is used for remote control of the autonomous heater (see illustration 14.3). Handle the remote control carefully to avoid damaging the electronic components inside. The operating range of the remote control with a fully charged battery and favorable signal propagation conditions is 600 m. To increase the operating range of the remote control, hold the remote control with the antenna (A) upward. The remote control should not be used at a distance of less than 2 meters. After pressing the button on the remote control, the indicator on the remote control provides the user with the following response information.
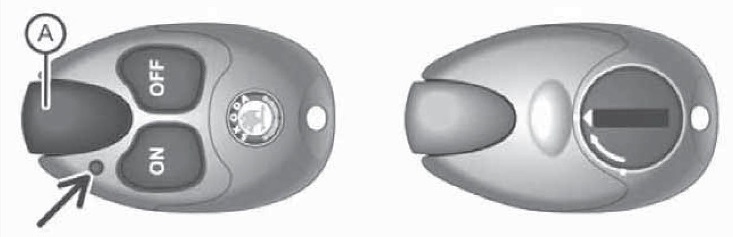
14.3 Front (left) and back (right) sides of the remote control for an autonomous heater
Lights up green/red for about 2 seconds - the independent heater is turned on/off by pressing the "ON"/"OFF" button.
Green/red light flashes slowly for about 2 seconds (about 4 flashes per second) - the on/off signal was not received.
Flashes green rapidly for about 2 seconds (approximately 10 flashes per second) - the independent heater is blocked due to low fuel supply, low battery charge or internal malfunction.
Lights up orange for about 2 seconds, then turns green/red - the battery in the remote control is almost discharged, but the autonomous heater was able to be turned on/off by pressing the "ON"/"OFF" button.
Lights up orange for about 2 seconds and then flashes green/red - the remote control battery is almost discharged, the autonomous heater could not be turned on/off by pressing the "ON"/"OFF" button.
Flashes orange for about 5 seconds or does not respond at all - the remote control battery is discharged, the remote control does not work.
To replace the remote control battery, turn it over to the back, turn the cover (see illustration 14.3) counterclockwise and remove it. When removing the battery, remember which way it was installed so that you can install the new battery the same way.