



Contents: TSU bracket/ball end ⬇ Bringing to the ready position/ready…⬇ Installing the ball end/locking the…⬇ Checking the correctness of the…⬇ Removal the ball end of the TSU ⬇
The vehicle has a 13-pin socket for connecting the electrical systems of the vehicle and the trailer. If the trailer to be connected has a 7-pin socket, one of the corresponding ŠKODA adapters can be used. The maximum permissible vertical load on the towing hitch is 75 kg (80 kg for Combi 4x4).
TSU bracket/ball end
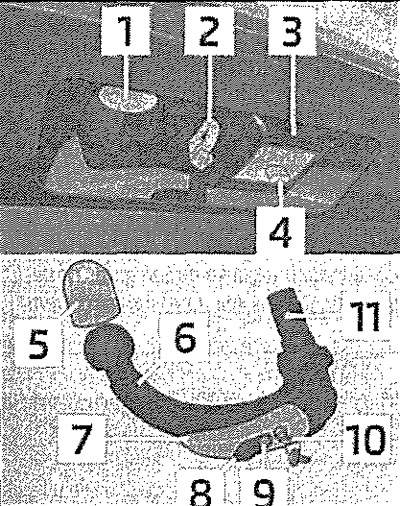
The ball end is removable and is located in the spare wheel well or in the spare wheel compartment in the luggage compartment.
1. 13-pin socket
2. Locking eye
3. Ball joint socket
4. Lid
5. Protective cap
6. TSU ball end
7. Control lever
8. Lock cap
9. Release finger
10. Key
11. Fixing balls
Bringing to the ready position/ready for installation position
Before installing the ball end of the TSU, it must be brought to the position ready for installation. Turn key 1 so that the red mark is visible. Take hold of the ball end under the protective cap 2. Press the release pin 3 in the direction of the arrow until it stops and simultaneously press the lever 4 in the direction of the arrow down until it stops. The lever will remain fixed in this position.
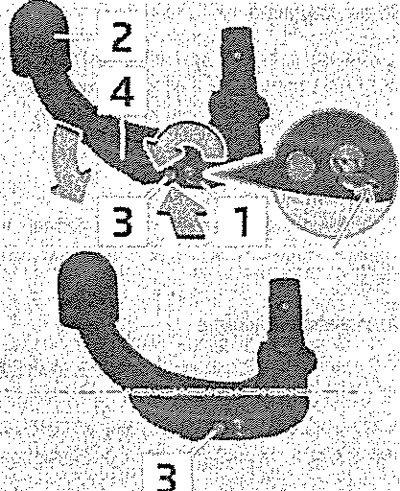
Caution! In the ready-to-install position, it is impossible to remove the key or turn it to another position.
Installing the ball end/locking the lock and installing the protective cap
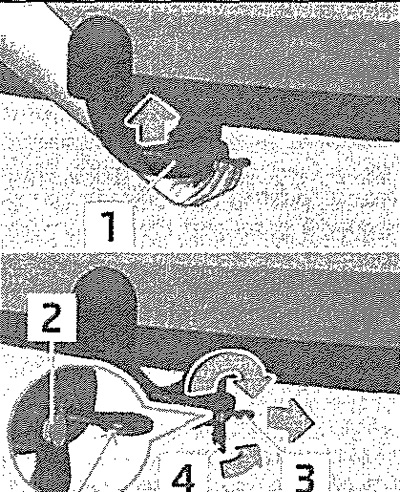
Remove cover 4 downwards. Bring the ball end of the towing hitch to the position ready for installation. Grasp the ball end from below and insert it into the socket until it clearly locks into place. Lever 1 rotates upwards on its own and release pin 2 extends (its red and green parts become visible). If lever 1 does not turn on its own, or the release pin 2 does not extend, it is necessary to turn the lever down until it stops, remove the ball end from the socket and clean the inclined surfaces of the ball end and the socket. Lock the control lever by turning the key 180° clockwise (his green mark 3 is visible) and remove the key in the direction of the arrow. Put the cap 4 on the lock in the direction of the arrow. Check that the ball end is secured correctly.
Caution! When attaching the ball joint, keep your hands outside the rotation area of the lever - risk of finger injury! Never try to pull the control lever upwards by force to turn the key. This will cause the ball joint to be attached incorrectly! After removing the key, always replace the cap on the lock - risk of contamination of the lock. Keep the ball joint socket clean. Contamination prevents the ball joint from being securely attached! Always close the socket with the cap when the ball joint is removed.
Checking the correctness of the fastening
Proper fixing of the towing hitch ball joint
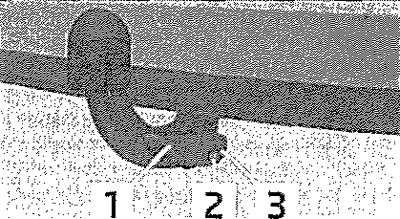
Before each use of the ball end of the TSU, it is necessary to check its proper fastening. Check the following points: lever 1 is in the extreme upper position, pin 2 is fully extended (red and green parts are visible), the key is removed, cap 3 is put on the control lever lock, the ball end, if you "wiggle" it strongly, does not come out of the socket.
Removal the ball end of the TSU
Unlocking the control lever of the ball end Disconnecting the ball end
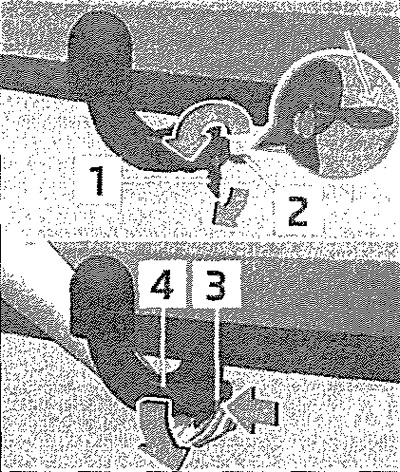
Remove cap 1 from the ball joint lock in the direction of the arrow. Unlock the control lever lock by turning key 2 180° counterclockwise until the red mark becomes visible. Grasp the ball joint from below. Press release pin 3 in the direction of the arrow as far as it will go and simultaneously press lever 4 in the direction of the arrow down as far as it will go. In this position, the ball joint is released and falls downwards into your hand. If, after release, the ball joint does not come off the socket on its own, press it from above with your other hand. At the same time, the ball joint locks into the ready-to-install position and is thus ready to be installed in the mounting socket again. Close the mounting socket with cover 4.
Caution! If the lever is held and not pressed down all the way, after removing the ball end it returns to the upper position again and does not lock in the ready-to-install position. In this case, the towing hitch ball end must be brought to this position before the next installation. Place the ball end in the ready-to-install position with the key inserted in the lock in the toolbox, placing it with the side facing the inserted key down - risk of damaging the key! Do not apply excessive force to the control lever (for example, don't stand on it with your feet)! Before removing the ball end, it is recommended to put a protective cap on it. Before storing the ball end in the box with the on-board tool, clean the ball end from dirt.
Source of the article web resource SkodaBook.ru
Operation and maintenance
Cover the mounting socket with a cap to prevent contamination. Always check the towball before connecting the trailer and, if necessary, treat it with a suitable grease. When storing the towball, use a protective cap to protect the luggage compartment from contamination. If contaminated, clean the surfaces of the towball mounting socket and treat them with a suitable preservative.
Caution! There is grease in the top of the mounting socket. Do not allow the grease to come off.