
Removing
1. Turn off the ignition and all electrical consumers.
2. Disconnect and remove the front part of the right wheel arch liner (for details, see the relevant section in chapter Body).
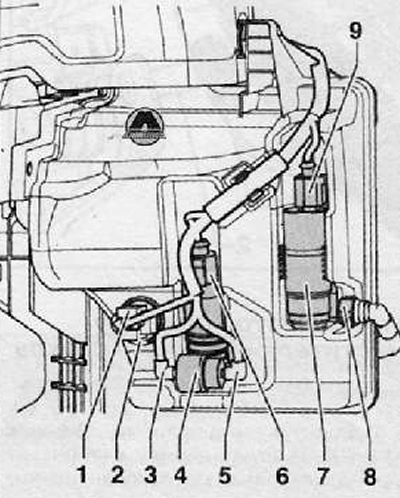
3. Disconnect the wiring harness connector (6) from the windshield washer pump, then disconnect the wiring harness connector (9) from the headlight washer pump and from the washer fluid level sensor as shown in the figure below.
4. To unlock, turn the locking clip on the connection (3) (black mark - windshield washer), (5) (white mark - rear window washer), then disconnect the hose from the washer pump (4), as shown in the figure below. Collect escaping washer fluid in a suitable container.
5. To unlock, squeeze the fastening clamp and pull the hose together with the coupling (8), by disconnecting it from the headlight washer pump (7), as shown in the figure below.
6. If necessary, move the washer pumps upward from the washer fluid reservoir (before displacement of the pump (7) for the headlight washer, it must first be rotated 90 degrees). Then remove the fluid level sensor in the washer reservoir (1), shown in the figure below.
7. Remove the front bumper (for details, see the relevant section in chapter Body).
8. Remove the cap from the neck.
9. Move the cistern support (4), to detach from the holder (3), as shown in the figure below.
10. Remove the clamp (5) (arrow), as shown in the figure below.
11. Unscrew the fastening nuts (1), then remove the washer fluid reservoir (2), as shown in the figure below. The tightening torque of the fastening nuts when installing the tank: 8 Nm.

Installation
Installation is carried out in the reverse order of removal.
Hoses with clamps must be connected with a characteristic click.