
Removing
Note.
- Necessary special devices, control and measuring devices, as well as auxiliary means:
- Stand for removing and installing the engine and gearbox -VA G 1383A -.
Note. The ignition must be turned off and the key removed from the ignition.
1. After opening the cover, unscrew the fuel tank filler cap.
2. Remove the rear right wheel arch liner (for details, see the relevant section in chapter Body).
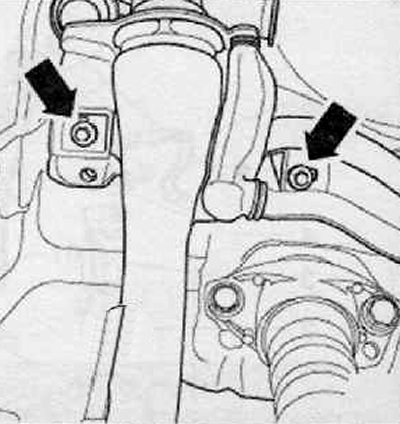
3. Unscrew the retaining screws on the filler neck (arrows), as shown in the figure below.
4. Remove the rear seat cushion assembly (for details, see the relevant section in chapter Body).
5. Disconnect the wiring harness connector, remove the fuel supply and return lines from the fuel pump flange.
Attention. The fuel supply line is under pressure. Cover the joint with a clean cloth before disconnecting hose connections. Then release the pressure by carefully disconnecting the connection.
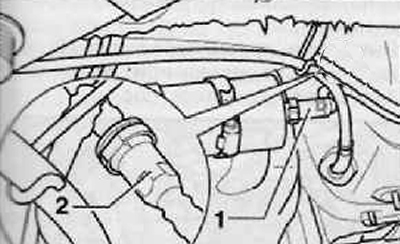
6. Disconnect the fuel supply line (1) and vent pipe (2) by pressing the button on the coupling to connect the hoses, as shown in the figure below.
7. Unscrew the bolts of the mounting bands of the fuel tank.
8. Support fuel tank with engine and gearbox removal and installation tool -VAG 1383 A-.
9. Remove the fuel tank retaining screws.
10. Having slightly lowered the device for dismantling the power unit, remove the fuel tank with the assistance of a second mechanic.
Installation
1. Installation is made in reverse order to removal.
Check bleed and fuel hoses for damage.
Check the tightness of the fuel hoses.
Do not confuse the fuel supply line with the bleed line.
After replacing the fuel tank, bleed air from the fuel system using the valve on the fuel rail.
Note. After installing the fuel pump, check whether the fuel supply and return lines and the air bleed pipe are fixed to the fuel tank.