
Company vehicles Hyundai Company vehicles Kia Company vehicles Lada Company vehicles Mazda Company vehicles Mercedes-Benz Company vehicles Opel Company vehicles Mitsubishi
English Русский
Български
Беларускі
Український
Српски
Hrvatski
Română
Polski
Slovenský
Magyar
Articles   
Bookmark Contacts Sitemap
SkodaBook.ru


Fabia Rapid Octavia Superb Kodiaq Yeti Others
Rapid 1 (2012-2022)

Replacing the left shaft seal with the gearbox flange 02U (Skoda Rapid NH1)

  • Main
  • Rapid
  • NH1 (2012-2022)
  • Transmission
  • Mechanical gearbox
  • Replacing the left shaft seal with the gearbox flange 02U
0
Contents: Removal ⬇ Installation ⬇
Note.
  • Necessary special devices, control and measuring instruments, as well as auxiliary means:
  • Universal device (MRZ-419 (VW 771).
  • Puller (MRZ-419/37 (VW 771/37).
  • Driving device (T10160).
  • Receiving bath.
  • Sealing grease (G 052 128 A1).


Removal


1. Remove the front left wheel by unscrewing its mounting bolts.

2. Remove the lower engine protective cover.

3. Remove the wheel arch (wing) liner of the left front wheel (for more details, see the corresponding section in the chapter Body).

4. Turn the steering wheel all the way to the left.

5. Disconnect the drive shaft from the shaft with the gearbox flange.

6. Loosen the nuts (arrows) securing the lower left arm of the front suspension to the ball joint, as shown in the figure below.
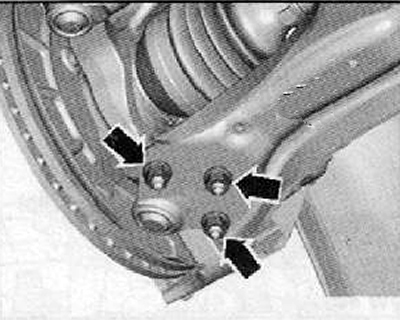
6. Loosen the nuts (arrows) securing the lower…


7. Loosen the nut (1) securing the strut (3) to the anti-roll bar, as shown in the figure below. Disconnect the strut from the anti-roll bar. Repeat this operation on the other side.

8. After disconnecting the struts from the anti-roll bar, turn the anti-roll bar (2) upward.
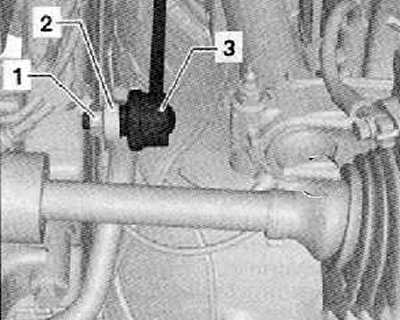
8. After disconnecting the struts from the…


9. Fold the wheel hub bearing housing cover outward to the left.


10. Insert the drive shaft into the wheel arch and suspend it with a piece of wire on the shock absorber strut. Do not damage the protective paint coating of the drive shaft.

11. Place a special tray under the gearbox to collect fuel and lubricants.

12. Unscrew the flange shaft mounting screw; for this purpose, screw two screws into the flange and hold the flange shaft using the assembly lever, as shown in the figure below.

13. Remove the shaft with the flange, including the spring.
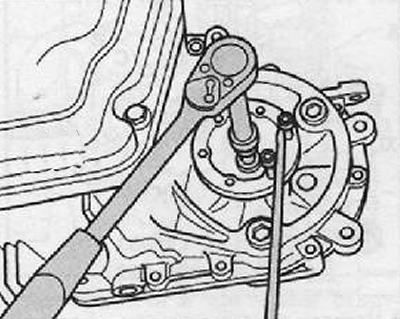
13. Remove the shaft with the flange, including…


14. Remove the shaft seal with flange using a universal tool (MPZ-419 (VW 771)) and a puller (MPZ-419/37 (VW 771/37)), as shown in the figure below.
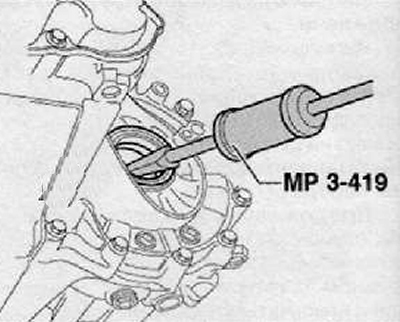
14. Remove the shaft seal with flange using a…


Installation


1. Press in the new sealing cuff (oil seal) until it stops. Make sure that the ring does not become distorted, as shown in the figure below.


2. Fill the space between the working edges halfway with sealing grease (9G 052 128 A1).
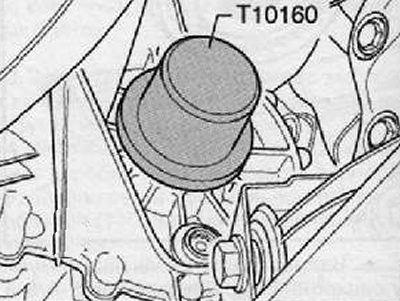
2. Fill the space between the working edges…


3. Install the flange shaft into the gearbox assembly. The flange shaft should be secured with a conical head screw and tightened to the appropriate tightening torque.

4. Connect the drive shaft to the flange.

5. Connect the stabilizer struts to the anti-roll bar. Install and tighten the mounting nuts to the required tightening torque.

6. Check the transmission oil level and, if necessary, top it up to the lower edge of the filler hole.

7. Install the wheel arch liner (lining) of the left wheel (for more details, see the corresponding section in the chapter Body).

8. Install the lower engine cover.

9. Install the front left wheel, install and tighten its mounting bolts to the required tightening torque.
This article is available at russian, bulgarian, belarusian, ukrainian, serbian, croatian, romanian, polish, slovak, hungarian
Article verified: Anatoly Ovchinnikov
Share with friends:
◀ Previous
Skoda Rapid 1: Mechanical gearbox
Next ►

Gearbox assembly 02U
Disassembling the gearbox 02U
Tightening torques for threaded connections of gearbox 02U
Removal and installation of a 6-speed manual gearbox 02U
Gearbox assembly 02T
Replacing the right shaft seal with the 02U gearbox flange (the seal and…
Differential assembly — external view (gearbox 02U)
Outer race of tapered roller bearing of gearbox differential 02U
Inner rings of tapered roller bearing of differential of gearbox 02U
Outer ring of tapered roller bearing of gearbox differential 02U
Read similar articles on other Skoda models

➧ Replacing the right shaft seal with a split flange Skoda Fabia 2 (2007-2014)
➧ Pulley Side Flange Seal — General Installation Diagram Skoda Octavia 3 (2013-2019)
➧ Features of replacing flange shaft seals Skoda Superb 2 (2008-2015)
➧ Replacing the gear shift control shaft seal Skoda Kodiaq 1 (2016-2024)
➧ Features of replacing flange shaft seals Skoda Yeti (2009-2017)
➧ Replacing the intermediate shaft seal Skoda Felicia (1994-2001)
Link to this article in various formats
Reviews and comments of visitors
No comments yet


Add two numbers: 45 + 30


Rapid 1 (2012-2022) 
  • General information
  • Faults en route
  • User manual
  • Maintenance and care
  • Power unit
  • Petrol engines
  • Diesel engines
  • Power and control system
  • Lubrication system
  • Cooling system
  • Intake and exhaust system
  • Transmission
  • Clutch
  • Mechanical gearbox
  • Automatic gearbox
  • Drive shafts
  • Chassis (running gear)
  • Front suspension
  • Rear suspension
  • Brake system
  • Steering
  • Body and interior
  • Exterior (external elements)
  • Interior (internal elements)
  • Doors, locks and windows
  • Heating and air conditioning
  • Security systems
  • Electrical equipment
  • Equipment and devices
  • Power devices
  • Electrical circuits
  • Electrical circuits (petrol)
  • Electrical circuits (diesel)
SkodaBook.ru © 2018–2026 | Mobile version | Articles on Skoda | Sitemap EN BG BY UA RS HR RO PL SK HU | Feedback | Site search | Bookmark
Fabia 1 (1999-2007) | Fabia 2 (2007-2014) | Rapid 1 (2012-2022) | Octavia 1 (1996-2004) | Octavia 3 (2013-2019) | Superb 2 (2008-2015) | Kodiaq 1 (2016-2024) | Yeti (2009-2017) | Favorit (1987-1994) | Felicia (1994-2001) |
By continuing to use the site, you agree to the use of cookies.