



Note: Before installing the parts, make sure that their fasteners are intact.
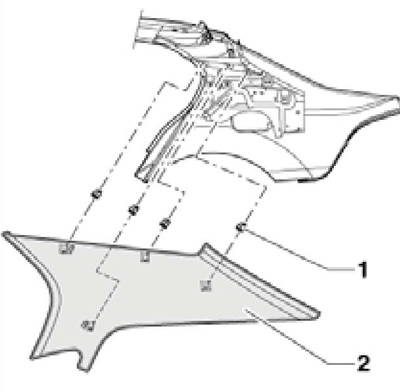
1. To remove the upper trim of the A-pillar (2 on the accompanying illustration) unhook its fasteners (1) from the rack, starting from the top one.
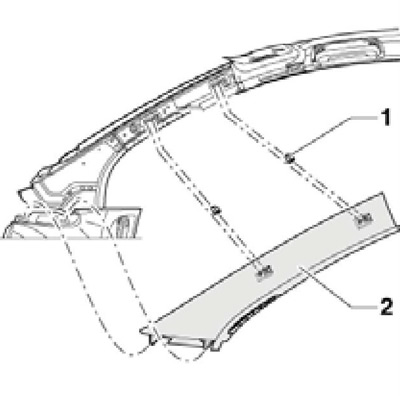
17.1 Right upper A-pillar trim fasteners
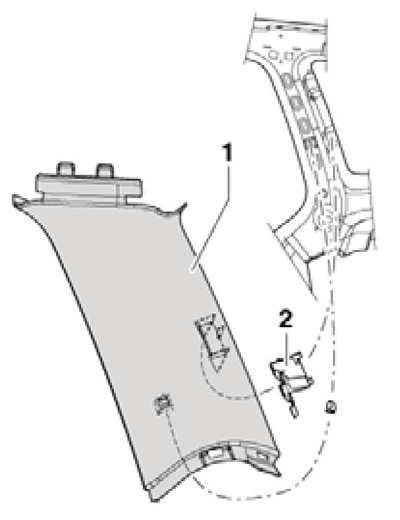
2. To remove the lower trim of the A-pillar (1 on the accompanying illustration) remove the lower B-pillar trim (see below), hood release lever (only on the left side), remove the screw (2, 1.5 Nm, left side only) and pull the cover out of the clips (3).
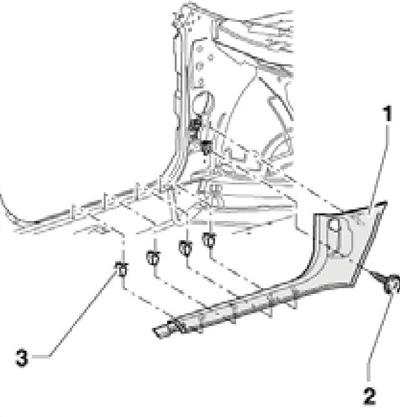
17.2 Removing the left lower trim of the A-pillar
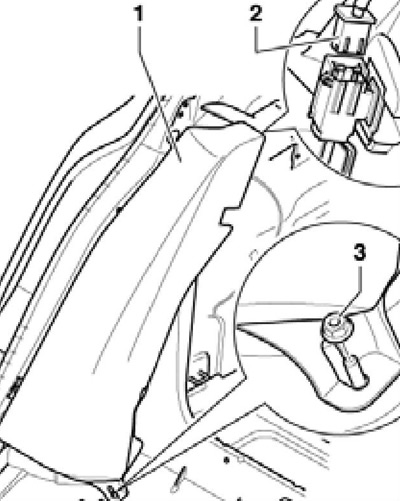
3. To remove the upper trim of the B-pillar (1 on the accompanying illustration) remove the lower seat belt anchor from the seat (11 in illustration 20.1), release the trim on the sides from the door seals, unhook it from the top, pass the seat belt (2) through it and disconnect the air duct connector (3) as described in Chapter 3. Check the fasteners (4).
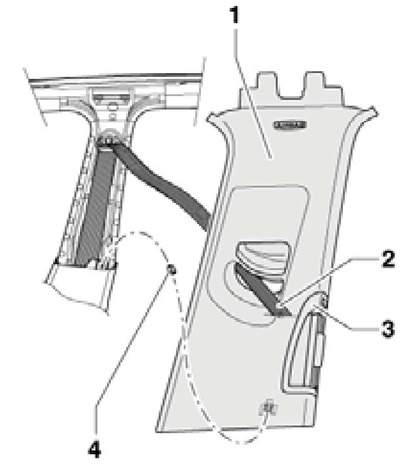
17.3 Removing the upper trim of the B-pillar
4. To remove the lower trim of the B-pillar (2 on the accompanying illustration) remove the rear seat together with the backrest (see Section 19), loosen the lower part of the upper B-pillar trim (see paragraph 3), unscrew the bolts (4, 1.5 Nm), remove the retainer (3), carefully separate the trim and disconnect the interior volume sensor connector (if available, only on the left side). Check the fasteners (1).
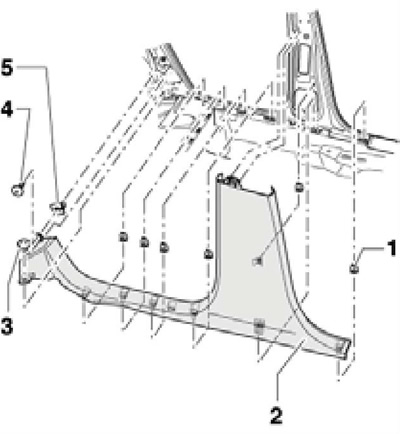
17.4 Removing the lower trim of the B-pillar
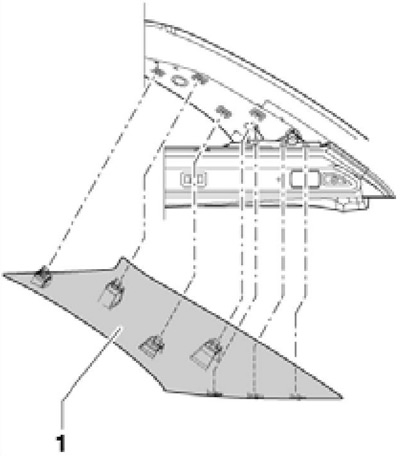
5. To remove the upper trim of the C-pillar (2 on the accompanying illustration) on Hatchback models, release it from the clips (1).
17.5 Removing the upper pillar trim Hatchback models
6. To remove the upper trim of the C-pillar (1 on the accompanying illustration) on station wagon models, remove the upper part of the side trim of the luggage compartment, release the C-pillar trim from the clips (2), tilt it and press it out of the openings in the body in a downward direction.
17.6 Removing the upper pillar trim from Station wagon models
7. To remove the lower trim of the C-pillar (on the accompanying illustration) remove the back seat (see Section 19), disconnect the airbag connector (2) (if available), loosen the nut (3.24 Nm), turn the pad upwards by approximately 90° and unhook it from the support.
17.7 Removing the lower trim of the C-pillar
8. To remove the upper trim of the D-pillar (1 on the accompanying illustration) for station wagon models, unhook its fasteners from the rack.
17.8 D-pillar upper trim fasteners (station wagon models only)
9. To remove the rear door sill trim (1 on the accompanying illustration) on hatchback models, lift the floor covering, remove the spare wheel, loosen the nuts (2, 2.2 Nm), unscrew the screws (3, 1.5 Nm) and unhook the trim from the threshold in an upward direction. Disconnect the microswitch connector on the back of the trim and remove it. 10 To remove the rear door threshold trim (3 on the accompanying illustration) on station wagon models, unscrew the bolts (2, 2.5 Nm) from the luggage compartment side and unhook the trim from the threshold upwards. If necessary, you can then unscrew the upper bolts (2) and remove the side trim of the tailgate opening.
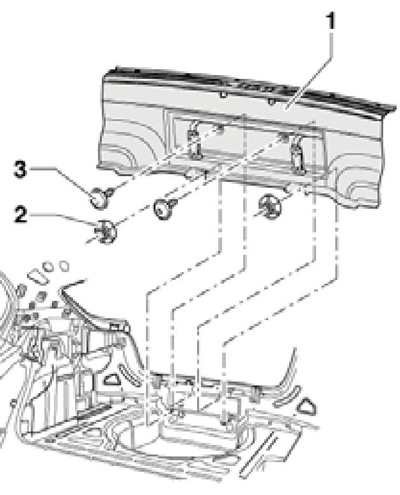
17.9 Fastening the rear door sill trim for hatchback models
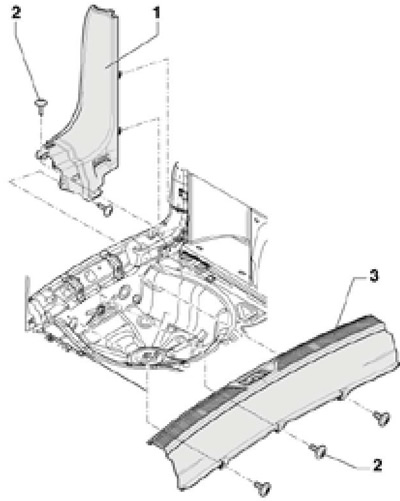
17.10 Fastening the lower and side trims of the rear door opening of Hatchback models
Side trim of the luggage compartment (Hatchback)
11. The fastening details of the luggage compartment side trim are shown in the accompanying illustration. References in this subsection refer to this illustration.
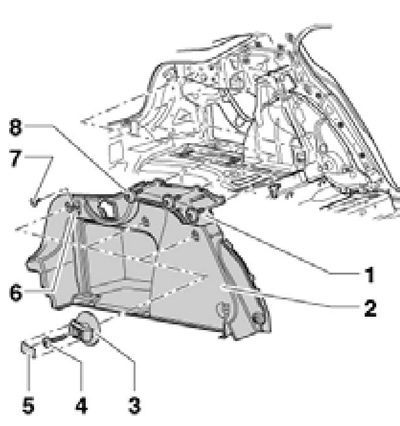
17.11 Installation details of the side trim of the luggage compartment of the Hatchback models
1 Upper overlay
2 Side trim of the luggage compartment
3 Retainer
4, 7, 8 Screw, 2.5 Nm
5 Plug
6 Hook
12. Remove the rear seat (see Section 19) and the lower trim of the C-pillar (see paragraph 7).
13. Remove the screws (8) of the cover (1). Then remove the screw (7), remove the hook (6) and remove the cover (1).
14. Remove the threshold trim (see paragraph 9).
15. Remove the plug (5), unscrew the screw (4) and remove the retainer (3).
16. On the right side, disconnect the 12V socket connector.
17. Disconnect the luggage compartment light connector and remove its side trim (2).
Side trim of luggage compartment (Station wagon)
18. The fastening details of the luggage compartment side trim are shown in the accompanying illustration. The references in this subsection refer to this illustration. The side trim can only be removed after removing its upper cover.
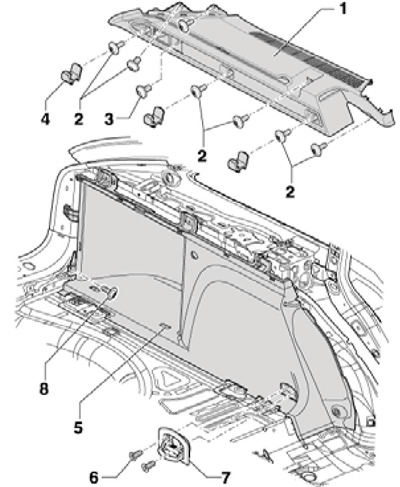
17.18 Installation details of the side trim of the luggage compartment of the Station wagon models
1 Upper overlay
2, 8 Screw, 2.5 Nm
3 Screw, 7 Nm
4 Hooks-plugs
5 Side trim of the luggage compartment
6 Bolt, 5.5 Nm
7 Eye
19. Remove the luggage compartment cover and remove the upper D-pillar trims (see paragraph 8).
20. If equipped, remove the rear side airbag (see Chapter 12).
21. Remove the outlet flange from the rear bottom.
22. Remove the plugs (4) and unscrew the screws (2). Unscrew the bolts (3) of the folding hooks.
23. Unhook the upper cover, disconnect the connectors of the luggage compartment light and the locking element to release the luggage compartment cover. Remove the upper cover (1).
24. Remove the side trim of the rear door opening (see paragraph 10).
25. Remove the rear seat back (see Section 19).
26. If equipped, remove the loading aid and high luggage compartment floor.
27. Remove the screw (8) and bolts (6). Remove the eye (7), disconnect the 12-volt socket connector and remove the side trim (5) of the luggage compartment.