



Contents: Description of the climate system ⬇ Description of the refrigeration unit ⬇ Safety precautions when servicing a…⬇
Note: Due to its greater prevalence and the greatest complexity of repair, the climate control system is discussed below; heating and ventilation systems without a refrigeration unit are not considered.
Description of the climate system
The description of the climate control system is given in Chapter "Controls and operating techniques". The main components of the climate control system located in the vehicle interior are shown in Illustrations 8.1. a-b.
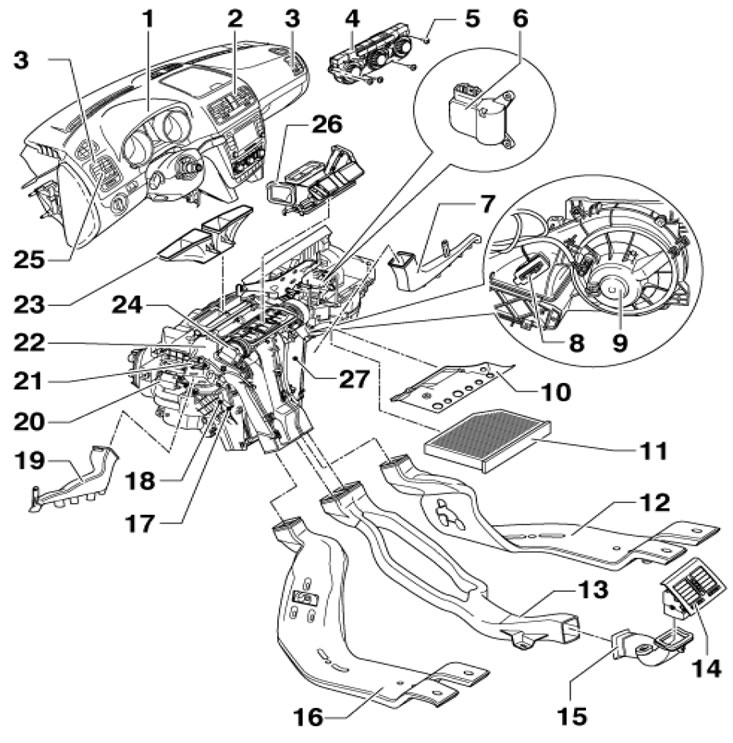
8.1a. Details of the climate control system in the car interior (models with refrigeration unit, with manual control). 1. Instrument panel; 2. Central deflectors; 3. Side deflectors; 4. Climate control panel; 5. Screws, 1.5 Nm; 6. Activator V113 of the circulation flap; 7. Air duct to the right footwell; 8. Assembly of resistors N24 fans 9, with thermal fuse; 9. Fan V2; 10. Climate control unit shield; 11. Cabin filter; 12. Air duct to rear right footwell; 13. Air duct to deflectors 14; 14. Rear central deflectors; 15. Rear central deflectors pipe; 16. Air duct to rear left footwell; 17. Auxiliary heating element Z35 (on some diesel models); 18. Heater radiator, after replacement, replace the coolant; 19. Air duct to the left footwell; 20. Temperature flap actuator V68; 21. Sensor G192 for temperature of air supplied to feet, not used since 46th week of 2010; 22. Climate system housing; 23. The pipe to the windshield blower deflectors, to remove it you need to remove the instrument panel; 24. Activator V145 of the front distribution flap, removed in the same way as activator V426; 25. Sensor G191 for temperature of air supplied from deflectors 2 and 3, not used since the 46th week of 2010; 26. Pipe to deflectors 2 and 3, to remove it you need to remove the instrument panel; 27. Evaporator outlet temperature sensor G263.
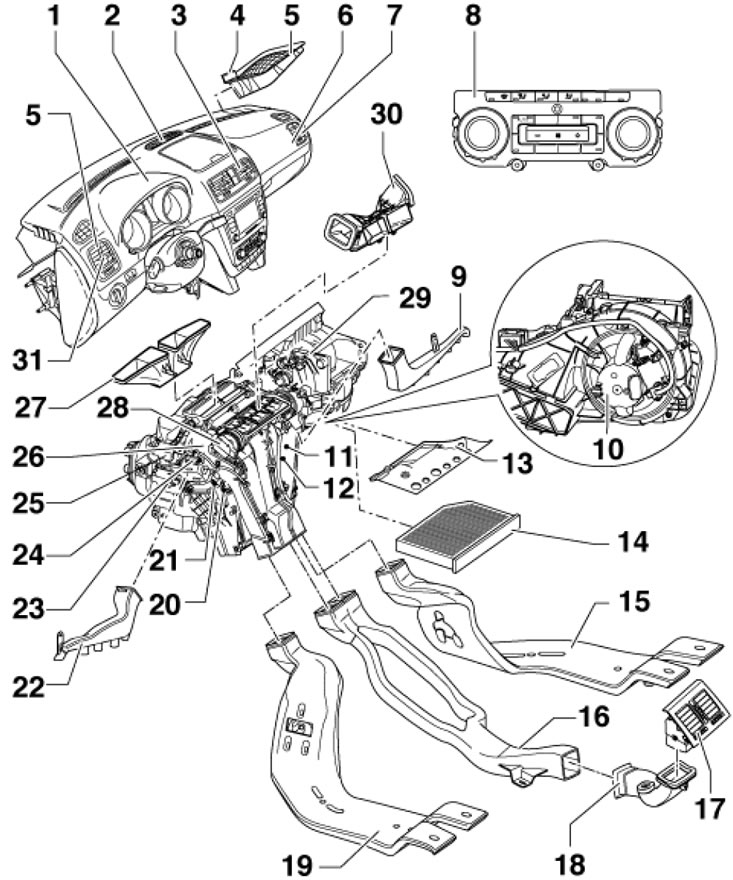
8.1b. Details of the climate control system in the vehicle interior (models with refrigeration unit, with automatic control). 1. Instrument panel; 2. Assembly of the G107 solar radiation sensor and the G134 solar radiation sensor No. 2; 3. Central deflectors; 4. Air quality sensor G238; 5. Air intake grille; 6. Sensor G151 for temperature of air supplied through the right deflector; 7. Side deflectors; 8. Climate control panel, with control unit J255; 9. Air duct to the right footwell; 10. Fan V2 with control unit L26; 11. Evaporator outlet temperature sensor G263; 12. V159 actuator right temperature flap; 13. Climate control unit shield; 14. Cabin filter; 15. Air duct to rear right footwell; 16. Air duct to deflectors 17; 17. Rear central deflectors; 18. Rear central deflectors pipe; 19. Air duct to rear left footwell; 20. Auxiliary heating element Z35 (on some diesel models); 21. Heater radiator, after replacement, replace the coolant; 22. Air duct to the left footwell; 23. Activator V158 left temperature flap; 24. Sensor G261 for temperature of air supplied to the left footwell; 25. Activator V107 for glass blower flap; 26. Climate system housing; 27. Pipe to windshield blower deflectors, to remove it you need to remove the instrument panel; 28. V426 Front Temperature Flap Actuator; 29. Activator V425 of the distribution and circulation flaps; 30. Pipe to deflectors 3 and 7, to remove it you need to remove the instrument panel; 31. Sensor G150 for temperature of air supplied through the left deflector.
One of the main elements of the climate control system is its housing, which contains the main components: cabin filter, fan, radiator, evaporator (with air cooling function) and air flow distribution flaps. On diesel models, an auxiliary electric heating element may also be installed in the climate control housing.
To clean the air taken from outside the car from small particles (dust, soot, pollen, etc.) there is a cabin filter that should be replaced periodically (see Chapter 1).
The fan is designed to ventilate the interior, i.e. to increase the intensity of air supply to the interior of the car; the fan speed can be adjusted. On models without automatic climate control, the fan speed is changed by changing the combination of resistances in the resistor assembly, while on models with automatic control, the fan speed is controlled by an electronically controlled fan.
To heat the interior, the coolant heated in the engine is passed through the radiator of the air conditioning system, giving off heat to the air passing through it. The coolant flow diagram is shown in the illustrations Section 1.
A refrigeration unit is used to cool the passenger compartment, in which the R134a refrigerant circulates. The air supplied to the passenger compartment, passing through the evaporator, is cooled and dried, so it is recommended to turn on the refrigeration unit to reduce the humidity in the passenger compartment (for example, to speed up the removal of condensation from glass). The flaps are used to: switch between supply ventilation/air circulation modes, regulate temperature, and distribute air flows in the cabin (to the feet, to chest level, to the glass and to the intermediate zones). Additional adjustment of air flow in the cabin is carried out by means of adjustable deflectors on the instrument panel and in the rear part of the central console (if available).
The climate control system is controlled by a control unit (see chapter "Controls and operating techniques"). The dampers are driven by activators; on models without a refrigeration unit, cables are used to drive the temperature and distribution flaps.
On models with a refrigeration unit, the set temperature is maintained based on data from the cabin air temperature sensor, installed in the center of the climate control unit. To ensure proper operation of the climate control system, do not cover this sensor.
Some models are equipped with an additional heater that heats the coolant independently of the engine by burning fuel.
Description of the refrigeration unit
The location of the refrigeration system components located in the engine compartment is shown in Illustration 8.2. The operating diagram of the refrigeration system is shown in Illustration 8.3. The asterisks in these illustrations indicate parts that, along with the refrigerant lines, must be serviced in a specialized workshop. The compressor, continuously driven by the accessory drive belt from the engine crankshaft, draws in gaseous refrigerant from the evaporator and compresses it. In this case, the temperature of the refrigerant increases to a value of 70 to 110°C. Under high pressure, the refrigerant is directed to the condenser, where the heat from the refrigerant is taken by the air passed through the condenser fins. Due to this heat loss, the refrigerant changes into liquid form and is directed from the condenser to the receiver-dryer located on it, which serves as a storage medium and filters out the moisture contained in the refrigerant. The thermostatic expansion valve regulates the amount of refrigerant supplied to the evaporator depending on the pressure and temperature in the evaporator. The expansion valve regulates the flow depending on the heat transfer so that the refrigerant does not completely change to a gaseous state before it reaches the evaporator outlet. Passing through the evaporator, the air supplied to the car's interior gives off heat to the cold refrigerant and is also dried. Moisture from the air is removed under the car. After passing through the evaporator, the refrigerant becomes gaseous. After the evaporator, the refrigerant is sucked back into the compressor under low pressure.
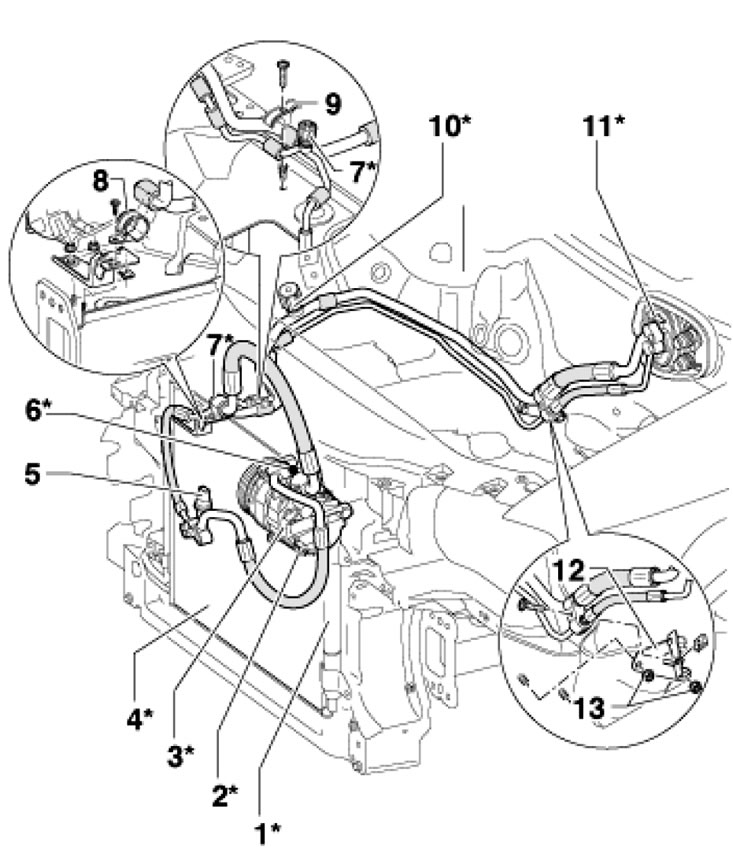
8.2. Location of refrigeration unit components in the engine compartment. 1*. Receiver-dryer; 2*. Compressor regulating valve "N280"; 3*. Compressor; 4*. Capacitor; 5. Sensor "G65" high pressure refrigerant; 6*. High pressure refrigerant relief valve, 10 Nm, sealing ring to be replaced; 7*. Service valve (unloading, filling and measuring) in the high pressure circuit; 8. Clamp; 9. Holder; 10*. Service valve (unloading and measuring) in the low pressure circuit; 11*. Expansion valve; 12. Refrigerant line holder; 13. Nuts, 20 Nm.
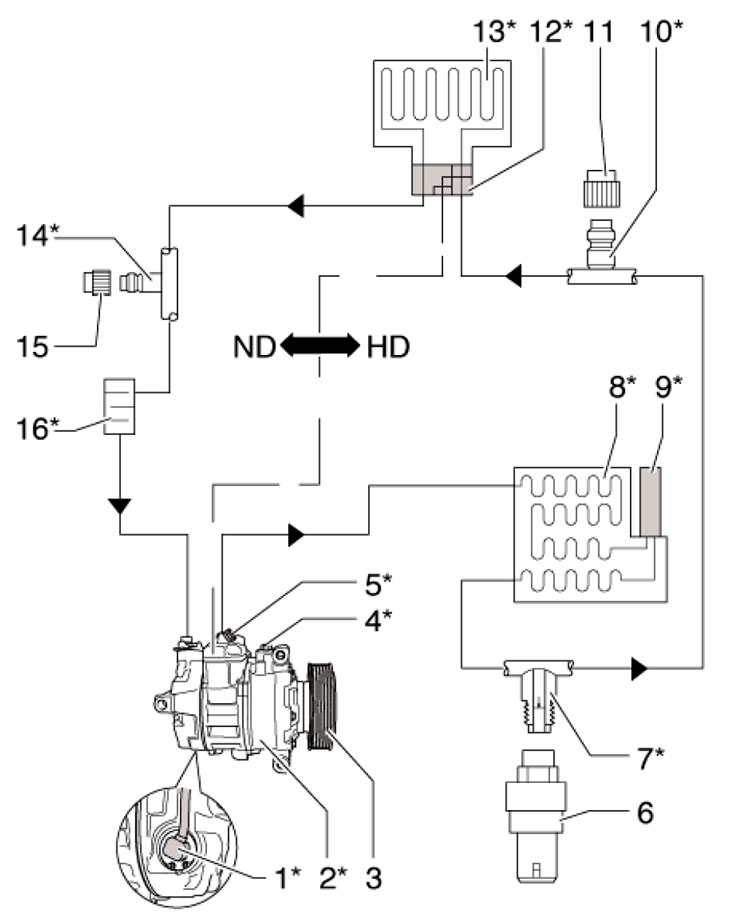
8.3. Scheme of operation of the refrigeration unit. HD High Pressure Circuit; ND Low pressure circuit; 3. Pulley; 4*. Oil drain plug; 7*. Connection with valve; 10*. Service valve (unloading, filling and measuring) in the high pressure circuit; 11, 15. Lid; 12*. Expansion valve; 13*. Evaporator; 14*. Service valve (unloading and measuring) in the low pressure circuit; 16*. Refrigerant surge damper.
Compressor oil is used to lubricate the components of the refrigeration unit and circulates in the system together with the refrigerant. Black and colored sealing rings are used for sealing.
A compressor without a magnetic clutch is used, i.e. when the engine is running, it is continuously driven by a belt from the crankshaft. This way the compressor works even when the cooling function is turned off (with minimal power consumption).
The compressor flow rate is regulated by the "N280" valve using a PWM signal from the climate control unit, depending on the required capacity of the refrigeration unit. The valve "N280" is built into the compressor on the suction side and changes the position of the articulated disk.
When the refrigerant pressure, determined by the high pressure sensor "G65", increases, the climate control unit increases the speed of the fan "V7" on the radiator and reduces the compressor flow if the pressure is too high (32 bar, for example, if the engine is not sufficiently cooled) or too low (2 bar, for example, in case of refrigerant leakage) refrigerant pressure.
If the compressor is blocked (the shaft jams and stops turning), overload protection is activated. Depending on the compressor temperature, the coupling will either deform (2 in illustration 8.4). or the rubber element (3) will wear out. In any case, the pulley will be able to turn. The jammed compressor needs to be replaced. To protect the refrigerant circuit from excessively high pressure (for example, due to charging excess refrigerant) a high pressure refrigerant relief valve installed on the compressor is used. The valve opens at a pressure of 40±4 bar and closes at no less than 31 bar. The fact that the valve is opening to release the refrigerant pressure can be determined by the small plate that is pressed out (see illustration 8.5). In addition, after opening the valve, a stain of refrigerant oil forms around it.
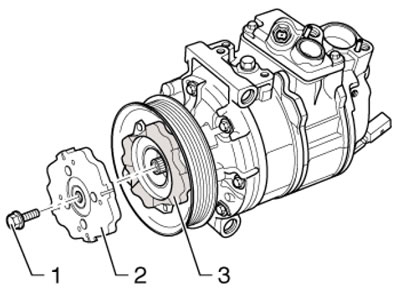
8.4. Compressor drive parts.
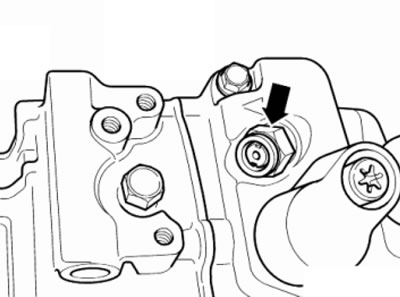
8.5. Safety valve on the compressor.
Note: When opening the valve, there is a risk of frostbite in the immediate vicinity.
Do not run the engine unless all refrigerant lines are connected, as this will cause the compressor to overheat and fail due to lack of lubrication. If possible, start the engine only with the refrigeration unit filled. If it is necessary to start the engine with the refrigerant circuit empty, the following conditions must be met: all refrigerant lines must be connected, the compressor must be filled with at least a quarter of the full volume of refrigerant oil, the engine speed must not exceed 2000 rpm, and its running time must be as short as possible (no more than 10 minutes).
After installing a new compressor or after adding refrigeration oil, before starting the engine, do the following:
- rotate the compressor pulley by hand 10 revolutions - this will prevent damage to the compressor;
- open the deflectors, set the air supply mode to chest level, set the minimum temperature and at least the 3rd fan speed (for Climatic) or maximum fan speed (for Climatronic);
- start the engine and let it idle for at least five minutes;
- turn off the engine.
Safety precautions when servicing a refrigeration unit
Do not open the refrigerant circuit, as refrigerant may cause frostbite if it comes into contact with your skin.
Work on the refrigeration unit must be carried out in a suitably equipped specialized workshop. The refrigeration system should only be serviced by trained technicians who are familiar with safe operating procedures, proper equipment, depressurization procedures, and the proper handling and storage of vehicle refrigerant.
- Avoid contact of refrigerant with skin.
- Wear safety glasses when working near the refrigeration unit.
- If refrigerant comes into contact with your skin or eyes, do not rub the affected area. Immediately rinse the affected area with running cold water for at least 15 minutes and seek qualified medical attention. Self-medication is not allowed.
- The refrigerant is stored in cylinders under pressure. Store the cylinder at a temperature not exceeding +50°C. Take measures to prevent the cylinder from falling from a height or other situations that may result in its damage.
- Work should be carried out in a well-ventilated area. The refrigerant evaporates quickly, reducing oxygen availability and making breathing difficult.
- The gaseous refrigerant is heavier than air and collects relatively quickly at low levels, such as under a car.
- When the refrigerant burns, a toxic gas is formed. Keep refrigerant away from open flames. Do not smoke when working on the refrigeration unit.
- When welding near the refrigeration unit, do not expose it to high temperatures or open flames. Overheating may cause pressure in the refrigerant circuit to increase and cause a fire.
- If the refrigerant circuit is not opened within 10 minutes after the refrigerant pressure has been released, pressure may re-emerge due to evaporation of the remaining refrigerant.
- Cleaning the condenser or evaporator with water vapor is not permitted. Only cold water or compressed air should be used.
Material is available on the website (skodabook)